Defining Course Substitutions Use the Course Substitution page to
advertisement
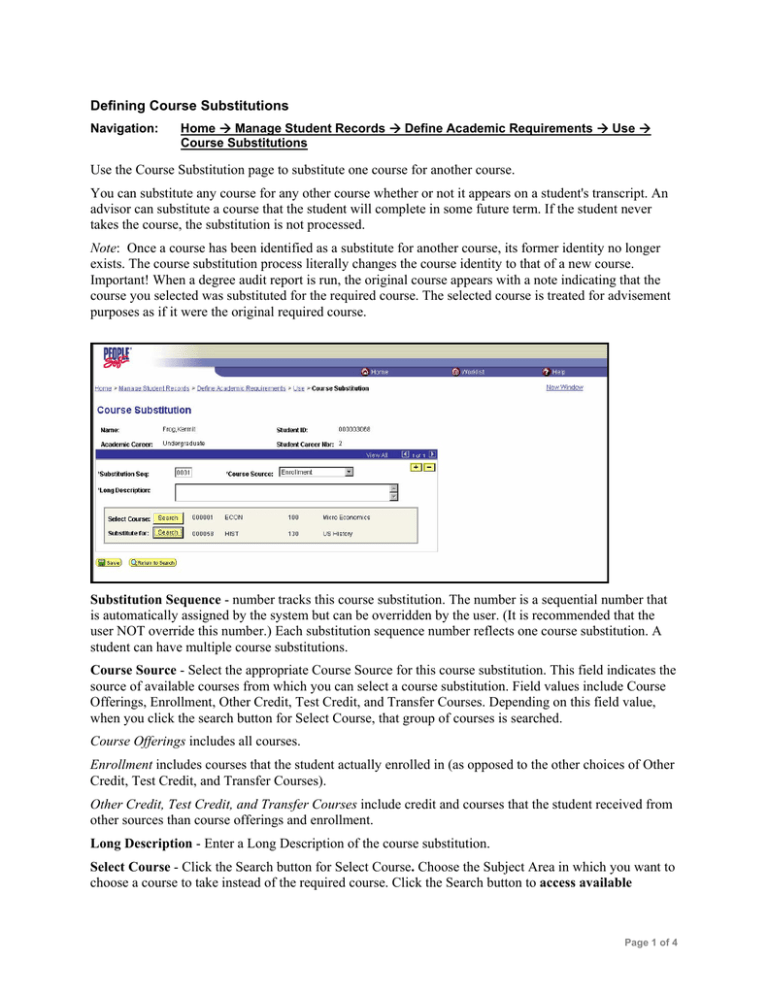
Defining Course Substitutions Navigation: Home Æ Manage Student Records Æ Define Academic Requirements Æ Use Æ Course Substitutions Use the Course Substitution page to substitute one course for another course. You can substitute any course for any other course whether or not it appears on a student's transcript. An advisor can substitute a course that the student will complete in some future term. If the student never takes the course, the substitution is not processed. Note: Once a course has been identified as a substitute for another course, its former identity no longer exists. The course substitution process literally changes the course identity to that of a new course. Important! When a degree audit report is run, the original course appears with a note indicating that the course you selected was substituted for the required course. The selected course is treated for advisement purposes as if it were the original required course. Substitution Sequence - number tracks this course substitution. The number is a sequential number that is automatically assigned by the system but can be overridden by the user. (It is recommended that the user NOT override this number.) Each substitution sequence number reflects one course substitution. A student can have multiple course substitutions. Course Source - Select the appropriate Course Source for this course substitution. This field indicates the source of available courses from which you can select a course substitution. Field values include Course Offerings, Enrollment, Other Credit, Test Credit, and Transfer Courses. Depending on this field value, when you click the search button for Select Course, that group of courses is searched. Course Offerings includes all courses. Enrollment includes courses that the student actually enrolled in (as opposed to the other choices of Other Credit, Test Credit, and Transfer Courses). Other Credit, Test Credit, and Transfer Courses include credit and courses that the student received from other sources than course offerings and enrollment. Long Description - Enter a Long Description of the course substitution. Select Course - Click the Search button for Select Course. Choose the Subject Area in which you want to choose a course to take instead of the required course. Click the Search button to access available Page 1 of 4 courses. Courses matching the subject area are listed. (The list is based on the value in the Course Source field.) If the Course Source is not Course Offerings, the retrieved courses are courses or credit work that the student has on record. Click the Select Class button next to the course that you want to select. This course is now listed on the page under Select Course. Substitute for: Click the Search button for Substitute for. Choose the Subject Area that contains the required course that will be substituted by another course. This field prompts against all the courses that are included in the selected subject area in the catalog. (This value is not restricted by the Course Source value.). Click the Search button to access available courses. Courses that can be substituted with the Select Course value are listed. Click the Select Class button next to the course that you want to select. This course is listed on the page under Substitute for. Setting Up Course Directives and Overrides Navigation: Home Æ Manage Student Records Æ Define Academic Requirements Æ Use Æ Authorize Student Exceptions Use the Authorize Student Exceptions page to create an advisement override. An advisement override can act as a course directive, change a requirement, override a requirement, or waive a requirement. An established override allows you to override a course, a requirement, a requirement line, or a requirement group. Once an override is established, it is always available for editing or revising. When any course directives or override exceptions are entered into the database, the user's ID is recorded for security and trace ability reasons. This information is printed as part of the degree audit report.) Important: Overridden data is used for the degree audit report only. Original data recorded in all other Student Administration pages remains unchanged Page 2 of 4 Authorize Student Exceptions Page Advisement Override - Advisement Override is an automatically assigned sequential number that is unique for each override. User ID - the ID of the user who created the advisement override. Effective Date - Enter an Effective Date for this advisement override. Status - Select a Status for this advisement override. Select Active when updating an existing override. The Inactive option should only be used if your institution will no longer be using this override. Descriptions - Enter a Description, Short Description, and Long Description for the advisement override that you are establishing. The Description and Short Description field values are used for documentation purposes only. The Long Description field value is printed on the audit report. Academic Institution - CICMP Academic Career – UGRD or PBAC Academic Program – UGRD, PBAC, CRED Important: Academic Plan, and Academic Sub-Plan fields can be blank as long as the subject of the override exists at the career level or higher. Academic Plan/ Academic Sub-Plan - Enter the Academic Plan/Sub-plan that contains the course, requirement line, requirement, or requirement group that is the subject of the override. Selection Code - Enter the Selection Code that determines who or what the override affects. Choices include Primary Academic Plan, Academic Program, Student Group, and Student. • Primary Academic Plan indicates that the override applies to all students in the specified primary plan. Page 3 of 4 • Academic Program indicates that the override applies to all students in the specified program. • Student Group indicates that the override applies to all students in the specified student group. • Student indicates that the override applies to a single student. Selection Data - Enter the Selection Data field value that is appropriate for the Selection Code. Choices include all valid values, based on whatever Selection Code field value was entered. For example, if you choose a Selection Code of Student Group, then the only values available in the Selection Data field are student groups. If a Selection Code of Student is entered, then only the student's ID can be entered in the Selection Data field. Operation Code - Enter the Operation Code that indicates the type of advisement override. Choices include • Requirement Waiver - indicates that the override waives a specific existing requirement. • Course Directive - indicates that the override directs where a specific course is used or not used to satisfy a requirement. Note: If the Operation Code field value is Course Directive, then the Level field is not applicable. Course directives can only be accomplished at the requirement line level. • Requirement Change - indicates that the override acts as a change to a specific requirement. • Requirement Override indicates that a specific requirement is overridden with a student individualized plan requirement (CI is not using individualized plan requirements so this will not be a valid choice Level - Enter the Level field value that indicates the level at which the Operation Code works. If the Operation Code is Requirement Change or Requirement Waiver, then Level field value choices include LN, RG, and RQ. LN indicates that the operation code works at the requirement line level. RG indicates that the operation code works at the requirement group level. RQ indicates that the operation code works at the requirement level. Click the Create Exception link to retrieve the FROM/TO page. From Page - On the FROM page, enter those specific items that you are overriding/changing. Based on the information entered on the Authorize Student Exceptions page, only relevant fields appear on this page. In addition, prompt values are filtered based on the information entered on the Authorize Student Exceptions page. To Page - Only relevant fields appear on this page. (In fact, there may not be any fields on this page, depending on information entered in previous pages.) In addition, prompt values are filtered based on the information entered on the Authorize Student Exceptions page and the FROM page. CI Description Standards: Long Descriptions should contain the following information: Person making the exception Date exception was made Person exception was approved by Description of why exception was done (optional) Descriptions should contain the following information: Start with either GE, Major or Minor exception and then describe exception made Page 4 of 4
