V-Temp Oil Temperature Gauge Installation Instructions
Thank you for purchasing our high quality temperature gauge. Your business is greatly
appreciated. Please follow the instructions below. Failure to follow the procedure can lead to damage of
the oil temperature gauge and/or damage to the electrical system of your motorcycle. If you require
additional information, please do not hesitating to contact our technical group at
tech@parts4powertoys.com.
Step1: Installation Preparation
Remove the front fairing as described in the owners manual and/or service manual of your
Harley Davidson motorcycle. It is recommended that your motorcycle is held in a vertical position for
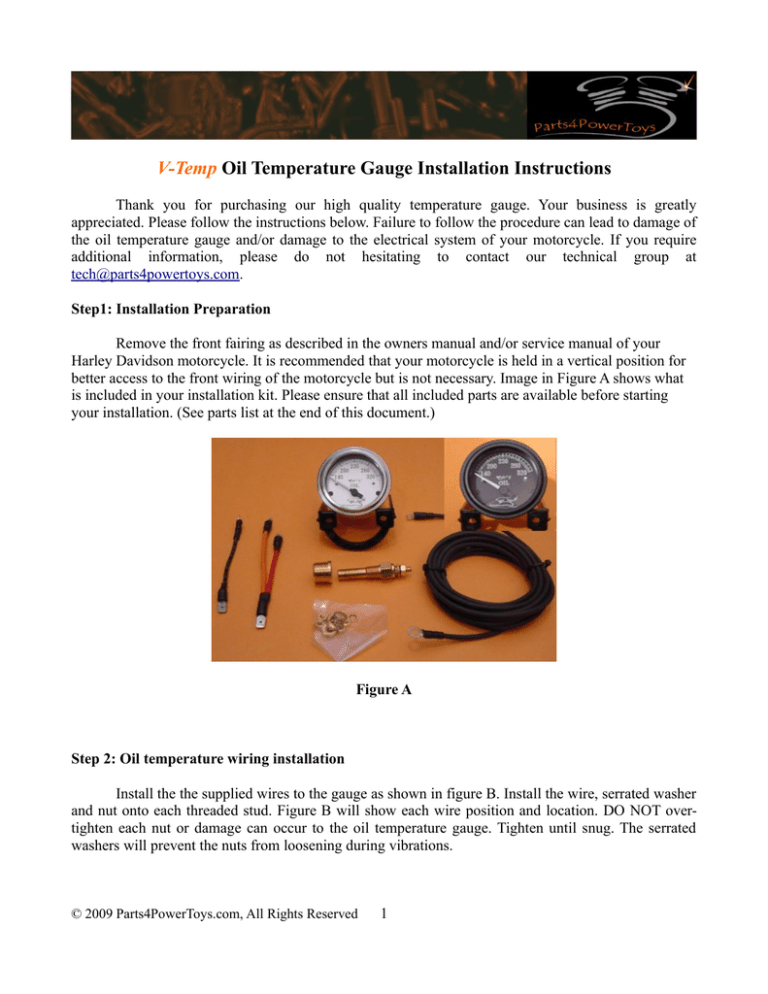
better access to the front wiring of the motorcycle but is not necessary. Image in Figure A shows what
is included in your installation kit. Please ensure that all included parts are available before starting
your installation. (See parts list at the end of this document.)
Figure A
Step 2: Oil temperature wiring installation
Install the the supplied wires to the gauge as shown in figure B. Install the wire, serrated washer
and nut onto each threaded stud. Figure B will show each wire position and location. DO NOT overtighten each nut or damage can occur to the oil temperature gauge. Tighten until snug. The serrated
washers will prevent the nuts from loosening during vibrations.
© 2009 Parts4PowerToys.com, All Rights Reserved
1
Figure B
Step3: Oil temperature gauge installation
Remove existing air temperature gauge as per the Harley Davidson service manual. Once the
two connectors have been disconnected, the two prong connector will no longer be used. Only the
existing three prong connector will be used for the new oil temperature gauge installation (Blue,
Orange and Black wire connector). Install the new gauge and rear bracket as shown in figure C.
Position the rear mounting bracket on the lower half of the gauge as in the figure C. Use the two large
nuts and serrated washers to secure the gauge in place. DO NOT over-tighten the nuts otherwise
damage to the bracket and/or gauge will result. Tighten until snug. Applying some blue thread lock
such as “LocTite” is recommended.
Figure C
© 2009 Parts4PowerToys.com, All Rights Reserved
2
Step 4: Oil Sensor Installation
To facilitate the removal of the existing 3/8 inch NTP Allen plug in the oil pan, warm-up the
motorcycle until the oil pan is warm and not hot. This will soften the thread-lock material to easily
remove the plug. Have the the new oil sensor threaded into the 3/8 NTP supplied brass adapter by hand.
Do not tighten them yet but only hand tight. Have it ready to install when removing the old plug. Since
there is existing oil in the pan, you will have to switch the old plug and install the new sensor without
loosing too much oil. You can remove the oil in the pan but it is not necessary. Only an ounce or two
will be lost. Once installed, tighten the sensor until snug and tighten to 10 ft-lbs only. When tightening
the sensor, the 3/8 adapter will seat in place as you tighten the sensor. DO NOT over tighten or
damage to oil pan will occur. DO NOT add threading material as these are tapered threads and self
sealing. Sensor body is the electrical ground for the gauge. In the event there is oil sweating around the
sensor, tighten the sensor another 1/8 turn. Wipe and recheck after a few days, Clean around the plug
with mineral spirits to remove any oil and wipe clean.
Figure D
Step 5: Oil Sensor Wire Installation
Run the sensor wire from the oil pan sensor along the frame and attach with the supplied large
tie wraps. The sensor wire is specifically designed to be flexible. It is made of a high quality heat
resistant rubber material and will ensure that vibrations will not damage the wire. Take care to run the
wire as to not rest onto any sharp edges. It is recommended that you run the wire underneath the gas
tank within the wiring channel to the front of the motorcycle fairing. The terminal ends are a different
size so please make sure that you run the appropriate end to the sensor terminal (large terminal to oil
sensor). Install the washer, sensor wire terminal, lock washer and nut onto the sensor terminal. Once
snug to the point that the post begins to turns, this is enough tightness. Install the other end of the
sensor wire to the terminal marked S as shown in Figure B. Tighten until snug with the suppled serrated
washer and nut. DO NOT over tighten. A small amount of blue thread lock can be added to ensure that
the nut does not vibrate loose, but this step is optional. The serrated washer should be adequate
© 2009 Parts4PowerToys.com, All Rights Reserved
3
Step 6: Oil Temperature Gauge Wiring Installation
Install the Red/Orange and Black push on terminal plugs from the oil temperature gauge to the
existing three wire connector (Figure E). Install the Red/Orange wire into the connector with the
existing orange wire. Install the back wire terminal from the oil temperature gauge to the existing black
wire in the three pronged connector. The existing blue wire is not used. It is highly recommended to
add a small amount of black silicone to the connector mating area to prevent the push-in terminals from
working themselves loose during vibration. Ensure the the terminals are not loose and are well seated
into the existing three prong connector. You should feel slight resistance when inserting th push in
terminals.
Figure E
Step 7: End of Installation
Securely tie wrap all loose wires and ensure that everything is well secured and no sharp edges
can damage the wires. Turn the ignition on and make sure that the amber back light is visible. Also
double check that the back light bulb is securely installed and twist tight as to not work itself loose. See
Figure F. Adding a small amount of silicone to the bulb housing is recommend.
Figure F
© 2009 Parts4PowerToys.com, All Rights Reserved
4


