Imagery Help Card
About Images on your Website
Schoolwires supports GIF, JPG, JPEG and PNG file types.
Images are automatically compressed when uploaded to the site using the Insert Image wizard; this ensures a quick load time for viewers.
It is better to upload a larger image and resize it smaller than to enlarge a smaller image.
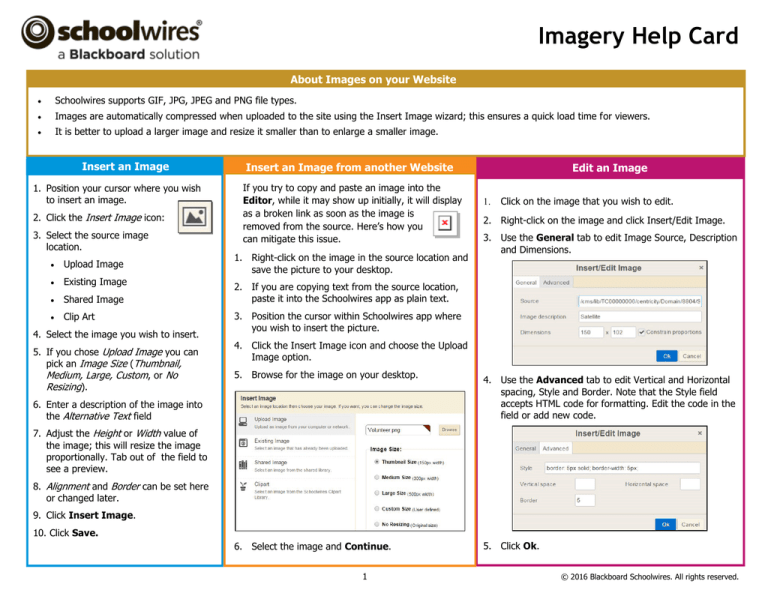
Insert an Image
1. Position your cursor where you wish
to insert an image.
2. Click the Insert Image icon:
3. Select the source image
location.
Upload Image
Existing Image
Shared Image
Clip Art
4. Select the image you wish to insert.
5. If you chose Upload Image you can
pick an Image Size (Thumbnail,
Medium, Large, Custom, or No
Resizing).
Insert an Image from another Website
If you try to copy and paste an image into the
Editor, while it may show up initially, it will display
as a broken link as soon as the image is
removed from the source. Here’s how you
can mitigate this issue.
1. Right-click on the image in the source location and
save the picture to your desktop.
Edit an Image
Click on the image that you wish to edit.
2. Right-click on the image and click Insert/Edit Image.
3. Use the General tab to edit Image Source, Description
and Dimensions.
2. If you are copying text from the source location,
paste it into the Schoolwires app as plain text.
3. Position the cursor within Schoolwires app where
you wish to insert the picture.
4. Click the Insert Image icon and choose the Upload
Image option.
5. Browse for the image on your desktop.
6. Enter a description of the image into
the Alternative Text field
4. Use the Advanced tab to edit Vertical and Horizontal
spacing, Style and Border. Note that the Style field
accepts HTML code for formatting. Edit the code in the
field or add new code.
7. Adjust the Height or Width value of
the image; this will resize the image
proportionally. Tab out of the field to
see a preview.
8. Alignment and Border can be set here
or changed later.
9. Click Insert Image.
10. Click Save.
6. Select the image and Continue.
1
5. Click Ok.
© 2016 Blackboard Schoolwires. All rights reserved.
Imagery Help Card
Make an Image a Link
1. Click the image that you wish to make a link.
2. Click the Insert Link icon.
3. Select a link destination.
Edit a Linked Image
Click on the image that you
wish to edit.
Your Site
2. Right-click on the image and
click Insert/Edit Link.
Email Address
3. Make change to the link.
Web Address
4. Click Ok.
Bookmark
4. Enter the information required for the link destination.
5. Click Insert Link.
Insert an Accent Image
Best Practices for working with Images
Don’t copy and paste photos. Use the Insert Image icon.
This ensures that the image is viewable on your site.
When inserting images, add descriptive Alt. Text. This
text shows when a user hovers over the image and is used by
screen reader applications for the visually impaired.
Recommended image sizes (100 pixels = 1 inch):
Regular Image: Width narrower than 500 pixels
Accent Images: Width and height between 25-100 pixels.
Avoid animated images.
JPG, PNG and GIF file types are preferred.
When resizing images, it is always best to go from a larger image
to a smaller image. Making a small image larger can result in a
grainy or pixelated image.
Avoid inserting an image into a table with a background color. If
background colors are used, maintain high contrast between the
background colors and dominant image color for improved
visibility.
Add Horizontal and Vertical Spacing around your image to improve
readability of surrounding text.
Accent images can be added to the left of
titles on Article Library and
Headlines & Features App records.
An accent image should be small; a width
between 30 and 75 pixels wide should work well.
Accent Image
1. Insert a new article or
headline.
2. Click the Accent Image tab.
3. Click Browse and select an
image source.
Upload Image
Existing Image
Shared Image
4. Select the image you wish to
insert and click Continue.
5. Set the Height and Width fields for the image and click Insert Image.
6. Enter Alt Text for the image. Click Save.
2
© 2016 Blackboard Schoolwires. All rights reserved.


