Display Table and Graphs for Qualitative Data
advertisement
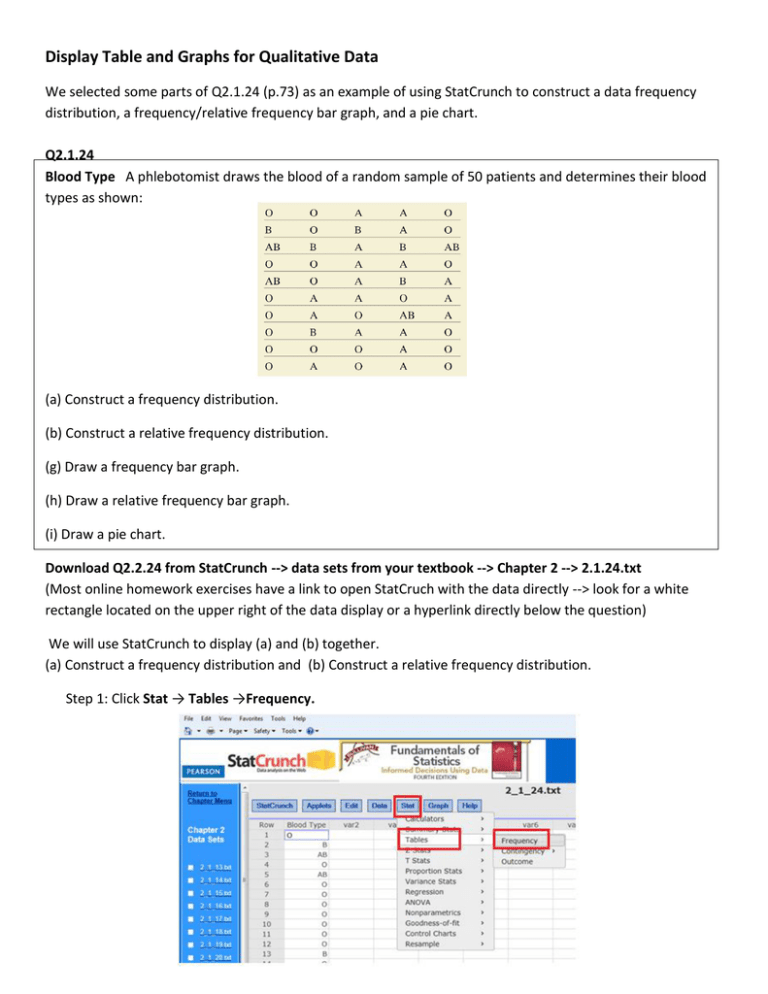
Display Table and Graphs for Qualitative Data We selected some parts of Q2.1.24 (p.73) as an example of using StatCrunch to construct a data frequency distribution, a frequency/relative frequency bar graph, and a pie chart. Q2.1.24 Blood Type A phlebotomist draws the blood of a random sample of 50 patients and determines their blood types as shown: (a) Construct a frequency distribution. (b) Construct a relative frequency distribution. (g) Draw a frequency bar graph. (h) Draw a relative frequency bar graph. (i) Draw a pie chart. Download Q2.2.24 from StatCrunch --> data sets from your textbook --> Chapter 2 --> 2.1.24.txt (Most online homework exercises have a link to open StatCruch with the data directly --> look for a white rectangle located on the upper right of the data display or a hyperlink directly below the question) We will use StatCrunch to display (a) and (b) together. (a) Construct a frequency distribution and (b) Construct a relative frequency distribution. Step 1: Click Stat → Tables →Frequency. Step 2: Select Blood Type under Select Column(s): Under Statistic(s): --> select Frequency and Relative Frequency. (To select more than one category use the Ctrl key) Click Compute! The pop-up box represents the answer for part (a) and (b). (g) Draw a frequency bar graph. Step 1: Click Graph → Bar Plot → with data. Step 2: 1) Click Blood Type under Select Column(s): 2) Choose Frequency under Type: 3) Put a check √ Value above bar box under Display: 4) Under Graph properties, enter Blood Type for X-axis label, Frequency for Y-axis label, and Frequency Bar Graph for Blood Type for Title. 5) Click Compute! StatCrunch output of the frequency bar graph is shown below. (h) Draw a relative frequency bar graph. Step 1: For changing a frequency bar graph to a relative frequency bar graph, we can simply click Options → Edit. Step 2: 1) Change from Frequency to Relative Frequency under Type: 2) Under Graph properties:, change to Relative Frequency for Y-axis label, and change to Relative Frequency Bar Graph for Blood Type for Title. 3) Click Compute! StatCrunch output of the relative frequency bar graph is shown below. (i) Draw a pie chart Step 1: Click Graph → Pie Chart → with data. Step 2: 1) Click Blood Type under Select Column(s): 2) Under Display: --> click Count and Percent of Total while holding Ctrl key on the keyboard. 3) Enter Blood Type for Title. 4) Click Compute! StatCrunch output of the pie chart is shown below.
