8. installation/wire connect guide
advertisement
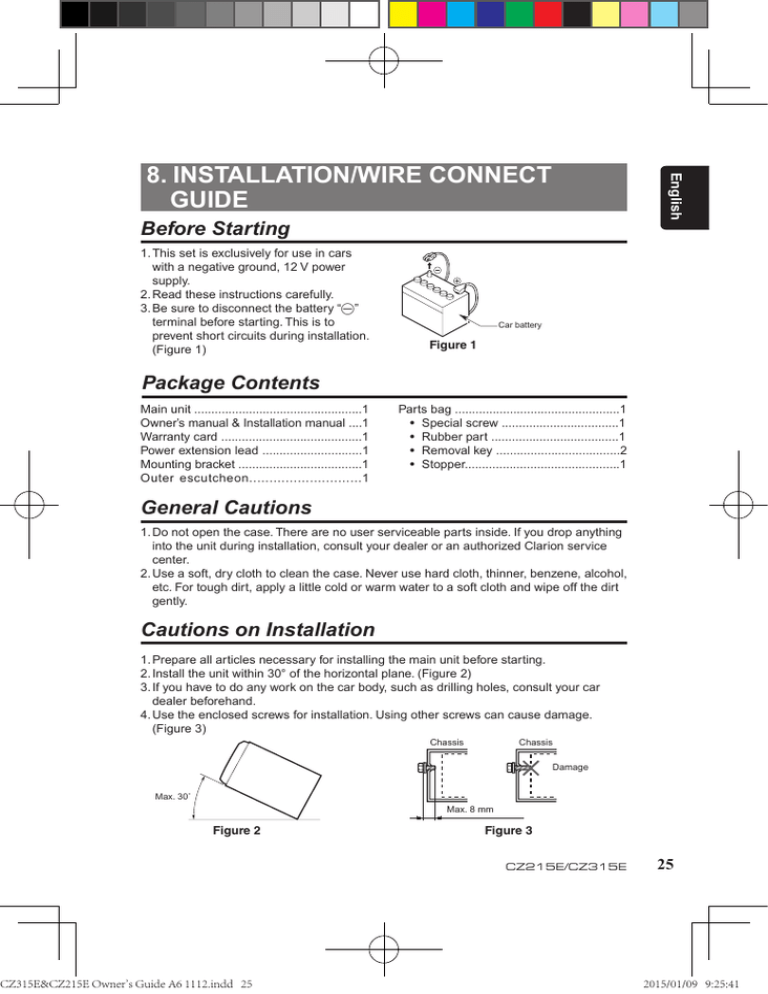
English 8. INSTALLATION/WIRE CONNECT GUIDE Before Starting 1.This set is exclusively for use in cars with a negative ground, 12 V power supply. 2.Read these instructions carefully. 3.Be sure to disconnect the battery “-” terminal before starting. This is to prevent short circuits during installation. (Figure 1) Car battery Figure 1 Figure 1 Package Contents Main unit .................................................1 Owner’s manual & Installation manual ....1 Warranty card .........................................1 Power extension lead .............................1 Mounting bracket ....................................1 Outer escutcheon............................1 Parts bag ................................................1 • Special screw ..................................1 • Rubber part .....................................1 • Removal key ....................................2 • Stopper.............................................1 General Cautions 1.Do not open the case. There are no user serviceable parts inside. If you drop anything into the unit during installation, consult your dealer or an authorized Clarion service center. 2.Use a soft, dry cloth to clean the case. Never use hard cloth, thinner, benzene, alcohol, etc. For tough dirt, apply a little cold or warm water to a soft cloth and wipe off the dirt gently. Cautions on Installation 1.Prepare all articles necessary for installing the main unit before starting. 2.Install the unit within 30° of the horizontal plane. (Figure 2) 3.If you have to do any work on the car body, such as drilling holes, consult your car dealer beforehand. 4.Use the enclosed screws for installation. Using other screws can cause damage. (Figure 3) Chassis Chassis Damage Max. 30˚ Max. 8 mm Figure Figure 2 2 CZ315E&CZ215E Owner's Guide A6 1112.indd 25 Figure 3 3 Figure CZ215E/CZ315E 25 2015/01/09 9:25:41 English Installing the Main Unit 1.Place the universal mounting bracket into the instrument panel, use a screwdriver to bend each stopper of the mounting bracket inward, then secure the stopper. (Figure 4) 2.Wire as shown on page 30. 3.Insert the main unit into the universal mounting bracket. 4.Mount the outer escutcheon so that all the hooks are locked. (Figure 7, 8 on page 28) Notes: • Some car models require special mounting kits for proper installation. Consult your Clarion dealer for details. • Fasten the front stopper securely to prevent the main unit from coming loose. Instrument Panel Stopper Rear Fastening Hole (of car) Rubber Cap (included) Screwdriver Main Unit Special Screw (included) Spring Stoppers Universal Mounting Bracket (included) Outer Escutcheon Figure 44 Figure • Console opening dimensions Hole 53mm 182mm CAUTION PRECAUTION Push in the protruding part (STOPPER) as shown in the Figure 5. When this main unit is installed without the universal mounting bracket. 26 CZ215E/CZ315E CZ315E&CZ215E Owner's Guide A6 1112.indd 26 2015/01/09 9:25:41 English Stoper Main Unit Figure 5 Figure 5 Fixed Mount (Using the bracket originally equipped in vehicle) If the vehicle is equipped with a factory-installed radio, install the main unit with the parts and screws marked (★). (Figure 6) If the vehicle is not equipped with a factory-installed radio, obtain an installation kit to install the main unit in the following procedure. 1.Secure the mounting brackets to the chassis as shown in Figure 6. When the main unit is installed without the universal mounting bracket, holes exist; modification, such as drilling new holes, of the mounting brackets may be required for other models. 2.Wire as shown in Installation (page 30). 3.Secure the unit in the dashboard, and then reassemble the dashboard and the center panel. 5 2 * * 3 6 * 1 * 4 7 1 Center Panel (Note 1) 2 Mounting bracket (1 pair for the left and right sides) 3 Source Unit 4 Pocket 5 Dashboard 6 4-The screws are Included with the unit*. (8 mm Max.) 7 Note 2 Figure 6 * : The screws with this mark are included with the unit. (Note 3). ★: The screws with this mark are originally attached to the vehicle. CZ315E&CZ215E Owner's Guide A6 1112.indd 27 CZ215E/CZ315E 27 2015/01/09 9:25:42 English Note 1: • In some cases, the center panel may require some modification (trimming, filling, etc.). Note 2: • If a hook on the installation bracket interferes with the unit, bend and flatten it with a nipper or a similar tool. Note 3: • If reattaching screws which have been detached, remove any filings from the screws and screw mounting bracket. Removal 1.Remove the Detachable Control Panel (DCP). For instructions on removing the DCP, refer to the owner’s guide. 2.Press the outer escutcheon upward and remove it. (Figure 7) 3.Insert and lock the hook plates. (Figure 8) 4.Pull the hook plates to remove the main unit. Outer Escutcheon Removal key Figure 77 Figure 28 Figure Figure88 CZ215E/CZ315E CZ315E&CZ215E Owner's Guide A6 1112.indd 28 2015/01/09 9:25:42 1.Be sure to turn the power off when wiring. 2.Be particularly careful where you route the cables. Keep them well away from the engine, exhaust pipe, etc. Heat may damage the wires. 3.If the fuse should blow, check that the wiring is correct. If it is, replace the fuse with a new one with the same amperage rating as the original one. (Figure 9) 4.When the main power supply fuse in the car is 15 A or less, purchase an automotive cable that can withstand 15 A and supply this unit with power directly from the battery to ensure that the unit will operate normally. Note that a fuse must be installed at a distance no longer than 30 cm from the cable battery terminal to prevent accidents. English Cautions on Wiring Fuse Fuse holder Figure 9 For VW and Audi Vehicles 1.For VW and Audi vehicles, change the position of fuse installation as shown on the diagram. (Figure 10) 2.When the car stereo is installed in 1998 and later Volkswagen models, remove the auto antenna leads (A-5), g and f. Be sure to insulate both the ISO connector side terminal f and the main unit side terminal g with insulation tape, respectively. (Figure 11) 3.When the main unit is also connected to an external amplifier, connect REMOTE on the external amplifier to AMP Remote lead. For models 1992 and later For models 1992 and later c c For models up to 1991 For models up to 1991 a a e e d d c c b b e e b b d d FigureFigure 10 10 Figure 10 Insulation tape Insulation tape g g AMP Remote AMP Remote f f a a b b c c d d e e f f g g Yellow Yellow Red Red Yellow Yellow Red Red Yellow Yellow Blue/white Blue/white Blue/white Blue/white Insulate the terminal Insulate the terminal ∗ Never let the terminals make contact with the metal plate parts of the car. ∗ Never let the terminals make contact with the metal plate parts of the car. CZ315E&CZ215E Owner's Guide A6 1112.indd 29 Figure 11 11 Figure Figure 11 CZ215E/CZ315E 29 2015/01/09 9:25:43 English Wire Connections CAUTION: • Please make sure when connecting external power amplifier, that you properly, to the car chassis, ground the amplifier. If this is not done, severe damage to the main unit may happen. * RCA No. B-1 B-2 B-3 B-4 B-5 B-6 B-7 B-8 Description REAR RIGHT + REAR RIGHT FRONT RIGHT + FRONT RIGHT FRONT LEFT + FRONT LEFT REAR LEFT + REAR LEFT - A-4 A-5 A-6 A-7 A-8 1 2 BACK UP REMOTE/POWER ANTANNA ILLUMINATION +12 V ACCESSORY GROUND FRONT RIGHT Grey (Red) FRONT LEFT Grey (White) REAR/SUBWOOFER RIGHT purple (Red) 3 4 5 REAR/SUBWOOFER LEFT purple (White) AMP REMOTE Main Unit Rear Microphone (CZ315E only) (RCB204: sold separately) Steering wheel remote control (sold separately) Antenna a 15A c Fuse d b e f g 5 B-2 B-1 B-4 B-3 B-5 B-6 B-7 B-8 A-5 A-4 A-5 A-6 A-8 A-7 ISO connector Notes: • External microphone has to be connected at the back of the main unit during installation if necessary. • By connecting optional external microphone, internal microphone is canceled automatically. 30 CZ215E/CZ315E CZ315E&CZ215E Owner's Guide A6 1112.indd 30 2015/01/09 9:25:44
