Carbonating Your Beer At Altitude
advertisement

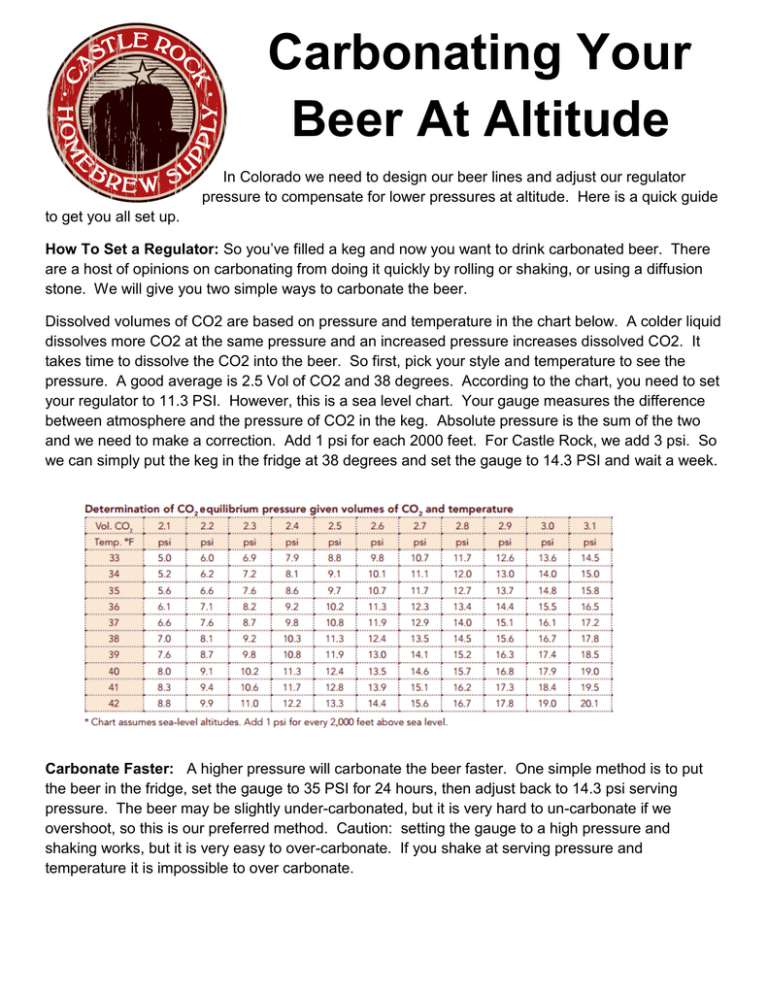
Carbonating Your Beer At Altitude In Colorado we need to design our beer lines and adjust our regulator pressure to compensate for lower pressures at altitude. Here is a quick guide to get you all set up. How To Set a Regulator: So you’ve filled a keg and now you want to drink carbonated beer. There are a host of opinions on carbonating from doing it quickly by rolling or shaking, or using a diffusion stone. We will give you two simple ways to carbonate the beer. Dissolved volumes of CO2 are based on pressure and temperature in the chart below. A colder liquid dissolves more CO2 at the same pressure and an increased pressure increases dissolved CO2. It takes time to dissolve the CO2 into the beer. So first, pick your style and temperature to see the pressure. A good average is 2.5 Vol of CO2 and 38 degrees. According to the chart, you need to set your regulator to 11.3 PSI. However, this is a sea level chart. Your gauge measures the difference between atmosphere and the pressure of CO2 in the keg. Absolute pressure is the sum of the two and we need to make a correction. Add 1 psi for each 2000 feet. For Castle Rock, we add 3 psi. So we can simply put the keg in the fridge at 38 degrees and set the gauge to 14.3 PSI and wait a week. Carbonate Faster: A higher pressure will carbonate the beer faster. One simple method is to put the beer in the fridge, set the gauge to 35 PSI for 24 hours, then adjust back to 14.3 psi serving pressure. The beer may be slightly under-carbonated, but it is very hard to un-carbonate if we overshoot, so this is our preferred method. Caution: setting the gauge to a high pressure and shaking works, but it is very easy to over-carbonate. If you shake at serving pressure and temperature it is impossible to over carbonate. Beer Line Design: Our beer line doesn’t simply move beer, it provides resistance so that the beer pours not too fast, and not too slow. Factors: Height: The faucet height above the keg provides resistance. Plan on 0.5 psi per foot. Beer Line Resistance: The diameter of the line will provide resistance. Here are some common numbers: Beer Line Resistance Table Line Type Avg Volume Resistance (ml per ft) 3/16″ I.D. plastic beer line 1.8 5.4 1/4″ I.D. plastic beer line 0.7 9.7 5/16″ I.D. plastic beer line 0.17 15.1 3/8″ I.D. plastic beer line 0.11 21.7 1/2″ I.D. plastic beer line 0.025 38.6 1/4″ O.D. Stainless Beverage Tubing 2 4.9 5/16″ O.D. Stainless Beverage Tubing 0.5 9.9 3/8″ O.D. Stainless Beverage Tubing 0.2 22.2 Please note: Most references indicate 3/16 provides 2.8-3 psi per foot. Our experience says this is too high and if true, our lines at the store would not flow at all. This is an estimate, as the resistance cannot be linear. Calculate Line Length: Homebrewers typically want a 1 psi differential between the keg and the glass so here is a quick formula. (Note: Professional Tap Rooms may do 5 PSI which is about 1 gallon per minute flow rate) Line Length= ((Serving Pressure) - (Height * 0.5) – (1 psi differential) ) / Line resistance For 1 foot height and using 3/16 line Length= (14.3-0.5-1.0)/1.8 = 7.1 feet If you need to go further with a line, go bigger with the tubing. Actual Balancing: We always recommend 8 feet of 3/16 line to new keg system brewers because there are a number of factors. Faucet temperature is the number one factor. As you can see from the chart, warm beer holds less CO2, so logically when a nicely carbonated beer runs through a warm faucet, it warms and foams until the faucet cools. Depending on your system the faucet may be cooler or warmer. A warmer faucet may appreciate a slower pour and longer line. The best thing for improving your kegerator is to ensure the faucet and shank remain cold. A bar will have the luxury of glycol coolant. A homebrewer can easily add fans to circulate air to the tower or shanks inside a fridge. A longer line also allows higher carbonation levels. Most importantly, a longer line can be cut back. You will need to take the time to learn how your kegerator works


