Kendo M Wet RGB - Installation Instructions for wet locations
advertisement
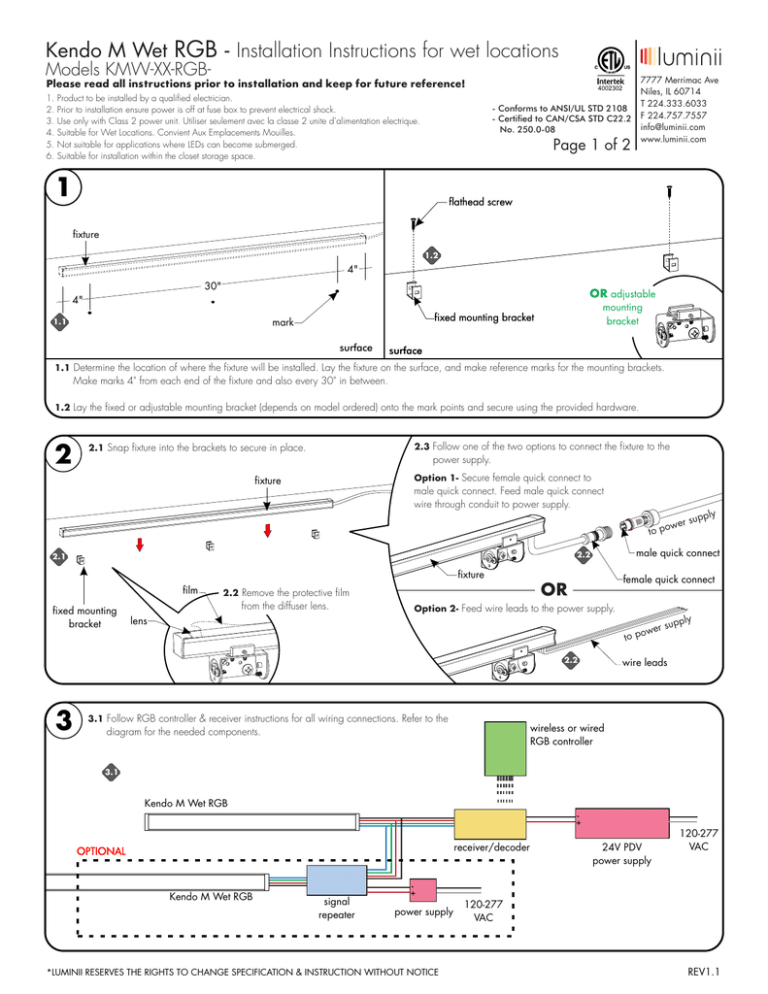
Kendo M Wet RGB - Installation Instructions for wet locations Models KMW-XX-RGB- Please read all instructions prior to installation and keep for future reference! 1. 2. 3. 4. 5. 6. Product to be installed by a qualified electrician. Prior to installation ensure power is off at fuse box to prevent electrical shock. Use only with Class 2 power unit. Utiliser seulement avec la classe 2 unite d’alimentation electrique. Suitable for Wet Locations. Convient Aux Emplacements Mouilles. Not suitable for applications where LEDs can become submerged. Suitable for installation within the closet storage space. 7777 Merrimac Ave Niles, IL 60714 T 224.333.6033 F 224.757.7557 info@luminii.com www.luminii.com 4002302 - Conforms to ANSI/UL STD 2108 - Certied to CAN/CSA STD C22.2 No. 250.0-08 Page 1 of 2 1 flathead screw fixture 1.2 4" 30" OR adjustable 4" mounting bracket fixed mounting bracket mark 1.1 surface surface 1.1 Determine the location of where the fixture will be installed. Lay the fixture on the surface, and make reference marks for the mounting brackets. Make marks 4" from each end of the fixture and also every 30" in between. 1.2 Lay the fixed or adjustable mounting bracket (depends on model ordered) onto the mark points and secure using the provided hardware. 2 2.3 Follow one of the two options to connect the fixture to the power supply. 2.1 Snap fixture into the brackets to secure in place. Option 1- Secure female quick connect to male quick connect. Feed male quick connect wire through conduit to power supply. fixture wer to po male quick connect 2.2 2.1 fixture film fixed mounting bracket 2.2 Remove the protective film from the diffuser lens. female quick connect OR Option 2- Feed wire leads to the power supply. lens wer to po 2.2 3 ly supp 3.1 Follow RGB controller & receiver instructions for all wiring connections. Refer to the diagram for the needed components. ly supp wire leads wireless or wired RGB controller 3.1 Kendo M Wet RGB receiver/decoder OPTIONAL Kendo M Wet RGB signal repeater power supply *LUMINII RESERVES THE RIGHTS TO CHANGE SPECIFICATION & INSTRUCTION WITHOUT NOTICE 24V PDV power supply 120-277 VAC 120-277 VAC REV1.1 Kendo M & S Wet - Installation Instructions for wet locations Models KMW-, KSW- Please read all instructions prior to installation and keep for future reference! 1. 2. 3. 4. 5. 6. Product to be installed by a qualified electrician. Prior to installation ensure power is off at fuse box to prevent electrical shock. Use only with Class 2 power unit. Utiliser seulement avec la classe 2 unite d’alimentation electrique. Suitable for Wet Locations. Convient Aux Emplacements Mouilles. Not suitable for applications where LEDs can become submerged. Suitable for installation within the closet storage space. 4 Kendo M Wet RGB sample layout 4002302 - Conforms to ANSI/UL STD 2108 - Certied to CAN/CSA STD C22.2 No. 250.0-08 Page 2 of 2 7777 Merrimac Ave Niles, IL 60714 T 224.333.6033 F 224.757.7557 info@luminii.com www.luminii.com adjustable mounting bracket upply wer s to po fixture 4.1 male quick connect female quick connect fixture fixed mounting bracket 5 5.1 If applicable, slightly loosen screw on adjustable mounting bracket and adjust up to 180° and then re-tighten screw to secure position. adjustable mounting bracket 5.1 180° screw *LUMINII RESERVES THE RIGHTS TO CHANGE SPECIFICATION & INSTRUCTION WITHOUT NOTICE REV1.1
