Wifi Setup Guide - Radio Thermostat
advertisement

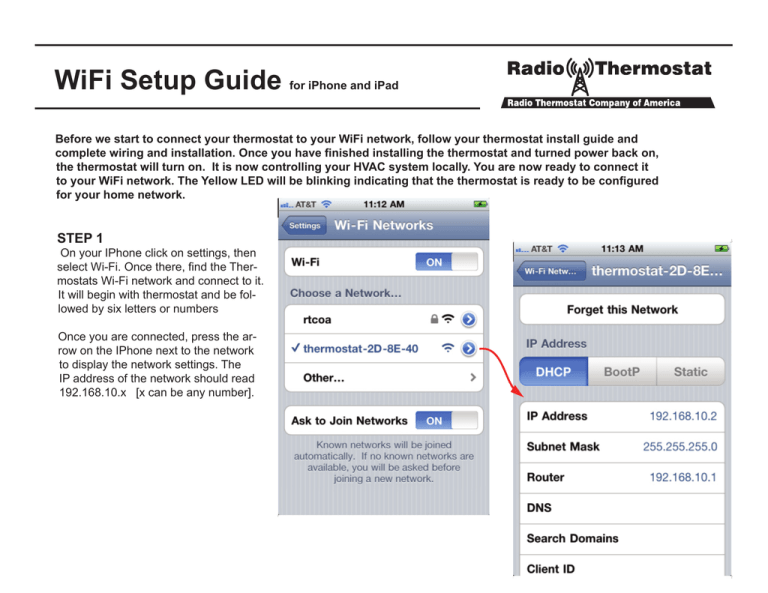
WiFi Setup Guide for iPhone and iPad Before we start to connect your thermostat to your WiFi network, follow your thermostat install guide and complete wiring and installation. Once you have finished installing the thermostat and turned power back on, the thermostat will turn on. It is now controlling your HVAC system locally. You are now ready to connect it to your WiFi network. The Yellow LED will be blinking indicating that the thermostat is ready to be configured for your home network. STEP 1 On your IPhone click on settings, then select Wi-Fi. Once there, find the Thermostats Wi-Fi network and connect to it. It will begin with thermostat and be followed by six letters or numbers Once you are connected, press the arrow on the IPhone next to the network to display the network settings. The IP address of the network should read 192.168.10.x [x can be any number]. PG STEP 2 Open your web browser and enter the address 192.168.10.1. The following page will load. For the most common setups touch Scan Wireless Networks. This will tell the thermostat to look for your home wireless network. After a few moments you will see a list of available wireless networks displayed in the window. Click on your home network to join. This joins the thermostat to your home network. My_Home_Network 2 PG STEP 3 This is the screen where you enter your Password for your wireless network. This is the same password you would use to connect your laptop or smartphone to your home wireless network. Enter your passphrase and press the next button. For your protection we encrypt all data transmitted over Wi-Fi with industry proven security methods. This ensures that nobody else can gain access to your thermostat during this configuration process. To find your PIN look at the top left hand corner of your thermostat. Enter this PIN into the Pin: text box. [In this example the PIN is 44911.] After this, click Set Network to proceed. 3 PG STEP 4 The Wi-Fi thermostat will now attempt to join your home network. If this is successful the green light on the thermostat will start to blink, and the word “link” will appear on the screen of the thermostat. In addition the last three digits of the thermostat’s IP address will be displayed in the top left hand corner of the screen. In this case the IP address of the thermostat is 192.168.1.14. You can see the “14” on the screen. The PROVISIONING DONE screen will display in your browser. It shows details about the configuration of your WiFi module. Some thing like: SSID: My_Home_Network BSSID: 00-18-01-F7-03-82 Security: wpa2 IP: Dynamic When you verify the green indicator on the thermostat you can close your browser window. If there is an error in the setup process then the red light will flash. This many happen because you did not enter the security password correctly or the connection was momentarily lost. After a few minutes the thermostat will return to its Ready to Connect state with the yellow light flashing. Please try again and repeat this guide from STEP 1. 4 PG STEP 5 When the Provisioning process is completed successfully, we need to connect your computer back to your home network. Do this by touching SETTINGS -> WiFi, then select your home network. Your WiFi module is configured. Now go to radiothermostat.com/wifi create an account and login to control your thermostat remotely and save energy! Using the Advanced tab - Each WIFi setup screen has an ADVNACED tab Selecting the advanced tab will allow you to manually set the parameters for your network, including static IP addresses. To use this tab click it and input your parameters. Click submitt to return to the previous page. My_Home_Network 5 PG 6


