Introduction to vacuum gauges
advertisement
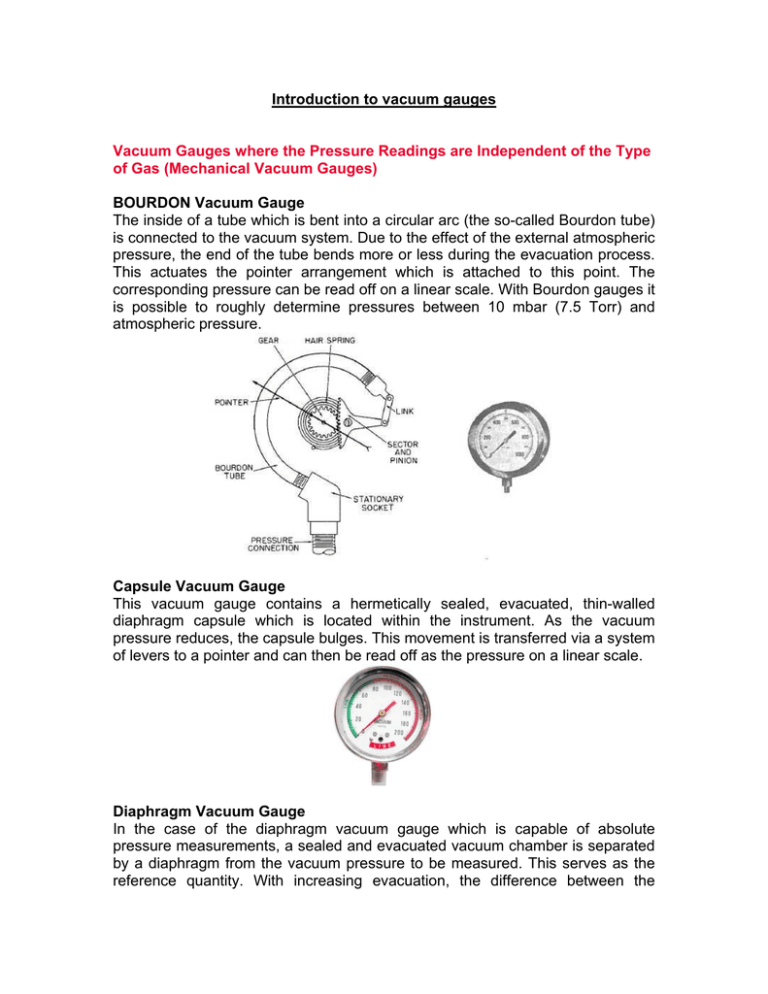
Introduction to vacuum gauges Vacuum Gauges where the Pressure Readings are Independent of the Type of Gas (Mechanical Vacuum Gauges) BOURDON Vacuum Gauge The inside of a tube which is bent into a circular arc (the so-called Bourdon tube) is connected to the vacuum system. Due to the effect of the external atmospheric pressure, the end of the tube bends more or less during the evacuation process. This actuates the pointer arrangement which is attached to this point. The corresponding pressure can be read off on a linear scale. With Bourdon gauges it is possible to roughly determine pressures between 10 mbar (7.5 Torr) and atmospheric pressure. Capsule Vacuum Gauge This vacuum gauge contains a hermetically sealed, evacuated, thin-walled diaphragm capsule which is located within the instrument. As the vacuum pressure reduces, the capsule bulges. This movement is transferred via a system of levers to a pointer and can then be read off as the pressure on a linear scale. Diaphragm Vacuum Gauge In the case of the diaphragm vacuum gauge which is capable of absolute pressure measurements, a sealed and evacuated vacuum chamber is separated by a diaphragm from the vacuum pressure to be measured. This serves as the reference quantity. With increasing evacuation, the difference between the pressure which is to be measured and the pressure within the reference chamber becomes less, causing the diaphragm flex. This flexure may be transferred by mechanical means like a lever, for example, to a pointer and scale, or electrically by means of a strain gauge or a bending bar for conversion into an electrical measurement signal. The measurement range of such diaphragm vacuum gauges extends from 1 mbar (0.75 Torr) to over 2000 mbar (1500 Torr). Capacitance Vacuum Gauge The pressure sensitive diaphragm of these capacitive absolute pressure sensors is made of Al2O3 ceramics. The term “capacitive measurement” means that a plate capacitor is created by the diaphragm with a fixed electrode behind the diaphragm. When the distance between the two plates of this capacitor changes, a change in capacitance will result. This change, which is proportional to the pressure, is then converted into a corresponding electrical measurement signal. Here too, an evacuated reference chamber serves as the reference for the pressure measurements. With capacitance gauges it is possible to accurately measure pressures from 10-5 mbar/Torr to well above atmospheric pressure, whereby different capacitance gauges having diaphragms of different thickness (and therefore sensitivity) will have to be used. From Loewener Vacuum service Vacuum Gauges where the Pressure Readings Depend of the Type of Gas Thermal Conductivity Gauge (Pirani) This measurement principle utilizes the thermal conductivity of gases for the purpose of pressure measurements in the range from 10-4 mbar/Torr to atmospheric pressure. Today, only the principle of the controlled Pirani gauge is used by LEYBOLD in order to attain a quick response. The filament within the gauge head forms one arm of a Wheatstone bridge. The heating voltage which is applied to the bridge is controlled in such a way, that the filament resistance and thus the temperature of the filament remains constant regardless of the quantity of heat given off by the filament. Since the heat transfer from the filament to the gas increases with increasing pressures, the voltage across the bridge is a measure of the pressure. Improvements with regard to temperature compensation have resulted in stable pressure readings also in the face of large temperature changes, in particular when measuring low pressures. Cold Cathode Ionization Vacuum Gauge (Penning) Here the pressure is measured through a gas discharge within a gauge head whereby the gas discharge is ignited by applying a high tension. The resulting ion current is output as a signal which is proportional to the prevailing pressure. The gas discharge is maintained also at low pressures with the aid of a magnet. New concepts for the design of such sensors permit safe and reliable operation of these socalled Penning sensors in the pressure range from 10-2 to 1 x 10⁻⁹ mbar/Torr. LEYBOLD VACUUM PRODUCTS AND REFERENCE BOOK 2003/2004 Hot Cathode Ionization Vacuum Gauge These sensors commonly use three electrodes. A hot cathode emits electrons which impinge on an anode. The gas, the pressure of which is to be measured, is thus ionized. The resulting positive ion current is detected through the third electrode - the so-called ion detector - and this current is used as the signal which is proportional to the pressure. The hot cathode sensors which are mostly used today, are based on the Bayard-Alpert principle. With this electrode arrangement it is possible to make measurements in the pressure range from 1010 to 10-2 mbar/Torr. Other electrode arrangements permit access to a higher range of pressures from 10-1 mbar/Torr down to 10-10 mbar/Torr. For the measurement of pressures below 10-10 mbar/Torr so-called extractor ionization sensors after Redhead are employed. In extractor ionization gauges the created ions are focused onto a very thin and short ion detector. Due to the geometrical arrangement of this system, interfering influences such as X-ray effects and ion desorption can be almost completely eliminated. The extractor ionization gauge permits pressure measurements in the range from 10-4 to 10-12 mbar/Torr. Common vacuum fittings: from Trinos Vacuum http://us.trinos.com/cgi-bin/trinos/iboshop.cgi?show0,780834353823438 » CF / Conflat 16 - 400 mm In this type of fitting the seal is made by a copper ring. These flanges and components are also referred to as: • • • CF ConFlat UHV We can supply them in a variety of materials: • • • • • 304L SS 316L SS 316LN SS 316LN SS ESR Aluminum Connecting a CF Fitting or Flange When making a CF connection it is important to fasten the screws on a CF connection opposite each other. Fasten one screw and then the next screw fastened should be offset 180°. The next screw should be approximately 90° off and then 180° and so on. This will prevent any unnecessary tension. A radial keyway on the face of the flange serves to break any unwanted sealing connection that will interfere with the testing at higher vacuum ranges and will also permit the helium to be diffused directly on the sealing surface. When connecting two CF Flanges are being connected. It is helpful to have at least one flange rotatable in order to align the bolt holes for fastening. Nominal diameter US [inch/OD] 1 1/3 " 2 1/8 " 2 3/4 " 2 3/4 " 3 3/8 " 4 1/2 " 4 5/8 " 6" 6 3/4 " 8" 10" 12" 14" 16 1/2 " Nominal diameter DN [mm/ID] 16 CF 25 CF 38 CF 40 CF 50 CF 63 CF 80 CF 100 CF 130 CF 160 CF 200 CF 250 CF 300 CF 350 CF Inner diameter I [mm] 16 22.2 35 38 47.6 63 73 100 123. 7 150 200 250 298. 5 349. 3 Outer diameter A [mm] 34.0 54.1 69.9 69.9 85.9 113. 5 117. 6 152.0 171. 5 202. 5 253. 0 306. 0 355. 6 419. 1 Height H [mm] 7.2 12.6 13 13 17.5 17.5 20.6 20 21.4 22 24.5 26 28.5 28.5 flange socket R [mm] 18.2 41.3 38.2 40 51 70.3 76.5 108.3 127. 3 159. 3 205. 3 256. 3 305. 3 356. 1 Pipe diameter R [mm] 18 x 1 25.4 x 38 x 1.5 40 x 1.5 50.8 x 70 x 2 76.2 x 108 x 2 127 x 159 x2 205 x 2.5 256 x3 305 x3 356 x3 Bolt circle L [mm] 27 41.3 58.7 58.7 72.4 92.1 5 102. 4 130.2 5 151. 6 181. 0 231. 8 284. 0 325. 4 388. 9 Screw/thre ad (metric) 6x M4 4x M6 6x M6 6x M6 8x M8 8x M8 10 x M8 16 x M8 18 x M8 20 x M8 24 x M8 32 x M8 30 x M8 36 x M8 Screw/thre ad (US) 6x 832 4x 1/428 6x 1/428 6x 1/428 8x 5/16 -24 8x 5/16 -24 10 x 5/16 -24 16 x 5/1624 18 x 5/16 -24 20 x 5/16 -24 24 x 5/16 -24 32 x 5/16 -24 30 x 5/16 -24 36 x 5/16 -24 ISO-KF 0 - 50 mm The ISO-KF flange system utilizes a single clamp system. This is an economical and reusable solution for rapid and frequent assembly and disassembly. The ISO-KF flanges can operate in high vacuum environments to pressures in the range of 10-8mbar (10-8 torr). Trinos stocks ISO-KF flange components in metric tube sizes from 10mm - 50mm and imperial tube sizes from 1/2" - 2". Custom ISO-KF flange or tube sizes are available upon request. Larger tube sizes are available in a clamping style ISO-K Flange system and a bolt style ISO-F Flange system. Trinos ISO-KF flanges comply with all ISO specifications (DIN 28 404 and ISO 1609) for vacuum mounting hardware and are compatible with ISO-KF, QF and NW flanges and components from most third parties. Figure 1: ISO-KF Flange System ISO-Flanges are deliverable with different tubes. The table below contains guidance values for the tube inner diameter, for exact values refer to the specific component. ID mm ID Inches Flange OD inches ISO-KF 16 16 0.63 1.2 ISO-KF 25 24 0.94 1.6 ISO-KF 40 40.5 1.6 2.2 ISO-KF 50 50.6 2 3 ISO-K 63 70.1 2¾ 3.74 ISO-K 80 82.9 3¼ 4.33 ISO-K 100 102 4 5.12 ISO-K 160 153 6 7.09 ISO-K 200 213 8.4 9.45 ISO-K 250 267 10 ½ 11.42 ISO-K 320 318 12 ½ 14.57 ISO-K 400 400 15 ¾ 17.72 ISO-K 500 502 19 ¾ 21.65 ISO-K 630 654 25 ¾ 27.17 Trinos Reference ISO-KF Flange System ISO-K Flange System ISO-K 63 - 630 mm The ISO-K flange system utilizes a multiple clamp system. This is an economical and reusable solution for rapid and frequent assembly and disassembly. The ISO-K flanges can operate in high vacuum environments to pressures in the range of 1x10⁻⁸mbar (1x10⁻⁸ torr). Trinos stocks ISO-K flange components in metric and imperial tube sizes. Custom ISO-K flange or tube sizes are available upon request. Smaller flange sizes are available in a single clamping style known as the ISO-KF Flange system. ISO-K Flange System with clamps ISO-K Recommended Number x Grip Flange Number of when assembling on Size clamps a baseplate 63 4 4 x M8 x 35 80 4 8 x M8 x 35 100 4 8 x M8 x 35 160 4 8 x M10 x 40 200 6 12 x M10 x 40 250 6 12 x M10 x 40 320 8 12 x M12 x 50 400 8 16 x M12 x 50 500 12 16 x M12 x 50 630 12 20 x M12 x 55 ID mm ID Inches Flange OD inches ISO-KF 16 16 0.63 1.2 ISO-KF 25 24 0.94 1.6 ISO-KF 40 40.5 1.6 2.2 ISO-KF 50 50.6 2 3 ISO-K 63 70.1 2¾ 3.74 ISO-K 80 82.9 3¼ 4.33 ISO-K 100 102 4 5.12 ISO-K 160 153 6 7.09 ISO-K 200 213 8.4 9.45 ISO-K 250 267 10 ½ 11.42 ISO-K 320 318 12 ½ 14.57 ISO-K 400 400 15 ¾ 17.72 ISO-K 500 502 19 ¾ 21.65 ISO-K 630 654 25 ¾ 27.17 Trinos Reference ISO-KF Flange System ISO-K Flange System ISO-F 63 - 630 mm ISO-F Flanges are also commonly referred to as ISO Bolt Flanges. ISO-F Flanges are comparable to other ISO flanges in that they seal with an ORing which is carried by a center-ring. Whereas other ISO flange systems are connected with special clamps, ISOFlanges are joined with bolts in through holes. It is important to note, that ISO-F and ISO-K can be joined with a bolt-ring which slides over the standard ISO-K flange. This bolt ring converts an ISO-K into an ISO-F with a rotable collar. ISO-F ISO-F ISO-F ISO-F ISO-F Flange Half Nipples Tees, Crosses, Elbows & Doors Centering Rings & O-Rings Set of Screws Wire Seal Flanges 250 - 600 mm Wire-Seal Flanges These flanges are commonly referred to as: • • • COF UHV Large Wire Seal Flange We carry them in Materials • • 304 316L All parts mentioned in this catalog can be customized in terms of dimensions and materials used, normally within just a few days.
