Fetal Pig Dissection
advertisement
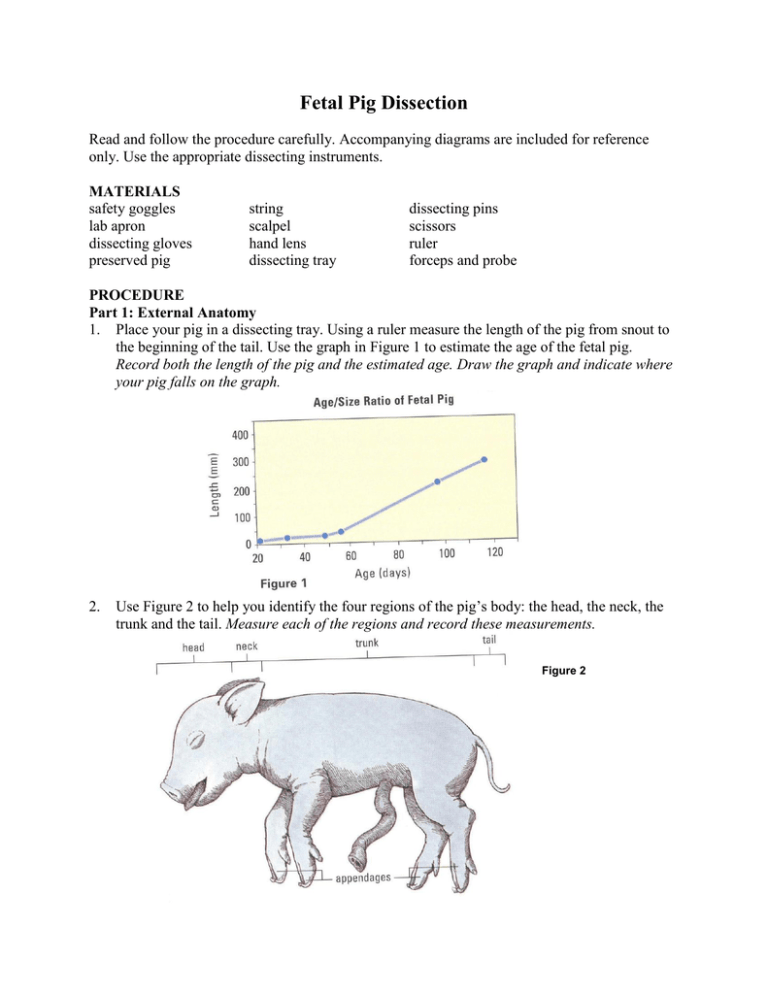
Fetal Pig Dissection Read and follow the procedure carefully. Accompanying diagrams are included for reference only. Use the appropriate dissecting instruments. MATERIALS safety goggles lab apron dissecting gloves preserved pig string scalpel hand lens dissecting tray dissecting pins scissors ruler forceps and probe PROCEDURE Part 1: External Anatomy 1. Place your pig in a dissecting tray. Using a ruler measure the length of the pig from snout to the beginning of the tail. Use the graph in Figure 1 to estimate the age of the fetal pig. Record both the length of the pig and the estimated age. Draw the graph and indicate where your pig falls on the graph. 2. Use Figure 2 to help you identify the four regions of the pig’s body: the head, the neck, the trunk and the tail. Measure each of the regions and record these measurements. Figure 2 3. 4. 5. Place the pig on its dorsal surface and observe the umbilical cord. Locate the paired rows of nipples along the ventral surface of the pig. Both males and females have these nipples. Record the number of nipples and describe the umbilical cord. Examine the feet of the fetal pig. Indicate the position and number of toes on each foot. Examine the external reproductive structures of the fetal pig. Determine the gender of your pig. Name the pig appropriately based on the pig’s gender. Part 2: Abdominal Cavity During the dissection, you will be directed to examine specific organs as they become visible. Remove only those organs indicated by the dissection procedure. Proceed cautiously to prevent damaging underlying structures. 6. With the pig still on its dorsal surface, attach one piece of string to one of the pig’s hind legs, pull it under the dissecting pan and tie it to the other hind leg. Repeat the procedure for the fore legs. 7. 8. 9. Using scissors, make the incision indicated as #1 in Figure 3. Start by cutting around the umbilical cord, and then cut straight toward the anterior end of the pig. Make incision #2 toward the posterior end of the pig. Make incision #3 near the neck, and then incision #4. Make lateral incision #5; this incision runs parallel to the diaphragm, which separates the thoracic cavity from the abdominal cavity. Pull apart the flaps along incision #5, exposing the abdominal cavity. Use the probe to open the connective tissue (peritoneum) that holds the internal organs to the lining of the body cavity. Now pull apart the flaps of skin covering incision #4 to expose the posterior portion of the abdominal cavity (see Figure 4). 10. Locate the liver near the anterior end of the abdominal cavity. Record the number of lobes in the liver. 11. Using a probe, lift the lobes and locate the saclike gall bladder. Using the correct anatomical terms, state the exact location of the gall bladder. 12. Follow the thin duct from the gall bladder to the coiled small intestine. Bile salts, produced in the liver, are stored in the gall bladder. The bile duct conducts the fat-emulsifying bile salt to the small intestine. 13. Locate the J-shaped stomach beneath the liver. Using forceps and a probe, lift the stomach and locate the esophagus attached near its anterior end. Locate the small intestine at the posterior junction of the stomach. The coiled small intestine is held in place by mesentery (a thin, somewhat transparent, connective tissue). Note the blood vessels that transport digested nutrients from intestine to the liver. 14. Using a probe and forceps, lift the junction between the stomach and small intestine, removing supporting tissue. Uncoil the junction and locate the creamy-white pancreas. The pancreas produces a number of digestive enzymes and a hormone called insulin, which helps regulate blood sugar. Describe the appearance and of the pancreas. 15. Locate the spleen, the elongated organ found around the outer curvature of the stomach. The spleen stores red and white blood cells. The spleen also removes damaged red blood cells from the circulatory system. 16. Using a scalpel, remove the stomach from the pig by making transverse cuts near the junction of the stomach and the esophagus, and near the junction of the stomach and small intestine. Make a cut along the midline of the stomach, and open the cavity. Rinse the stomach. View the stomach under a hand lens. Describe the appearance of the inner lining of the stomach. Part 3: Thoracic Cavity 17. Carefully fold back the flaps of skin that cover the thoracic cavity. List the organs found in the thoracic cavity. 18. Locate the heart. Using forceps and a probe, remove the pericardium (a thin connective tissue covering the heart) from the outer surface of the heart. 19. Trace blood flow through the heart, by examining the blood vessels and chambers of the heart. 20. Make a longitudinal incision through the heart so that the heart is cut in half, leaving the top portion intact. This allows the heart to flip open exposing the interior chambers. Compare the thickness of the wall of a ventricle with that of the wall of an atrium. 21. Locate the spongy lungs on either side of the heart and find the trachea leading into the lungs (Figure 7). 22. Place your index finger on the trachea and push downward. Now locate the esophagus which lies dorsal to the trachea and push downward. Compare the differences between the structure, location and termination point of the trachea and esophagus. Analysis a) What is the function of the umbilical cord? b) Use a table to state the function of the following organs: stomach, liver, small intestine, gall bladder, pancreas, large intestine and spleen. c) What is the function of the mesentery? d) Why does the left ventricle contain more muscle than the right ventricle? e) Lungs normally feel spongy. Why do fetal lungs feel more solid? f) Based on their functions, explain the observed differences between the trachea and the esophagus. g) The thoracic cavity is surrounded by a stiff rib cage, while the abdominal cavity has a softer muscular wall. Explain how such structures are beneficial in each case. h) What advantage(s) is(are) there to dissecting a fetal pig rather than other mammals?
