ALL-PRO
advertisement
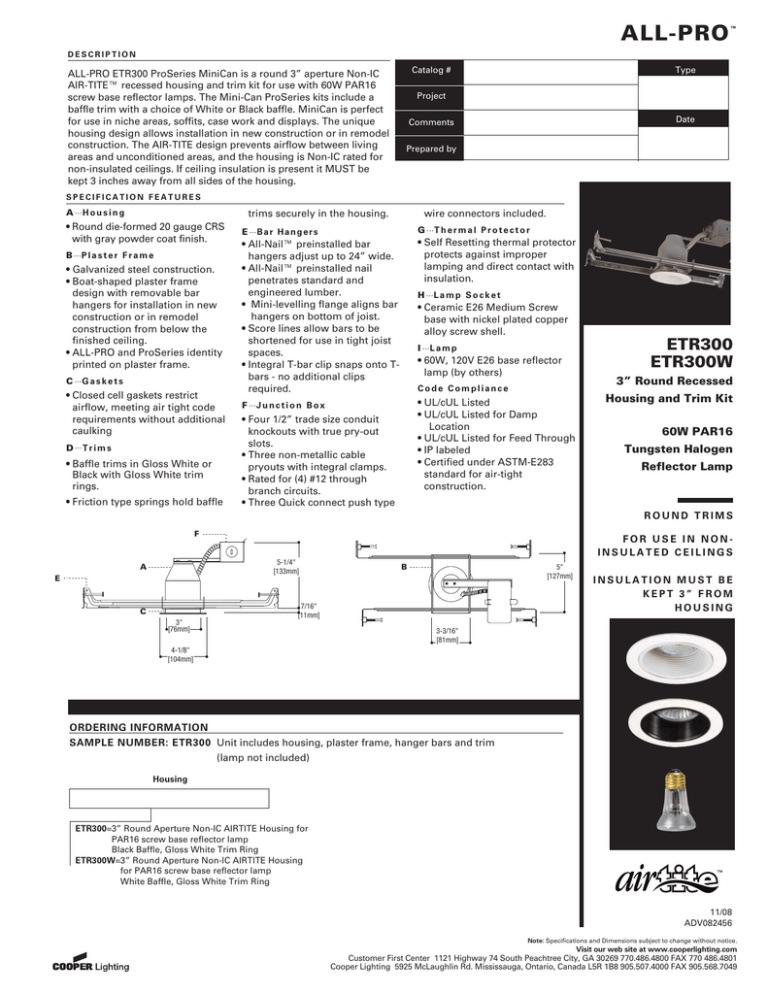
ALL-PRO ™ DESCRIPTION ALL-PRO ETR300 ProSeries MiniCan is a round 3” aperture Non-IC AIR-TITE™ recessed housing and trim kit for use with 60W PAR16 screw base reflector lamps. The Mini-Can ProSeries kits include a baffle trim with a choice of White or Black baffle. MiniCan is perfect for use in niche areas, soffits, case work and displays. The unique housing design allows installation in new construction or in remodel construction. The AIR-TITE design prevents airflow between living areas and unconditioned areas, and the housing is Non-IC rated for non-insulated ceilings. If ceiling insulation is present it MUST be kept 3 inches away from all sides of the housing. Type Catalog # Project Date Comments Prepared by SPECIFICATION FEATURES A ...H o u s i n g wire connectors included. trims securely in the housing. • Round die-formed 20 gauge CRS with gray powder coat finish. B ...P l a s t e r F r a m e • Galvanized steel construction. • Boat-shaped plaster frame design with removable bar hangers for installation in new construction or in remodel construction from below the finished ceiling. • ALL-PRO and ProSeries identity printed on plaster frame. C ...G a s k e t s • Closed cell gaskets restrict airflow, meeting air tight code requirements without additional caulking D ...T r i m s • Baffle trims in Gloss White or Black with Gloss White trim rings. • Friction type springs hold baffle E ...B a r H a n g e r s G ...T h e r m a l P r o t e c t o r • All-Nail™ preinstalled bar hangers adjust up to 24” wide. • All-Nail™ preinstalled nail penetrates standard and engineered lumber. • Mini-levelling flange aligns bar hangers on bottom of joist. • Score lines allow bars to be shortened for use in tight joist spaces. • Integral T-bar clip snaps onto Tbars - no additional clips required. • Self Resetting thermal protector protects against improper lamping and direct contact with insulation. F ...J u n c t i o n B o x • UL/cUL Listed • UL/cUL Listed for Damp Location • UL/cUL Listed for Feed Through • IP labeled • Certified under ASTM-E283 standard for air-tight construction. H ...L a m p S o c k e t • Ceramic E26 Medium Screw base with nickel plated copper alloy screw shell. I ...L a m p • 60W, 120V E26 base reflector lamp (by others) Code Compliance • Four 1/2” trade size conduit knockouts with true pry-out slots. • Three non-metallic cable pryouts with integral clamps. • Rated for (4) #12 through branch circuits. • Three Quick connect push type ETR300 ETR300W 3” Round Recessed Housing and Trim Kit 60W PAR16 Tungsten Halogen Reflector Lamp ROUND TRIMS F FOR USE IN NONINSULATED CEILINGS 5-1/4" [133mm] A E 5" [127mm] B 7/16" [11mm] C 3" [76mm] INSULATION MUST BE KEPT 3” FROM HOUSING 3-3/16" [81mm] 4-1/8" [104mm] ORDERING INFORMATION SAMPLE NUMBER: ETR300 Unit includes housing, plaster frame, hanger bars and trim (lamp not included) Housing ETR300=3” Round Aperture Non-IC AIRTITE Housing for PAR16 screw base reflector lamp Black Baffle, Gloss White Trim Ring ETR300W=3” Round Aperture Non-IC AIRTITE Housing for PAR16 screw base reflector lamp White Baffle, Gloss White Trim Ring 11/08 ADV082456 Note: Specifications and Dimensions subject to change without notice. Visit our web site at www.cooperlighting.com Customer First Center 1121 Highway 74 South Peachtree City, GA 30269 770.486.4800 FAX 770 486.4801 Cooper Lighting 5925 McLaughlin Rd. Mississauga, Ontario, Canada L5R 1B8 905.507.4000 FAX 905.568.7049 ALL-PRO INSTALLATION ™ Installation - New Construction, Suspended Ceiling or Remodel New Construction For new construction, the plaster frame and bar hangers are installed first. Remove trim from housing. After the ceiling is installed, the housing can be wired and then slid into the ceiling and secured with the plaster frame clips. Suspended Ceiling After cutting a hole in the ceiling tile, the plaster frame and bar hangers are installed. The bar hangers have integral T-bar clips. Insert the housing into the ceiling tile, secure in place with plaster frame clips and complete the wiring. Remodel After cutting a hole in the ceiling, Install plaster frame and secure in place with clips. Make wiring connections and insert housing into ceiling. Finally, secure housing in place with plaster frame clips. 11/08 ADV082456 Note: Specifications and Dimensions subject to change without notice. Visit our web site at www.cooperlighting.com Customer First Center 1121 Highway 74 South Peachtree City, GA 30269 770.486.4800 FAX 770 486.4801 Cooper Lighting 5925 McLaughlin Rd. Mississauga, Ontario, Canada L5R 1B8 905.507.4000 FAX 905.568.7049
