Document 13747856
advertisement
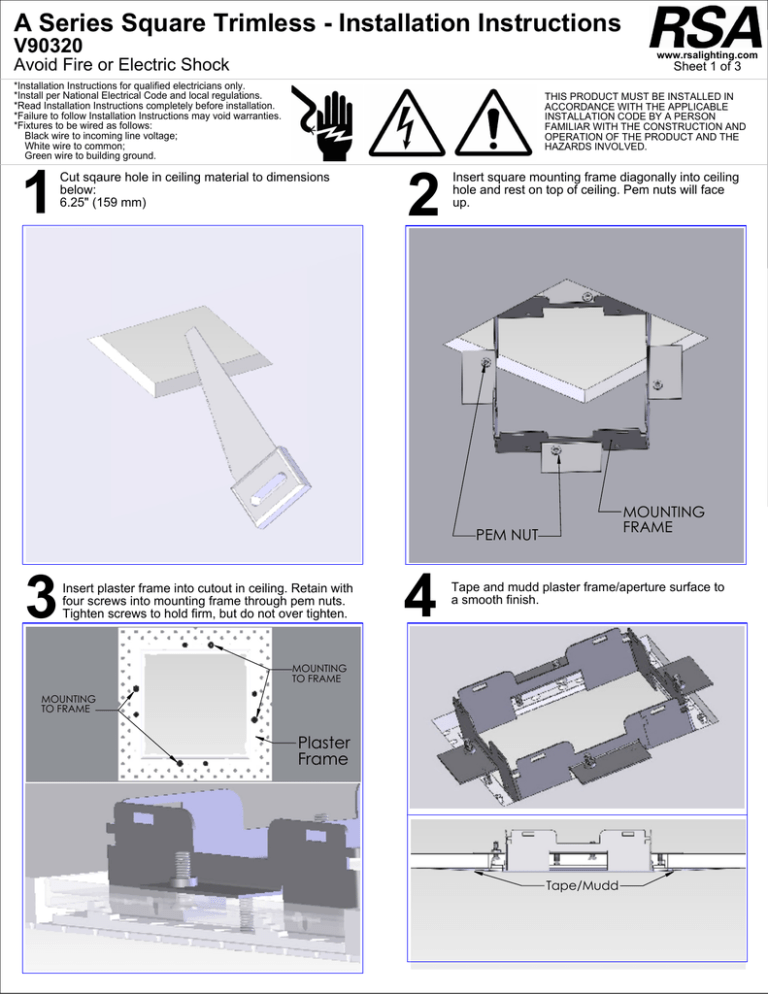
A Series Square Trimless - Installation Instructions V90320 www.rsalighting.com Avoid Fire or Electric Shock Sheet 1 of 3 *Installation Instructions for qualified electricians only. *Install per National Electrical Code and local regulations. *Read Installation Instructions completely before installation. *Failure to follow Installation Instructions may void warranties. *Fixtures to be wired as follows: Black wire to incoming line voltage; White wire to common; Green wire to building ground. 1 THIS PRODUCT MUST BE INSTALLED IN ACCORDANCE WITH THE APPLICABLE INSTALLATION CODE BY A PERSON FAMILIAR WITH THE CONSTRUCTION AND OPERATION OF THE PRODUCT AND THE HAZARDS INVOLVED. Cut sqaure hole in ceiling material to dimensions below: 6.25" (159 mm) 2 Insert square mounting frame diagonally into ceiling hole and rest on top of ceiling. Pem nuts will face up. MOUNTING FRAME PEM NUT 3 Insert plaster frame into cutout in ceiling. Retain with four screws into mounting frame through pem nuts. Tighten screws to hold firm, but do not over tighten. 4 Tape and mudd plaster frame/aperture surface to a smooth finish. MOUNTING TO FRAME MOUNTING TO FRAME Plaster Frame Tape/Mudd A Series Square Trimless - Installation Instructions V90320 www.rsalighting.com Avoid Fire or Electric Shock *Installation Instructions for qualified electricians only. *Install per National Electrical Code and local regulations. *Read Installation Instructions completely before installation. *Failure to follow Installation Instructions may void warranties. *Fixtures to be wired as follows: Black wire to incoming line voltage; White wire to common; Green wire to building ground. 5 7 Pull wiring input through cutout and make connections into driver. First insert tabs into slots, then rotate fixture into frame, where it will snap into place. Snap on Sheet 2 of 3 THIS PRODUCT MUST BE INSTALLED IN ACCORDANCE WITH THE APPLICABLE INSTALLATION CODE BY A PERSON FAMILIAR WITH THE CONSTRUCTION AND OPERATION OF THE PRODUCT AND THE HAZARDS INVOLVED. 6 8 Insert driver, yoke and lamp assembly into hole. Driver will rest on ceiling material. Loosen knob and adjust light in desired orientation/angle (0 to 45 ) and retighten. Knob Tab SNAP A Series Square Trimless - Installation Instructions V90320 www.rsalighting.com Avoid Fire or Electric Shock *Installation Instructions for qualified electricians only. *Install per National Electrical Code and local regulations. *Read Installation Instructions completely before installation. *Failure to follow Installation Instructions may void warranties. *Fixtures to be wired as follows: Black wire to incoming line voltage; White wire to common; Green wire to building ground. 9 Mount trim by pushing torsion spings upwards. Once in the frame, release springs and push trim upwards until flush with the ceiling. Torsion Spring Sheet 3 of 3 THIS PRODUCT MUST BE INSTALLED IN ACCORDANCE WITH THE APPLICABLE INSTALLATION CODE BY A PERSON FAMILIAR WITH THE CONSTRUCTION AND OPERATION OF THE PRODUCT AND THE HAZARDS INVOLVED. 10 Completed assembly is shown below.
