EE630 PROJECT A STRIPE DETECTION AND SEGMENTATION by LGH Updated 10-15-12
advertisement
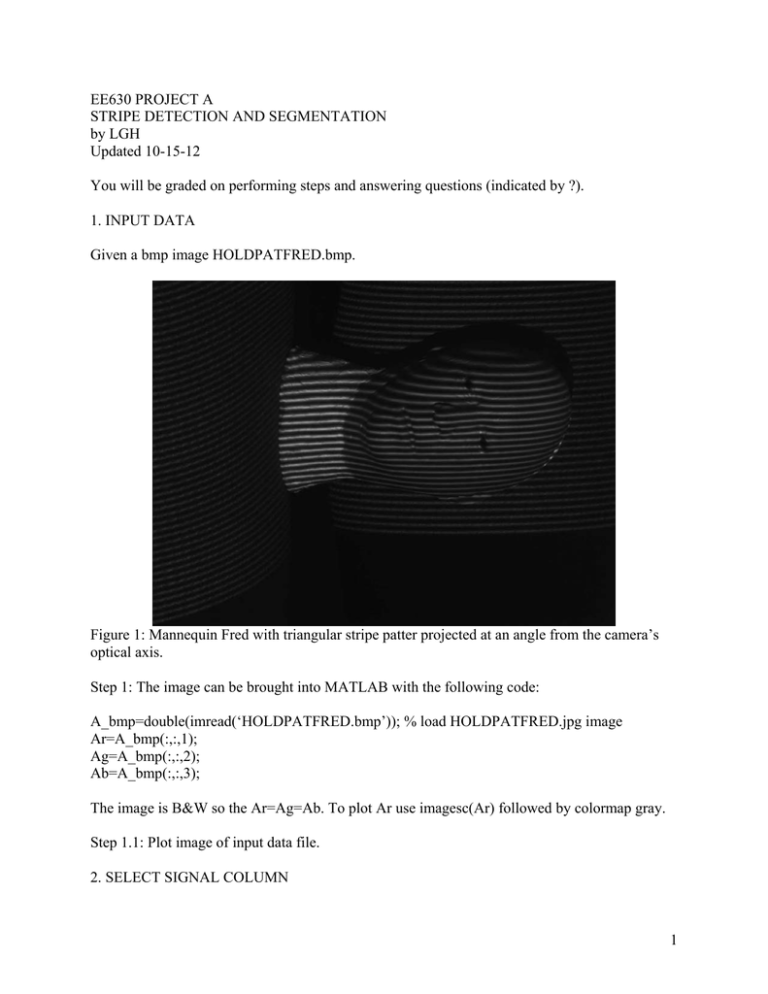
EE630 PROJECT A STRIPE DETECTION AND SEGMENTATION by LGH Updated 10-15-12 You will be graded on performing steps and answering questions (indicated by ?). 1. INPUT DATA Given a bmp image HOLDPATFRED.bmp. Figure 1: Mannequin Fred with triangular stripe patter projected at an angle from the camera’s optical axis. Step 1: The image can be brought into MATLAB with the following code: A_bmp=double(imread(‘HOLDPATFRED.bmp’)); % load HOLDPATFRED.jpg image Ar=A_bmp(:,:,1); Ag=A_bmp(:,:,2); Ab=A_bmp(:,:,3); The image is B&W so the Ar=Ag=Ab. To plot Ar use imagesc(Ar) followed by colormap gray. Step 1.1: Plot image of input data file. 2. SELECT SIGNAL COLUMN 1 Step 2.1: Select and plot, the nx column to represent a signal. Indicate which nx you used. The size of the image is [My Nx]=size(Ar); A 1-D vector would be My by 1. sc=Ar(1:My,nx); Figure 2: The middle column intensity of Fig. 1. 3. FIND THE SPECTRA OF THE COLUMN Step 3.1: Take the DFT of Figure 2 and plot as in Figure 3, such that Figure 3: FFT of Figure 2, with “fftshift” to center the dc term. 2 Questions: (3.1) Knowing the vertical height of the image (units of pixels) in Fig 1, estimate the number of stripe cycles occurring along the vertical direction of the image? (3.2) Does this value correspond to the peak locations in Fig. 3? (3.3) Which peaks? 4. STRIPE SEGMENTING We would like to segment the striping from the image of Fred. To do this, we can use an ideal bandpass filter. An “ideal” bandpass filter is two rectangle functions symmetric about dc in the frequency domain. To create a bandpass filter we can use a discrete-time cosine function and the downloadable irect. The discrete cosine can be synthesized as t=k-1; kc=??; c=cos(2*pi*kc*t/My); c=c'; Combining this with the rectangle function H=irect(1,41,1,My); H=H'; h=ifft(H); % time domain DT Sinc such that the bandpass filter is Hb=fft(c.*h); Step 4.1: generate the bandpass filter and manually optimize the center frequency. Plot results as in Figs. 4 and 5. The plot of the filter superimposed on the spectra is Figure 4: Bandpass filter superimposed on the signal spectra. 3 Applying the bandpass filter to the column signal and superimposing the results yields Fig. 5. Figure 5: Blue signal is filtering result and green is original. Step 4.2: Generate and plot the 2-D fft of the image as described for Fig. 6. To really evaluate the effectiveness of this approach and to gain an understanding of the effects of the Bandpass filter width, we look at the 2-D FFT of the full image. To be able to see this more clearly, we should either use a log scale or suppress the dc term. For this example we will suppress dc by using a 2-D irect function and then “notting” it as to notch out the dc term. Fr=fft2(Ar); H2d=irect(11,11,My,Nx); H2d=1-H2d; Sr=Fr.*H2d; The plot of the magnitude squared of Sr is 4 Figure 6: 2-D FFT based PSD of input image (negative for display). To filter out the regions of interest in Fig. 6, we need a spatial bandpass filter. This can be constructed with a cosine wave in one direction multiplied by a 2-D DT Sinc function. A 2-d image with a 1-D cosine function in it can be synthesized in matlab by c=cos(2*pi*kc*t/My); c=c'; uv=ones(1,Nx); cimage=c*uv; Step 4.3: Generate and plot the sine wave image as in Fig. 7. 5 Figure 7: Sine wave patterned image. Step 4.4: Generate a symmetric pulse using irect. Then inverse 2-D DFT the pulse, multiply by the 2-D sinewave image and 2-D DFT to create a 2-D filter in the frequency domain. Multiply this filter spectra times the spectra of the input and inverse 2-D DFT the resulting image as shown in Fig 8. 6 Figure 8: Filter selected stripes of input object. Step 4.5: Optimize the bandwidth and center frequency of the 2-D bandpass filter as to optimize the enhancement of the stripes in Fig. 8. Show you results compared with the results given in Fig. 8. Step 4.6: Binarize the image of Fig. 8. Use the find command to do this. Assume the zero mean, bandpass filtered image is arStripe. Ipos=find(arStripe>0); binStripe=zeros(My,Nx); binStripe(Ipos)=255; The result is shown in Fig. 9. 7 Figure 9: Binarized image of Fig. 8. 8
