CHAMP-PAK “QL Induction Lighting System” Luminaires CPMVIG Series IF 1453
advertisement
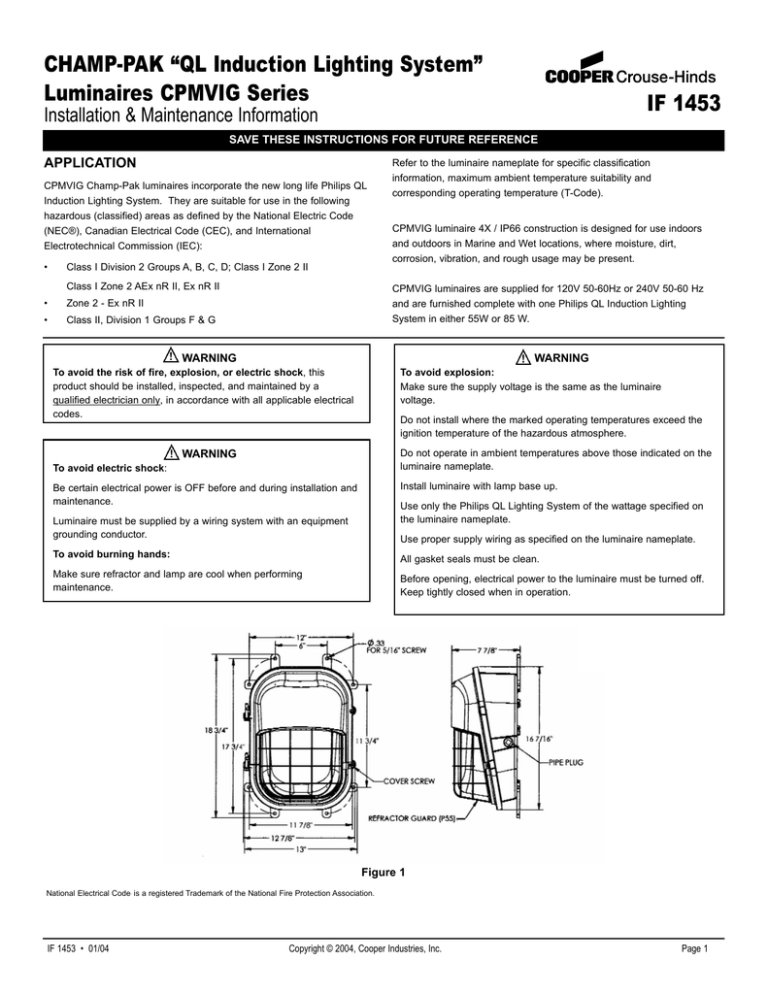
CHAMP-PAK “QL Induction Lighting System” Luminaires CPMVIG Series IF 1453 Installation & Maintenance Information SAVE THESE INSTRUCTIONS FOR FUTURE REFERENCE APPLICATION CPMVIG Champ-Pak luminaires incorporate the new long life Philips QL Induction Lighting System. They are suitable for use in the following hazardous (classified) areas as defined by the National Electric Code (NEC®), Canadian Electrical Code (CEC), and International Electrotechnical Commission (IEC): • Class I Division 2 Groups A, B, C, D; Class I Zone 2 II Class I Zone 2 AEx nR II, Ex nR II • Zone 2 - Ex nR II • Class II, Division 1 Groups F & G Refer to the luminaire nameplate for specific classification information, maximum ambient temperature suitability and corresponding operating temperature (T-Code). CPMVIG luminaire 4X / IP66 construction is designed for use indoors and outdoors in Marine and Wet locations, where moisture, dirt, corrosion, vibration, and rough usage may be present. CPMVIG luminaires are supplied for 120V 50-60Hz or 240V 50-60 Hz and are furnished complete with one Philips QL Induction Lighting System in either 55W or 85 W. WARNING WARNING To avoid the risk of fire, explosion, or electric shock, this product should be installed, inspected, and maintained by a qualified electrician only, in accordance with all applicable electrical codes. To avoid explosion: Make sure the supply voltage is the same as the luminaire voltage. Do not install where the marked operating temperatures exceed the ignition temperature of the hazardous atmosphere. Do not operate in ambient temperatures above those indicated on the luminaire nameplate. WARNING To avoid electric shock: Install luminaire with lamp base up. Be certain electrical power is OFF before and during installation and maintenance. Use only the Philips QL Lighting System of the wattage specified on the luminaire nameplate. Luminaire must be supplied by a wiring system with an equipment grounding conductor. Use proper supply wiring as specified on the luminaire nameplate. To avoid burning hands: All gasket seals must be clean. Make sure refractor and lamp are cool when performing maintenance. Before opening, electrical power to the luminaire must be turned off. Keep tightly closed when in operation. Figure 1 National Electrical Code‚ is a registered Trademark of the National Fire Protection Association. IF 1453 • 01/04 Copyright © 2004, Cooper Industries, Inc. Page 1 INSTALLATION Sealing Method 1: For Conduit. Seal according to NEC 505-15 (c) using Listed Conduit Entrance Seals. Seal all entries used. Mounting 1. Sealing Method 2: For Conduit. Alternate Sealing Method using an Electrical Sealing Putty as follows: If refractor guard (P55) is required and not factory installed, it may be easier to install now. The guard can be installed anytime during or after the luminaire installation (see REFRACTOR GUARD INSTALLATION section). 1. A maximum of six (6) #12 AWG conductors can be sealed in each conduit entry. 2. Attach 4 mounting brackets to back of luminaire with hardware provided. Rotate to desired position and tighten to 45 in.-lbs. 2. Form the Electrical Sealing Putty into a ball at least 1 inch (25.4 mm) in diameter. 3. Mark and drill desired location on mounting surface. 3. 4. Secure luminaire to surface using 5/16” (8 mm) bolts or lag screws (not included). Surround each conductor with the Electrical Sealing Putty and form into a ball, making sure the conductors are separated. 4. Carefully push the Electrical Sealing Putty and conductors back into the conduit keeping it flush with the end of the conduit. Make sure the sealing material surrounds all conductors providing a good seal between the conductors and the conduit. 5. Repeat steps 1 through 4 for each entry used. Wiring 5. Completely loosen the 2 captive cover screws and swing open the cover. 6. For a restricted breathing installation, seal per the RESTRICTED BREATHING SEALING section. Then continue to step 7. 7. Connect supply wires to luminaire leads per the attached wiring diagrams, using methods that comply with all applicable codes. 8. The CPMVIG Champ-Pak luminaire is furnished complete with the Philips QL Induction Lighting System, which consists of 3 parts: The Electrical Sealing Putty found to be acceptable for maintaining the restricted breathing characteristics of the CHAMP-PAK series CPMV luminaire is listed in Table 1. a) Lamp (glass bulb) b) Power Coupler Manufacturer Designation Cooper Crouse-Hinds TSC Epoxy Panduit Duct Seal (DS-1) Table 1 c) HF (high frequency) Generator For proper operation the lamp must be properly seated on the power coupler and for heat dissipation both the power coupler and HP generator must be firmly mounted to luminaire. To make sure nothing has loosened in shipment, check that the lamp is seated properly and both the power coupler and HP generator mounting screws are tight (20 in.-lbs.). For additional information specific to the QL Lighting system itself, refer to the Philips Lighting QL System Instruction Sheet supplied with the luminaire. 9. Close all unused conduit entries with pipe plugs provided. To prevent galling, lubricate pipe plugs with Crouse-Hinds HTL lubricant before installing. Tighten plugs securely, with at least three threads engaged. B) Cable and Cable Gland or Fittings Wiring Method Requirements for Restricted Breathing When wiring with cable, use Cable and Cable Glands or Fittings that are suitable for restricted breathing. Install according to instructions supplied with the gland or fitting. Repeat for each entry used. C) All unused conduit / cable entries must be closed up. Close with pipe plug supplied with unit. To prevent galling, lubricate pipe plugs with Crouse-Hinds HTL Lubricant before installing. D) If the protection method requires a test port, an unused conduit opening may be used as a test port. Mark test port by attaching self-adhesive label supplied with luminaire next to the test port. 10. Close cover and securely tighten the 2 cover screws. For proper gasket seal, torque the screws to 30 in.-lbs (3.4 N·m). 11. Turn power on. REFRACTOR GUARD (P55) INSTALLATION Restricted breathing sealing (or plugging) Note: Utilizing the Restricted Breathing protection method (-S826) will result in a cooler luminaire Maximum Temperature Identification Number or T-Number. See luminaire nameplate for T-Number information. WARNING Note: It is not necessary to open or remove the cover to install the optional refractor guard, catalog number P55. No additional hardware is needed to attach the guard. To install: 1. Remove the bottom cover screw and set aside. 2. Position the guard at the left side of the luminaire, with the hook to the right and the face of the guard toward the wall. Place the hook of the guard on the lower hinge pin, just above the hinge hook. Swing the guard over the refractor. 3. Reinstall the bottom cover screw through the guard screw tab and the housing screw hole. 4. Tighten the cover screw to 30 in.-lb. (3.4 N·m) torque. To avoid explosion, the wiring methods used must maintain the integrity of the Restricted Breathing luminaire. A) Threaded Rigid Metal Conduit Wiring Method Requirements for Restricted Breathing When wiring with conduit, all conduit entries used must be sealed. Use one of the following two sealing methods to maintain the restricted breathing integrity of Crouse-Hinds CPMV luminaires: IF 1453 • 01/04 Copyright © 2004, Cooper Industries, Inc. Page 2 QL LAMP SYSTEM REPLACEMENT COVER REMOVAL & INSTALLATION The CPMVIG Champ-Pak Luminaire uses the Philips QL Induction Lighting System, which has an average life of 100,000 hours (depending on ambient temperatures). As such, this luminaire should require minimal lamp system replacement, if at all. Cover removal: When a QL Lamp system no longer functions, it will typically be the HF generator that no longer operates and not the lamp or power coupler. However, due to the end-of-life lumen depreciation characteristic of the QL System, Philips recommends the entire system be replaced (all 3 components) not just the generator. 1. Turn off power to branch circuit. 2. Completely loosen the 2 captive cover screws. Swing cover open. Note: Hinge is designed with a mechanical stop that will prevent the refractor from hitting the wall. WARNING To avoid explosion and wire damage, do not support cover by power couper cable. When replacing the QL lamp system, refer to these instructions and the instructions supplied with the replacement QL Lighting System. 3. Disconnect power coupler cable at HF generator and cover ground connection and wire nuts. Completely loosen the 2 captive cover screws and swing open the cover. 4. Loosen the wire clamp in the housing and pull power coupler cable and ground wire free. 3. Disconnect the supply wires and the power coupler cable at the HF generator. 5. 4. Remove the lamp heat sink from the cover, then remove the lamp from the power coupler (See QL Lighting System instruction sheet). With cover fully open, close cover very slightly. Lift up along the hinge pin, toward the top of the luminaire, until the hook touches the upper hinge support. 6. 5. Remove the HF generator and power coupler by removing their attachment screws. Open the cover slightly wider and continue to lift up until hinge stop is clear of hinge pin. 1. Disconnect power to luminaire and allow to cool completely. 2. Cover Installation: NOTE: Power coupler is attached with M4 metric screws. Do not mix hardware. 1. With cover open, position cover so that the hook is lying on the open end of the hinge pins. 6. Perform cleaning and inspection as noted in the MAINTENANCE section. 2. Slide cover down until the hinge stop contacts the hinge support on the housing. 7. Install the new power coupler and HF generator using existing screws/bolts. To insure proper heat dissipation, make sure the power coupler and HF generator are seated flat against their corresponding mounting surface of the luminaire and tighten screws to 20 in.-lbs. The new QL Lighting System must be the identical type, size, voltage, and wattage as marked on the luminaire nameplate. 3. Close the cover slightly and slide the cover onto the hinge pins. 4. Route the power coupler cable and the cover ground connection through the wire clamp in the housing. 5. Reconnect the power coupler cable to HF generator and the ground wire connection. Tighten the wire clamp. 6. Test the wire routing by closing the cover and observing the flexing of the wires. If the wires are being pinched by the cover, loosen and rotate the wire clamp in the housing. 8. Install the lamp over the power coupler (See QL Lighting System instruction sheet). 9. Replace the lamp heat sink in the cover, tightening mounting screws to 20 in.-lbs. 10. Close cover and securely tighten the 2 cover screws. For proper gasket seal, torque the screws to 30 in.-lbs. (3.4 N·m). CAUTION To avoid shortened lamp life, power coupler failure, wiring faults, or HF generator failure install lamp onto power coupler firmly and completely following instructions supplied with the replacement QL Lighting System. To avoid injury, guard against lamp breakage. IF 1453 • 01/04 Copyright © 2004, Cooper Industries, Inc. Page 3 MAINTENANCE • • Perform visual, electrical, and mechanical inspections on a regular basis. The environment and frequency of use should determine this. However, it is recommended that checks be made at least once a year. We recommend an Electrical Preventive Maintenance Program as described in the National Fire Protection Association Bulletin NFPA No. 70B: Recommended Practice For Electrical Equipment Maintenance (www.nfpa.org). The refractor should be cleaned periodically to insure continued lighting performance. To clean, wipe the refractor with a clean, damp cloth. If this is not sufficient, use a mild soap or a liquid cleaner such as Collinite NCF or Duco #7. Do not use an abrasive, strong alkaline, or acid cleaner. Damage may result. • Visually check for undue heating evidenced by discoloration of wires or other components, damaged parts, or leakage evidenced by water or corrosion in the interior. Replace all worn, damaged, or malfunctioning components and clean gasket seals before putting the luminaire back into service. • Electrically check to make sure that all connections are clean and tight. • Mechanically check that all parts are properly assembled. ADDITIONAL MAINTENANCE FOR LUMINAIRES WITH A TEST PORT When required, a test port is provided in the luminaire housing. This test port is to be used for checking that the restricted breathing properties of the luminaire are retained. The restricted breathing properties can be verified in accordance with the tests in IEC 60079-15. This opening must be closed with a plug during operation. The restricted breathing properties should be checked only when the surrounding atmosphere is known to be non-hazardous. REPLACEMENT PARTS CPMVIG Series Champ-Pak luminaires are designed to provide years of reliable performance. However, should the need for replacement parts arise, they are available through your authorized Cooper Crouse-Hinds Distributor. Assistance may also be obtained through your local Cooper Crouse-Hinds representative or the Cooper Crouse-Hinds Sales/Service Department, P.O. Box 4999, Syracuse, New York, 13221, Phone 315 477-7000. WIRING DIAGRAMS All statements, technical information and recommendations contained herein are based on information and tests we believe to be reliable. The accuracy or completeness thereof are not guaranteed. In accordance with Crouse-Hinds "Terms and Conditions of Sale", and since conditions of use are outside our control, the purchaser should determine the suitability of the product for his intended use and assumes all risk and liability whatsoever in connection therewith. Cooper Industries Inc. Crouse-Hinds Division PO Box 4999, Syracuse, New York 13221 • U.S.A. Copyright© 2004, Cooper Industries, Inc. IF 1453 Revision 2 Revised 01/04 Supercedes 11/02
