Technical Note 10406
Effective September 2015
XLM Energy Storage Module
XLM 62V Energy Storage Module
Introduction
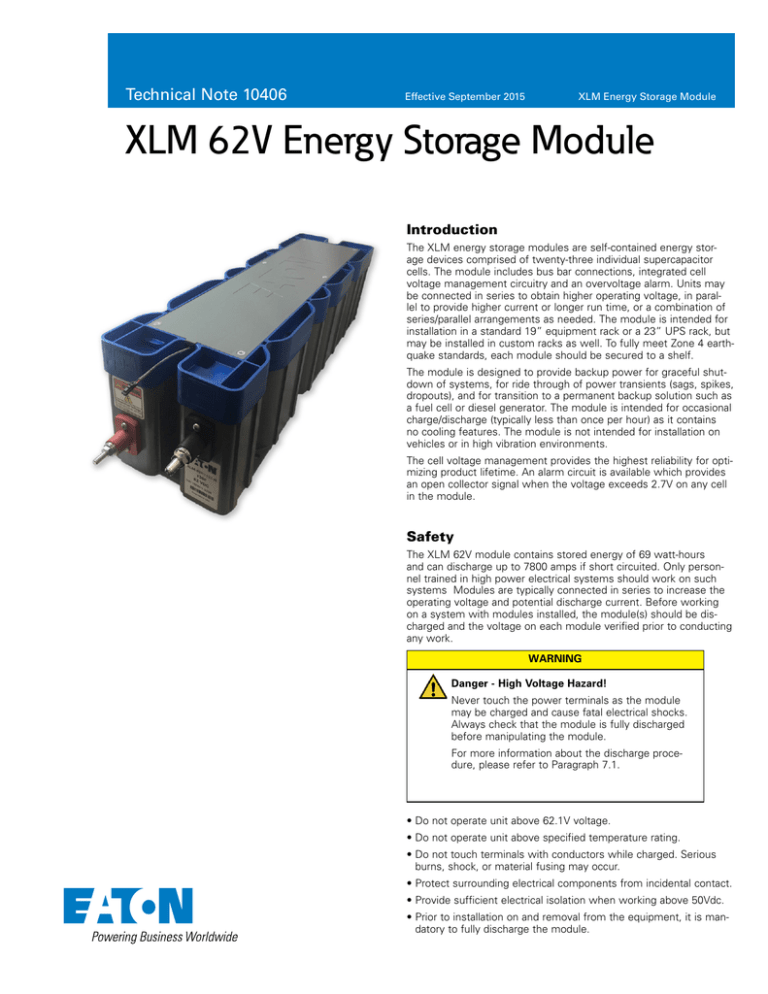
The XLM energy storage modules are self-contained energy storage devices comprised of twenty-three individual supercapacitor
cells. The module includes bus bar connections, integrated cell
voltage management circuitry and an overvoltage alarm. Units may
be connected in series to obtain higher operating voltage, in parallel to provide higher current or longer run time, or a combination of
series/parallel arrangements as needed. The module is intended for
installation in a standard 19” equipment rack or a 23” UPS rack, but
may be installed in custom racks as well. To fully meet Zone 4 earthquake standards, each module should be secured to a shelf.
The module is designed to provide backup power for graceful shutdown of systems, for ride through of power transients (sags, spikes,
dropouts), and for transition to a permanent backup solution such as
a fuel cell or diesel generator. The module is intended for occasional
charge/discharge (typically less than once per hour) as it contains
no cooling features. The module is not intended for installation on
vehicles or in high vibration environments.
The cell voltage management provides the highest reliability for optimizing product lifetime. An alarm circuit is available which provides
an open collector signal when the voltage exceeds 2.7V on any cell
in the module.
Safety
The XLM 62V module contains stored energy of 69 watt-hours
and can discharge up to 7800 amps if short circuited. Only personnel trained in high power electrical systems should work on such
systems Modules are typically connected in series to increase the
operating voltage and potential discharge current. Before working
on a system with modules installed, the module(s) should be discharged and the voltage on each module verified prior to conducting
any work.
WARNING
Danger - High Voltage Hazard!
Never touch the power terminals as the module
may be charged and cause fatal electrical shocks.
Always check that the module is fully discharged
before manipulating the module.
For more information about the discharge procedure, please refer to Paragraph 7.1.
• Do not operate unit above 62.1V voltage.
• Do not operate unit above specified temperature rating.
•D
o not touch terminals with conductors while charged. Serious
burns, shock, or material fusing may occur.
• Protect surrounding electrical components from incidental contact.
• Provide sufficient electrical isolation when working above 50Vdc.
•P
rior to installation on and removal from the equipment, it is mandatory to fully discharge the module.
XLM 62V Energy Storage Module
Technical Note 10406
Effective September 2015
Theory of Operation
Supercapacitors function on electrostatic principles with no chemical
reactions and no moving parts. They avoid the lifetime issues associated with chemical storage of batteries or mechanical issues associated with fly wheels. The XLM modules are non-toxic and designed
for years of maintenance-free operation.
Due to the very low equivalent series resistance (ESR) of the supercapacitors, minimal heat is generated during operation. However, as
supercapacitors can handle very high currents, a significant heat rise
can occur if the discharges and re-charging is frequent (duty cycle
>1.5%) and above 50A continuous current.
Supercapacitors are intended as energy storage with a DC discharge. The module should not be used for AC charging or discharging. Discharges may be constant current or constant power.
Example discharges are shown in Figure 1a and 1b. The voltage of
the module drops linearly under a constant current discharge.
Most systems require multiple modules connected in series to reach
higher operating voltages. The XLM module can be series connected
for operation up to 850V when using the overvoltage signal, 1500V
when overvoltage signal is not used.
1000
900
50
800
700
600
500
40
30
400
300
200
20
10
100
0.07
0
5
10
Discharge Time (seconds)
Voltage
15
Discharge Current
60
600
50
500
40
400
30
300
20
200
10
100
0
5
10
Discharge Time (seconds)
Voltage
15
Discharge Current (Amps)
Module Terminal Voltage (Volts)
Figure 1a.Example voltage and current discharge curves for 10kW
discharge from one module with 56V float voltage.
0
0
Discharge Current
Figure 1b.Example voltage and current discharge curves for 500A
discharge from one module with 56V float voltage.
2
The active balance circuit monitors the voltage of the two connected
cells relative to the voltage of the buss bar on the opposite side as a
reference. When the voltage difference between two cells exceeds
23mV, the balancing circuit will discharge the higher voltage cell until
the voltage differential is within specification. The balancing current
(and hence time to balance the voltage) depends upon the voltage
differences of adjacent cells (Figure 2).
EATON www.eaton.com
Balancing Current (Amps)
0
Discharge Current (Amps)
Module Terminal Voltage (Volts)
60
Due to manufacturing variations in capacitance and leakage current,
cells in a module can differ in voltage. This voltage difference affects
the capacitance and equivalent series resistance over time and
results in a shortening of the life of the system.
0.06
0.05
0.04
0.03
0.02
0.01
0.00
0.00
0.10
0.20
0.30
0.40
0.50
Cell Voltage difference (Volts)
Figure 2. Balancing current versus cell volage differential.
XLM 62V Energy Storage Module
Technical Note 10406
Effective September 2015
Installation
Unpacking
Inspect the shipping carton for signs of damage prior to unpacking
the module. Damage to the shipping carton or module should be
reported to the carrier immediately.
The 62V UPS Energy Module has eight M6 mounting holes. Four of
these holes are shown in Figure 3. Refer to Figure 4 for the location
of all mounting holes.
Remove the module from the shipping carton and retain the shipping materials until the unit has been inspected and is determined to
be operational.
NOTE: The original shipping materials are approved for both air and
ground shipment. The module should be removed from the shipping carton by lifting it by the body of the module.
If the unit is found to be defective or any parts are missing, contact
your local sales representative. A Return Material Authorization
(RMA) number must be issued prior to returning the unit for repair
or replacement.
Mechanical
Modules are intended for installation horizontally as shown in Figure
5. The module should be mounted on a shelf. The modules should
further be secured to the rack using the front or side mounting
holes. See the data sheet for available mounting locations.
Figure 4. Dimensional drawing of module, all dimensions in mm.
Figure 3. View of side and front mounting holes. Corresponding holes on the
opposite sides of the module for a total of eight (8) mounting points
Figure 5. Nine series connected modules mounted in a 24” rack.
EATON www.eaton.com
3
XLM 62V Energy Storage Module
Technical Note 10406
Effective September 2015
Electrical
WARNING
Caution
To avoid arcing and sparking the energy storage
module should be in a discharged state and the
system power disconnected during installation.
The module is shipped discharged and with
a shorting wire. The shorting wire should be
removed prior to electrical connection.
Caution
To provide the lowest possible ESR the energy storage modules
are not fused. Care should be taken within the application to prevent
excessive current flow as required. Excessive current and/or duty cycle
will result in overheating the module which will cause irreparable damage. Please consult the data sheet at www.eaton.com/elx-datasheets
for current and duty cycle capabilities.
Figure 6. S
eries connected modules (horizontal or vertical). In this example, the system
would provide 30KW for 15 seconds at 168V.
Output Terminal Posts
The output terminals of the module consist of threaded, tin-plated
brass posts. They are designed to connect directly to a ring lug or
a bus bar. The positive terminal is a 5/16”-18 threaded stud and
the negative terminal is a 3/8”-16 threaded stud. Securing nuts are
included.
The maximum stack height of lugs/bus bars/lock washers is 0.6” /
15mm. When applying torque to the terminals, it is recommended
to use a maximum torque of 10 N-m / 7.3 ft-lbs with an absolute
maximum torque of 15 N-m / 11.1 ft-lbs. Applying torque above 15
N-m / 11.1 ft-lbs may result in damage to the terminals.
Attachment to the output terminals should be made with ring lugs
or bus bars of an appropriate size for the application current. The
energy storage modules have low ESR. As a result, the resistance of
the cable connecting the energy storage module to the load can easily exceed the ESR of the module.
Connection of modules in series or parallel or combination thereof
Figure 7. Parallel connected modules (horizontal or vertical). In this example, the system
should utilize the same gauge wire (or equivalent bus bar) as deterwould provide 30KW for 15 seconds at 56V.
mined for final output connections. When connecting in series,
connect the positive output terminal of one module to the negative
output terminal of the next module (as shown in Figure 6 and Figure
8). For parallel connections, connect positive terminals together and
negative terminals together (as shown in Figure 7 and Figure 8). The
maximum operating voltage of a series connected system should
not exceed 850V when using the overvoltage signal, 1500V when
overvoltage signal is not used.
Figure 8. 3
Series x 2 Parallel connect modules. In this example, the system would
provide 60KW for 15 seconds at 168V. Parallel cables (dashed lines) connecting modules in the middle are optional.
Voltage Balancing
The modules are equipped with active voltage management circuitry
that balances the voltage between cells. The voltage management
functions over hours to minimize the voltage differential between
cells. The voltage management circuitry contains a passive balance
resistor for module to module balancing.
4
EATON www.eaton.com
XLM 62V Energy Storage Module
Technical Note 10406
Effective September 2015
Thermal Performance
Overvoltage Signal
Low internal resistance of the energy storage modules enables low
heat generation within the modules during use. As with any electronic component, the cooler the part operates the longer the service life. In most applications natural air convection should provide
adequate cooling. In severe applications requiring maximum service
life, forced airflow may be required.
An electrically isolated open collector logic output is made available
for alarm interface. If a supercapacitor cell is charged above 2.95V,
a signal will be triggered at alarm connector J1 present on module.
Connector J1 is Molex® part number 50-57-9402
The thermal resistance, Rth, of the units has been experimentally
determined assuming free convection at ambient (~ 25 oC). The Rth
value provided on the data sheet is useful for determining the operating limits for the units. Using the Rth value a module temperature
rise can be determined based upon any current and duty cycle. The
temperature rise can be expressed by the following equation.
When several modules are connected in series, parallel or seriesparallel combination, alarm logic output signal can be monitored individually or wired to form a single fault signal.
Below table shows pin out indication of connector J1, and maximum
current allowed. 5.0 Vdc can be the maximum open circuit voltage
across connector provided.
1
GND
1K
2
GND
LED (optional)
where:
I = RMS current (amps)
Figure 9. Overvoltage signal recommended circuit.
Pin #
Signal name
Rth = thermal resistance (oC/W)
1
GND
This ∆T plus ambient should remain below the specified maximum
operating temperature for the module (please refer to the module
datasheet).
2
Overvoltage
Resr = DC equivalent series resistance (ohms)
Output
High-not active
Low-active
Maximum
current
20mA
NOTE:
Operation
1.Overvoltage pin i.e. Pin 2 goes active (closes the circuit to ground)
if any cell inside module exceeds overvoltage limit of 2.7V
General
2.Since Pin 2 (overvoltage signal) is an open collector transistor
output, pull-up resistor (~1K) connected to a 5V supply should be
connected to Pin 2. Typical connections are shown below
The module should only be operated within specified voltage and
temperature ratings. Determine whether current limiting is necessary on input/output based on current ratings of ancillary devices.
Observe polarity indicated on module. Reverse polarity operation of
the module(s) is not recommended.
Electric isolation of the module is tested to 3500 Vdc for maximum
operating voltage of 850V when using the overvoltage signal, 1500V
when overvoltage signal is not used.
When several modules are connected in series for operating at
higher voltage, care must be taken to ensure proper creepage and
clearance distances in compliance with national safety standards for
electrical equipment.
3.When a simple pull up circuit is built around Pin 2, Pin 2 will
remain ~5V when there is no overvoltage which indicates normal
operating condition. When the cell goes into over-voltage condition, Pin 2 goes low. This alarming signal can be used to signal
system electronics to abort charging of module and to permit
overcharged cells to appropriately discharge down to set limits,
through a built-in active balancer
4.Internal overvoltage circuit can sink up to 20mA with an output
signal low voltage of no more than 0.7V. When there is no over
voltage signal, maximum leakage current through pull up resistor
is 100nA. Based on the overall electronic system, proper value of
the pull-up resistor should be selected
Discharge Procedure
Proceed as follow to discharge the module:
1.Using a voltmeter, measure the voltage between the 2 terminals.
2.If the module voltage is above 1V, a resistor pack (not supplied)
will need to be connected between the terminals. Proper care
needs to be taken in the design and construction of such a dissipative pack. e.g. At 56V, for a 2 Ohm pack, the module will be
discharged with a peak current of 28A and will take about 15
minutes to discharge. However, in this case, the heat/power dissipated in the resistor pack will be ~ 3.9kW. The resistor pack will
need to be sized and provided with suitable cooling to handle this
power dissipation. Additionally, proper enclosure or other packaging is necessary to ensure safety. In all cases, proper design of
the dissipative resistor pack is necessary.
3.If the voltage is under 1V, connect the shorting wire (minimum
18 AWG) to the + and – connectors. Due to the extremely low
module ESR, there may be a spark and warming of the wire when
first connecting the shorting wire.
Molex® is a registered trademark of Molex Incorporated
4.The module is now safe for handling. However, leave the shorting
wire connected at all times until the module is installed in the system and the power cables are connected.
EATON www.eaton.com
5
XLM 62V Energy Storage Module
Technical Note 10406
Effective September 2015
Maintenance
Prior to removal from the system, cable removal, or any other handling ensure that the energy storage module is completely discharged
in a safe manner. The stored energy and the voltage levels may be
lethal if mishandling occurs. Maintenance should only be conducted
by trained personnel on discharged modules.
Clean exterior surface of dirt/grime
• Reason - Improve power dissipation performance.
•U
se a cleaning cloth dampened with a water/soap solution.
Do not use high-pressure sprays or immersion
• Frequency - Annually
Check mounting fasteners for proper torque
• Reason - Avoid mechanical damage
• Frequency - Annually
Inspect housing for signs of damage
• Reason - Allows potential internal damage to be identified
• Frequency - Annually
Check signal/ground connections
• Reason - Avoid false signals or shock hazards
• Frequency - Annually
Storage
The discharged module can be stored in the original package in a dry
place. Discharge a used module prior to stock or shipment. A wire
across the terminals should be used to maintain short circuit after
having discharged the module.
Disposal
Do not dispose of module in the trash. Dispose of according to local
regulations for industrial waste. The disposal method should be
compatible with acetonitrile.
Specifications
Refer to datasheets at www.eaton.com/elx-datasheets
for specifications.
Eaton
Electronics Division
1000 Eaton Boulevard
Cleveland, OH 44122
United States
www.eaton.com/elx
© 2015 Eaton
All Rights Reserved
Printed in USA
Publication No. 10406 – BU-MC15020
September 2015
Eaton is a registered trademark.
All other trademarks are property
of their respective owners.


