3.032 Problem Set 2 Solutions
advertisement
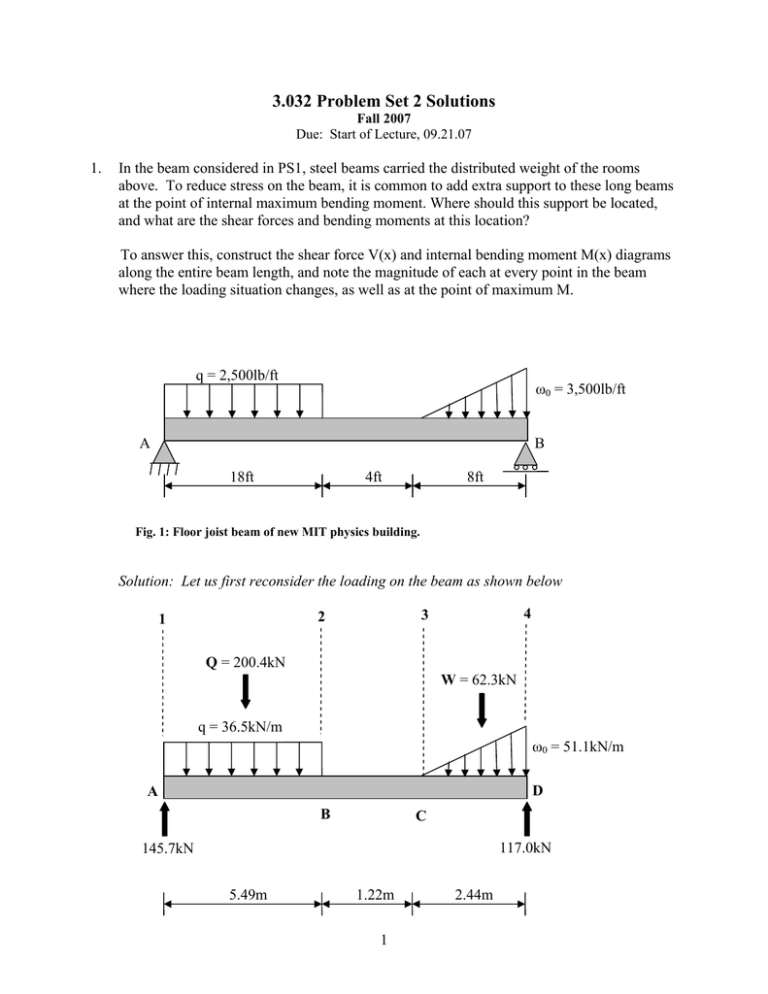
3.032 Problem Set 2 Solutions Fall 2007 Due: Start of Lecture, 09.21.07 1. In the beam considered in PS1, steel beams carried the distributed weight of the rooms above. To reduce stress on the beam, it is common to add extra support to these long beams at the point of internal maximum bending moment. Where should this support be located, and what are the shear forces and bending moments at this location? To answer this, construct the shear force V(x) and internal bending moment M(x) diagrams along the entire beam length, and note the magnitude of each at every point in the beam where the loading situation changes, as well as at the point of maximum M. q = 2,500lb/ft ω0 = 3,500lb/ft A B 18ft 4ft 8ft Fig. 1: Floor joist beam of new MIT physics building. Solution: Let us first reconsider the loading on the beam as shown below 4 3 2 1 Q = 200.4kN W = 62.3kN q = 36.5kN/m ω0 = 51.1kN/m D A B C 117.0kN 145.7kN 5.49m 1.22m 1 2.44m Shear Diagram: The shear at any point is determined by dividing the beam into two parts and considering either part as a free body. For example, directly to the right of line 2, we obtain the shear between B and C 200.4kN M V 145.7kN ∑F y = 0 :145.7 − 200.4 −V = 0 V = −54.7kN Using the same method we also find that the shear is 145.7kN directly to the right of A and 117.0kN directly to the left of D To find the slopes between these points we recall the following relationship dV = −ω dx Since the area under the load curve is zero between B and C, the shear will be constant. Thus, dV/dx=0 and the shear diagram between these points will be a horizontal line. Between A and B, the slope dV/dx = -ω under the uniformly distributed load is constant. Thus, the shear diagram between these two points is a straight line Between C and D, the loading increases linearly (in the downward direction), and the shear diagram will be parabolic with a negative curvature. 2 V (kN) 3 2 1 4 145.7kN (+291.4) A E C B (-66.7) (-40.8) -54.7kN D x (-133.5) (-50.7) -117.0kN Bending-Moment Diagram: The bending moment diagram can be determined by taking the area under the shear curve as M = ∫ Vdx We first note that at both A and D, the bending moment is zero so we know the two endpoints on our bending moment diagram. Next, we need to find the maximum bending moment where the shear force is equal to zero. Let’s call this point E (as noted on the shear diagram). To find this point we write the following VE −VA = − qx (where VE=0) 0 −145.7 = −36.5x x = 4.0m Therefore, the bending-moment diagram obtains a maximum at a point E that is located 4.0m to the right of A. 3 Now, we take the area under each section of the shear curve (values are noted on shear diagram in parenthesis) Between A and E: This is the area of a triangle A= 1 1 bh = (4)(145.7) = 291.4kN − m 2 2 Between E and B: This is the area of a triangle A= 1 1 bh = (5.49 − 4)( −54.7) = −40.8kN − m 2 2 Between B and C: This is the area of a rectangle A = bh = (1.22)(−54.7) = −66.7 kN − m Between C and D: This area consists of two shapes: a rectangle and a parabolic spandrel. The area of the rectangle is given by A = bh = (2.44)( −54.7) = −133.5kN − m The area of a parabolic spandrel is given by A= ah (2.44)( −117.0 − ( −54.7)) = = −50.7 kN − m 3 3 So, the total area between C and D is equal to -184.2kN-m Now, we can calculate the bending moment at each point MA =0 (no bending moment at point A) ME - MA = 291.4kN-m MB - ME = -40.8kN-m MC -MB = -66.7kN-m MD -MC = -184.2kN-m ME =+291.4kN-m MB =+250.6kN-m MC =+183.9kN-m MD = -0.3kN-m ≈ 0kN-m given rounding errors) Since we know that MD should be zero, we see our calculations are correct. Finally, we note in the shear diagram that segments AE and ED are linear, and so those two segments will have a parabolic shape in the bending moment diagram. Segment BC in the shear diagram is a horizontal line, and so it becomes a linear segment in the bending­ 4 moment diagram. Lastly, the parabolic segment CD in the shear diagram becomes a cubic curve in the bending-moment diagram. M (kN-m) 291.4kN-m 250.6kN-m 183.9kN-m x A E B C D Location of Beam Supports: The extra beam support will be added at the point of maximum bending moment, which we found to be 4.0m to the right of point A (labeled point E). This is where the shear force was equal to zero. The magnitude of the bending moment at this location is 291.4kN-m. 2. At a seminar at MIT last week, Prof. Ilya Zharov (Univ. of Utah, Department of Chemistry) showed that his group could create self-assembled colloidal films, which are basically a few planes of close-packed silica (SiO2) spheres. He proposed these as a potential new of fuel cell membrane, because he can coat the nanoscale pores between the silica spheres with sulfonated molecules and selectively allow proton exchange through the nanopores. This sounds exciting, but someone quickly pointed out this is basically a very thin, porous sheet of glass: as a free-standing film, it might fail mechanically under its own weight or under the loads due to proton flux. Prof. Zharov said he had no idea how strong these colloidal films were, but thought engineers would figure it out for him. He thought that laying strips of the films onto a metal grid (like a window screen) would keep the stresses low enough by supporting the film at several points along its length. Let us see if he is correct in this guess, treating a strip of the film as a beam and assuming it deforms elastically up to the point of fracture. 5 Images removed due to copyright restrictions. Please see Fig. 1 in ____________________________ http://www.chem.utah.edu/directory/faculty/zharov.html Figure 2. SEM images of the chemically-modified colloidal film prepared from 440 nm diameter silica spheres (A) top view;the geometric projection of a pore observed from the (111) plane is outlined in the inset. (B) Side view. (C) A scheme of its permselective behavior. From http://www.chem.utah.edu/directory/faculty/ zharov.html. Langmuir (2007, in revision). (a) We will first test the force required to break these films, using two different loading configurations: three-point bending (Fig. 3a) and uniaxial tension (Fig. 3b). In both tests, we use identical samples which are 100 µm in length and have rectangular cross-sections of 20 µm width and 2 µm thickness. Draw the expected tensile stress along the beam length σ(x) in each case. Assume all stresses remain within the elastic regime. (It may be useful to construct shear and bending moment diagrams.) P A B L/2 P L P/2 P/2 L P Figure 3. Experimental and schematic loading conditions for (A) Three-point bending; and (B) uniaxial tension. 6 Solution: In the 3-point bend test, we can model the film as a beam in bending. Thus, we can relate the normal stress, σx, to the bending moment and geometry of the beam section σx = − My I where M is the bending moment in a section of the beam, I is the moment of inertia of the cross-section with respect to a centroidal axis perpendicular to the plane of the couple, and y is the distance from the neutral axis. From this equation, we see that the distribution of normal stresses in a given section only depends on the bending moment of that section and the geometry of the section. Consideration of the FBD and shear force diagram for this situation (not shown here) would lead to a bending-moment diagram which looks like this M (N-m) P L PL × = 2 2 4 L/2 x Notice the bending moment is symmetric about the center point of the beam (or film in this case) and reaches a maximum value of PL/4 N-m at the midpoint. Since the stress distribution is directly proportional to the bending moment, we would expect a similar stress distribution for the beam. The negative sign in the equation shows us that the tensile (or positive) stresses will be along the bottom of the film where y is negative making σ positive. L/2 x σ (MPa) 7 For the tensile specimen, there are no bending moments because there are only tensile forces acting along the entire beam perpendicular to the cross-section. The stress is constant and is calculated as σ= F A where F is the force or load (same as ‘P’) acting on the specimen and A is the crosssectional area. Therefore, the stress distribution for the specimen would look like this σ (MPa) L x (b) We measure that these test samples catastrophically fail (i.e., transition from elastic deformation to fracture, without any prior plastic deformation or yielding) at an average load of 75.0 µN for the 3-pt. bend tests and at a load of 3.4 mN for the tensile tests. Determine the stress at which the colloidal films failed in both cases; this is called the flexural strength and tensile strength, respectively. Solution: Since there is no plastic deformation, we can use the elastic flexure formula to calculate the maximum tensile stress in the beam, which is synonymous to calculating the flexural strength σm = Mc I 8 where all of the variables have the same meaning as defined in part (a), and c is the maximum value of distance y. As seen from part (a) the maximum stress occurs at the midpoint of the specimen. Also, we know that the geometry of the specimen is a rectangle. Therefore, we can calculate the stress as follows bh3 I= 12 h c= 2 PL M = 4 3PL 3(75 ×10−6 )(100 ×10 −6 ) σm = σF = = = 140.6MPa 2bh 2 2(20 ×10 −6 )(2 ×10⁻⁶ ) 2 Note: For brittle materials such as BaTiO3, the flexural strength as calculated from a 3­ point bend test is often called the modulus of rupture (MOR). However, the test only proves flex strength data, and does not provide any information on the stiffness (or Young’s elastic modulus) of the material. The tensile stress is simply calculated as follows F (3.4 ×10⁻³ ) = 85.0MPa σT = = A (20 ×10−6 )(2 ×10⁻⁶ ) (c) In this case, the colloidal film is brittle: when the film fails, it fails at the nanopore defects as the spheres break free from one another. The mechanical strength of brittle materials depends strongly on the existence and density of defects in highly stressed regions of the material. Considering the stress distributions determined in (a), explain any differences in the flexural and tensile strength properties of the colloidal films calculated in (b). Solution: In 3-point bend tests, the area of uniform stress is small and the maximum stress is concentrated under the center loading point, as shown in part (a). However, in a tensile test, the maximum stress is experienced across the entire cross section of the tensile bar. Thus, there is a lower probability of finding a defect in the peak stress zone for the 3-point bend specimens than in the tensile specimens. As a result, the flexural strength (or MOR) of the ceramic films are typically higher than the corresponding tensile strength values, as seen in part (b). 9 (d) For this new proton-exchange membrane application, Zharov wants to “simply support” these beams of colloidal film by laying on a copper transmission electron microscopy (TEM) grid. The standard grid holes are 3 mm x 3 mm. He estimates the distributed load on the colloidal film due to proton flux to be 10 mN/mm. Considering this new loading condition and the flexural/tensile strengths we determined experimentally, will the colloidal film fail under this application? If so, how would you redesign the film and/or support to enable this fuel cell application? Solution: Here we will model the film as a supported beam under a distributed load. Below is a free-body diagram of the above situation: q = 10mN/mm A B RA 3mm RB Analyzing this FBD, we can calculate that RA=RB=(qL/2)=15mN Now that we know the reaction forces at A and B we can figure out what the shear force and bending-moment diagrams will be. T Shear Diagram: We can first observe that the shear stresses at points A and point B will be +15mN and -15mN, respectively. Between A and B, there is a uniformly distributed load which means that the shear force will decrease linearly from point A to point B. Taking any point along the beam between A and B we can calculate the equation of this line ∑F y = 0 :15 −10 x −V = 0 V = −10x +15 where x represents the distance from point A (x=0). 10 V (mN) 15mN A C x (mm) 1.5mm -15mN B We see that the shear force reaches zero exactly at the midpoint t(labeled ‘C’) across the beam. Thus, we expect that the maximum bending point will also be at the midpoint of the beam. Since we know that there is no bending moment at point A (MA=0), we can simply take the area under the shear curve between point A and point C to find out the value of the maximum bending moment. M C − M A = M C − 0 = 1/ 2(1.5 ×10 −3 )(15 ×10 −3 ) = 1.125 ×10 −5 N − m M C = 1.125 ×10 −5 N − m Knowing the maximum bending moment, we can now calculate the maximum stress in the beam Mc (1.125 ×10 −5 )(1× 10 −6 ) = = 845.9GPa σm = I (1.33 ×10 −23 ) This stress is much larger than either the flexural strength or the tensile strength of the film (about 3 orders of magnitude larger!), so the film will fail under this application. To solve this problem, either additional supports can be placed along the film (i.e. make the Cu grid holes smaller) so that the maximum bending moment (and thus maximum stress) is reduced to a value below the strength of the film. Or, the geometric design of the films can be changed to increase the film’s moment of inertia (or resistance to bending). This can be 11 most effectively done by making the films thicker (I ∝ h3), but it can also be done by making them wider (I ∝ b). 3. Solid polymer pressure-sensitive adhesives (PSA) are used for electronic component-to-heat sink attach to minimize interfacial thermal resistance, typically comprising polyacrylates filled with conductive ceramic particles These thermally conductive adhesives are applied between the interfaces of the electronic component and the heat sink (Fig. 4). The polymer becomes highly adhesive under elastic deformation, due to application of this uniform pressure between the electronic component and heat sink. Images removed due to copyright restrictions. Please see Fig. 1 in Eveloy, Valerie, et al. "Reliability of Pressure-Sensitive Adhesive Tapes for Heat Sink Attachment in Air-Cooled Electronic Assemblies." IEEE Transactions on Device and Materials Reliability 4 (December 2004): 650-657. Figure 4: Illustration of PSA application to component-heat sink attachment (adapted from Eveloy et al. IEEE Transactions on Device and Materials Reliability, 4 (2004) 650­ 657). Let us treat this PSA tape as an elastic continuum of Poisson’s ratio ν = 0.45. A press applies1000 N to the electronic package to compress the adhesive tape (Figure 5). The initial gap distance between the package and the heat sink is 0.35 mm. 12 z 100mm Figure 5: Schematic of component-to-heat sink joining procedure using pressure-sensitive adhesive tape. 1000 N x electronic Package 0.35mm 0.15mm adhesive x x HEAT SINK solid support (a) If the electronic package is 100 mm wide x 20 mm deep (into page), what is the applied stress? Solution: The applied stress is calculated as follows σ applied = F 1000 = = 0.5MPa A (100 ×10−3 )(20 ×10−3 ) (b) Derive the relationship between true strain and engineering strain: εt = ln (εe+1). Is there a significant difference in these strain values for the normal strain resulting from compression of the PSA from a thickness of 0.35 mm to 0.15 mm? 13 Solution: ε eng = lf l0 l f − l0 l0 = l f l0 −1 = ε eng +1 l ε true = ln( f ) l0 ε true = ln(ε eng +1) To examine the differences between the engineering and true strain, we can calculate the engineering and true strains as follows: ε eng = t f − t0 t0 = 0.15 − 0.35 = −0.57 0.35 ε true = ln(ε eng +1) = ln(−0.57 + 1) = −0.84 Thus, there is a significant difference between the engineering and true strain values (εtrue is almost 50% greater than εeng). This is typical for highly elastic materials, such as polymers, which can undergo large elastic deformations. . (c) To fit this PSA-joined device into the larger circuit, a final joint thickness of 0.15 mm is required (Figure 5). To ensure a reliable joint, the polymeric adhesive must deform laterally under the applied pressure to completely fill the joint (a change in length equal to 2x in Fig. 7). Given these two requirements, what is the minimum initial length of PSA tape that we need to ensure complete interfacial contact between the adhesive and electronic package after pressing? Use engineering strain calculations and idealize the PSA tape as an elastic continuum. Solution: We are given the Poisson’s ratio for the adhesive material (ν = 0.45) and we know the displacement of the adhesive material in the z-direction. With this information, we can calculate what the resulting strain of the material in the x-direction will be. First, we calculate the strain of the material in the z-direction: 14 εz = t f − t0 t0 = 0.15 − 0.35 = −0.57 0.35 where tf amd t0 represent the final and initial joint thickness, respectively. Using the Poisson’s ratio for the adhesive material, we can now determine the resulting strain in the x-direction εx εz ε x = −νε z = −(0.45)(−0.57) = 0.26 ν =− Finally, we know that the final length of the adhesive must be 100 mm in order to completely cover the surface of the package. Therefore, we can determine what the minimum initial length of the PSA tape must be in order for the adhesive to attain a final length of 100 mm εx = l f − l0 l0 = 100 − l0 = 0.26 l0 l0 = 79.4mm 4. Strain gages are designed only to measure normal (tensile or compressive) strains, but the engineering state of strain of the material plane is defined by εxx, εyy and γxy. Strain gage rosettes as you used in Lab 1 are one solution to this problem, because γxy can be calculated from experimentally measured εxx, εyy and ε(45o). Considering the axes transformation equations of strain, determine this relation. Solution: We have seen from stress transformation equations that the state of stress for a given coordinate system can be written as σ = σx +σ y 2 + σ x −σ y 2 15 cos(2θ ) + τ xy sin(2θ ) Since both stress and strain are symmetric, second-order tensors we can convert the above relationship for stress into strain by using the following conversions σx, σy, σz Æ εx, εy, εz and τxy, τyz, τzx Æ (γxy/2), (γyz/2), (γzx/2) Using these conversions we get a the strain transformation relationship εθ = εx +εy 2 + εx −εy 2 cos(2θ ) + Substituting θ=45° gives ε 45 = εx + εy + γ xy 2 2 ∴ γ xy = 2ε 45 − ε x − ε y 16 γ xy 2 sin(2θ )
