Density of NaCl Solutions: Lab Experiment & Standard Curve
advertisement
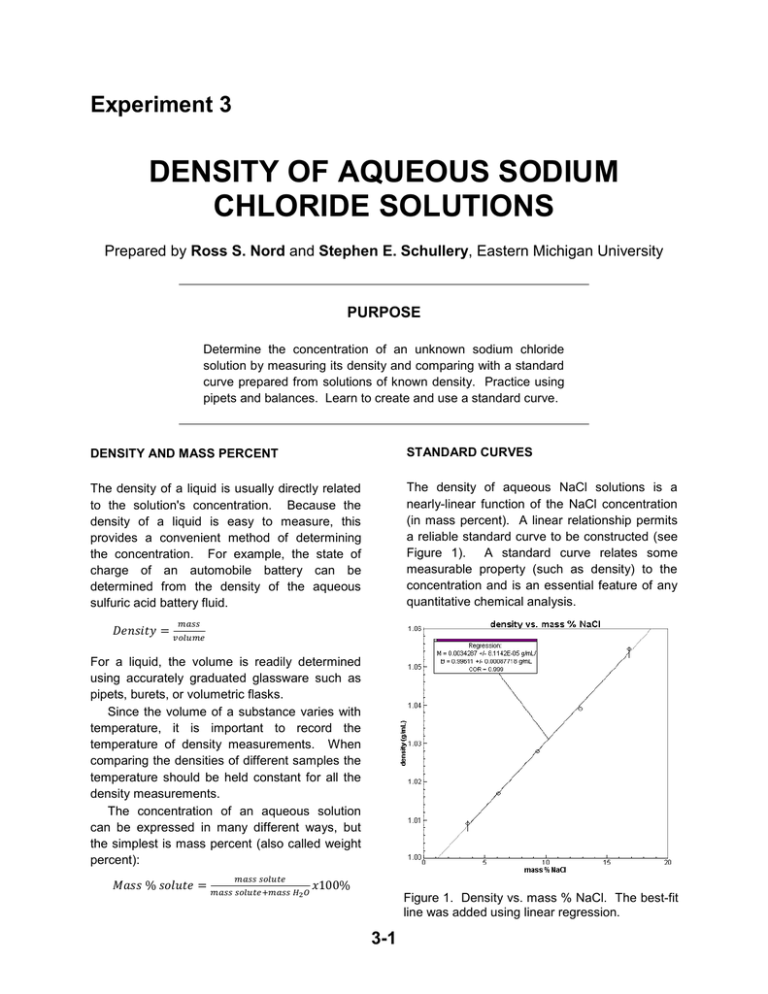
Experiment 3 DENSITY OF AQUEOUS SODIUM CHLORIDE SOLUTIONS Prepared by Ross S. Nord and Stephen E. Schullery, Eastern Michigan University PURPOSE Determine the concentration of an unknown sodium chloride solution by measuring its density and comparing with a standard curve prepared from solutions of known density. Practice using pipets and balances. Learn to create and use a standard curve. DENSITY AND MASS PERCENT STANDARD CURVES The density of a liquid is usually directly related to the solution's concentration. Because the density of a liquid is easy to measure, this provides a convenient method of determining the concentration. For example, the state of charge of an automobile battery can be determined from the density of the aqueous sulfuric acid battery fluid. The density of aqueous NaCl solutions is a nearly-linear function of the NaCl concentration (in mass percent). A linear relationship permits a reliable standard curve to be constructed (see Figure 1). A standard curve relates some measurable property (such as density) to the concentration and is an essential feature of any quantitative chemical analysis. 𝐷𝑒𝑛𝑠𝑖𝑡𝑦 = 𝑚𝑎𝑠𝑠 𝑣𝑜𝑙𝑢𝑚𝑒 For a liquid, the volume is readily determined using accurately graduated glassware such as pipets, burets, or volumetric flasks. Since the volume of a substance varies with temperature, it is important to record the temperature of density measurements. When comparing the densities of different samples the temperature should be held constant for all the density measurements. The concentration of an aqueous solution can be expressed in many different ways, but the simplest is mass percent (also called weight percent): 𝑀𝑎𝑠𝑠 % 𝑠𝑜𝑙𝑢𝑡𝑒 = 𝑚𝑎𝑠𝑠 𝑠𝑜𝑙𝑢𝑡𝑒 𝑚𝑎𝑠𝑠 𝑠𝑜𝑙𝑢𝑡𝑒+𝑚𝑎𝑠𝑠 𝐻2 𝑂 𝑥100% Figure 1. Density vs. mass % NaCl. The best-fit line was added using linear regression. 3-1 Experiment 3 – Density of Aqueous Solutions Usually there is enough random scatter among the data points so that they do not all fall exactly on a line. The best-fit line should go through as many points as possible while having an equal number of the remaining points scattered on either side of it. Generally, this is achieved using Linear Regression Analysis to calculate the equation of the best-fitting line. We will use the computer program LOGGER PRO to plot density vs. mass percent and perform linear regression analysis on it. fits your five density (y) vs. mass % (x) data pairs. Insert your unknown’s density for y and the best-fit values for m and b into y = mx + b and solve for the unknown’s mass percent x. IN THIS EXPERIMENT Five standard solutions of known mass percent will be prepared and their densities determined. Data will be entered into the LOGGER PRO (or GRAPHICAL ANALYSIS) computer program, and converted into mass percent and density. A standard curve will be constructed by plotting the density vs. mass % and the best-fit line will be determined via linear regression. The density of an unknown solution will be measured and its mass % will be determined from the best-fit line. DETERMINING THE UNKNOWN’S MASS % You can use the linear regression option of LOGGER PRO to calculate the slope, m, and yintercept, b, for the linear equation which best PRE-LABORATORY PREPARATION 1. Read the techniques, procedure and data analysis sections of the experiment. 2. Complete the computer-generated PRELAB assignment. Refer to the procedure and data analysis sections of the experiment as needed. The prelab questions for this experiment exactly replicate the questions in the data analysis section. EXPERIMENTAL SECTION WASTE DISPOSAL (zero) the balance, and then use a spatula to add solid NaCl to the flask. The mass of solid does not need to be exactly the mass given in the table. But you do need to know exactly how much you measured out, so record the mass to the nearest .001 g. Do not spill any salt on the balance. The NaCl can corrode the balance, ultimately ruining it. CLEAN UP any salt that you spill. Additionally, salt spilled on the balance pan will affect the weight and change your results (for the worse). For these reasons it is generally considered to be a bad idea to add any chemicals to a flask while it is sitting on a balance. It is better to remove the flask, add the chemicals, and replace the flask on the balance. This will not affect the taring done earlier. All of the chemicals used in this experiment may be safely disposed of by washing down the sink. PROCEDURE Unless instructed otherwise, you should work in groups of two or three to reduce the time spent waiting for access to a balance or a computer. PREPARING THE STANDARD CURVE 1. Weigh out the mass of NaCl for solution number 1 (given in Table I – see next page). Place a clean, dry, 50-mL (or 100 mL) beaker or 50-mL Erlenmeyer flask on a balance, tare 3-2 Experiment 3 – Density of Aqueous Solutions Table 1. Approximate Masses of NaCl to use. Solution Number 1 2 3 4 5 water) should have a mass somewhere between 10 and 12 g. Furthermore, solutions with larger mass percents of NaCl should have larger densities. Mass of NaCl (g) 6 4.5 3 2 1 6. Repeat the above steps for standard solutions 2-5. For each solution, weigh out a mass of NaCl close to the amount in Table 1. MEASURING THE UNKNOWN’S DENSITY 2. Tare the balance again (while the flask containing the salt is still on the balance). Remove the flask from the balance. Then add approximately 30 mL of distilled water to the flask and weigh it. Use a graduated cylinder to roughly measure the amount of liquid. Again, record the mass to the nearest .001 g. Each person must do his/her own unknown. 7. Give the laboratory assistant a clean, dry 50 or 100 mL beaker for your unknown solution. Record your unknown number on your data sheet. 3. Thoroughly mix the solution by swirling or stirring with a glass stirring rod until all of the solid has dissolved. 8. Measure the temperature of the unknown. o If necessary, adjust it to be the same (1 C) as the temperature of the standard solutions measured earlier. 4. Measure and record the temperature of the solution (to the nearest 0.1C). All five standard solutions must have the same temperature ( 1C). The temperature of a solution can be adjusted by holding the flask under hot or cold running water (being careful not to splash any water into the flask). Whenever reading calibrated glassware, always try to estimate one decimal place beyond the closest calibration marks. Since the thermometers are marked every degree, they should be read to the nearest 0.1C. 9. Measure the mass of a 10.00 mL aliquot of the unknown using the procedure described in step 5 above. Since your grade heavily depends upon the accuracy with which you determine the density of the unknown, you may want to repeat this measurement several times and then use the average value when calculating the density. CLEAN UP ANY CHEMICAL OR LIQUID SPILLED IN THE BALANCE AREA. Instructors have been known to deduct points from a group’s score (or even the entire class) if the balance area is not kept clean. Cleanliness is part of lab safety and that is EVERYBODY’S responsibility. 5. Measure the mass of a 10.00 mL aliquot (sample) of the standard solution. Rinse a 10 mL pipet with a small quantity of the solution to be measured. Tare an empty 50 or 100 mL beaker and then remove the beaker from the balance. Use the pipet to add a 10.00 mL aliquot of the standard solution to the beaker. Place the beaker back on the balance and record the mass of the solution. The mass of each aliquot (10 mL of salt RINSE YOUR GLASSWARE WITH DISTILLED WATER AND DRY IT BEFORE RETURNING IT TO THE DRAWER. 3-3 Experiment 3 – Density of Aqueous Solutions Name Station Used Partner Instructor/Day/Time Partner Station Checked & Approved DATA SHEET Record measured and calculated values with correct units and the appropriate number of significant figures. Each student should record their unknown data on their own half of the page below. Standard Solutions: Solution Number Mass NaCl Mass H2O 1 2 3 4 5 Unknowns: Name Unknown Number Temperature of Unknown (after any adjustment) Mass of 10.00 mL of Unknown: Aliquot 1 Aliquot 2 Aliquot 3 3-4 Temperature Mass of 10.00 mL Experiment 3 – Density of Aqueous Solutions DATA ANALYSIS Your instructor may either require one report per student, or one report per group of students. If this is not announced, ask. In either case, each student must analyze his/her own unknown. All calculations should be clearly organized, make proper use of significant figures, and include the units. 1. Enter your data in Logger Pro and calculate a column containing the mass % NaCl in each standard solution, as follows: (a) Enter the masses of NaCl and water used in preparing the standard solutions in the X and Y columns, respectively. The column headings should be changed (double click on the column heading) to identify the data in the columns. Title the columns mass NaCl and mass H2O (with units of g for both). (b) Now create a new column for the calculated mass %. To accomplish this, first select Data New Calculated Column from the menus. For the new column name enter mass %; leave the unit box empty. Given the definition of mass % (see the background section), the formula should be exactly entered (including quotation marks and parentheses) as ”mass NaCl”/(“mass NaCl”+”mass H2O”)*100 Note: The exact column headings you entered in step (a) must be used when you enter the above formula. Column headings must be inside quotation marks when entering a formula. It is faster (and it will help avoid typographical errors) if you insert the column headings into the formula by selecting them from the list displayed by clicking on the Variables (Columns) box instead of typing them directly. Click on Done after the formula has been entered. Show a sample calculation of mass % NaCl for Solution Number 1 below: 2. Create a data column containing the density of each of the five standard solutions. Choose Data New Manual Column from the menus. Enter an appropriate heading (density) and units (g/mL) for this new column and click Done. Since a 10-mL pipet was used, the calculation of the density from the measured mass and volume (10.00 mL) can easily be done by hand. Enter these five values into the new column. PRINT OUT YOUR COMPLETED DATA TABLE to turn in with your report. To do this: choose the File option from the menu at the top of the page. Then select Print Data Table. Finally, click OK. 3. Generate your standard curve and best-fit line. (a) Change the graph axes so that density is on the y-axis and mass % is on the x-axis (by clicking on each axis label and selecting the appropriate column). (b) Make sure the graph is scaled properly. If not, click on the autoscale icon (shows an A with axes on two sides). (c) Add a title (density vs. mass %). (d) Perform linear regression (by clicking on the linear regression icon, R=). Record the slope and intercept below. (e) Print out a copy of the graph to turn in. [Consult the directions in the Introduction to “PRELAB” and “LOGGER PRO” handout, if help is needed.] Slope _________________________ 3-5 y-intercept _________________________ Experiment 3 – Density of Aqueous Solutions ANALYSIS OF THE UNKNOWN Each member of the group must turn in their own individual page with the analysis of their individual unknown. (If the group turns in a single report, staple all of these pages to that report.) 4. Calculate the (average) density of your unknown solution. (a) Show your density calculation below. (b) Record your density in the summary table at the bottom of the page: 5. Calculate the concentration (mass %) of your unknown using its density and the slope and yintercept determined above. (a) Show your calculation below. (b) Check your calculation: on the printed graph, draw a horizontal line from the unknown’s density on the y-axis to the best-fit line and then a vertical line from this point to the x-axis. If the value you read off the x-axis differs from your calculated value, there must be a mistake that you need to fix. (c) Record your result in the summary table below. Summary of Results: Unknown Number Density of Unknown Mass % of Unknown Name 3-6
