Research Journal of Applied Sciences, Engineering and Technology 7(23): 4910-4916,... ISSN: 2040-7459; e-ISSN: 2040-7467
advertisement

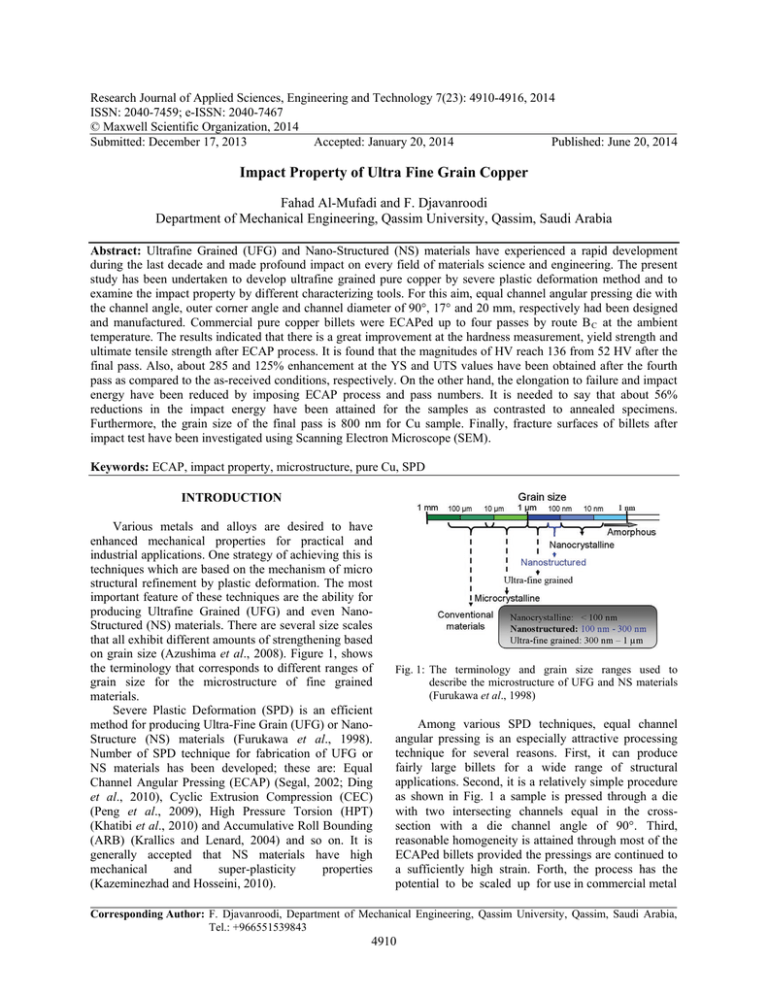
Research Journal of Applied Sciences, Engineering and Technology 7(23): 4910-4916, 2014 ISSN: 2040-7459; e-ISSN: 2040-7467 © Maxwell Scientific Organization, 2014 Submitted: December 17, 2013 Accepted: January 20, 2014 Published: June 20, 2014 Impact Property of Ultra Fine Grain Copper Fahad Al-Mufadi and F. Djavanroodi Department of Mechanical Engineering, Qassim University, Qassim, Saudi Arabia Abstract: Ultrafine Grained (UFG) and Nano-Structured (NS) materials have experienced a rapid development during the last decade and made profound impact on every field of materials science and engineering. The present study has been undertaken to develop ultrafine grained pure copper by severe plastic deformation method and to examine the impact property by different characterizing tools. For this aim, equal channel angular pressing die with the channel angle, outer corner angle and channel diameter of 90°, 17° and 20 mm, respectively had been designed and manufactured. Commercial pure copper billets were ECAPed up to four passes by route B C at the ambient temperature. The results indicated that there is a great improvement at the hardness measurement, yield strength and ultimate tensile strength after ECAP process. It is found that the magnitudes of HV reach 136 from 52 HV after the final pass. Also, about 285 and 125% enhancement at the YS and UTS values have been obtained after the fourth pass as compared to the as-received conditions, respectively. On the other hand, the elongation to failure and impact energy have been reduced by imposing ECAP process and pass numbers. It is needed to say that about 56% reductions in the impact energy have been attained for the samples as contrasted to annealed specimens. Furthermore, the grain size of the final pass is 800 nm for Cu sample. Finally, fracture surfaces of billets after impact test have been investigated using Scanning Electron Microscope (SEM). Keywords: ECAP, impact property, microstructure, pure Cu, SPD INTRODUCTION Various metals and alloys are desired to have enhanced mechanical properties for practical and industrial applications. One strategy of achieving this is techniques which are based on the mechanism of micro structural refinement by plastic deformation. The most important feature of these techniques are the ability for producing Ultrafine Grained (UFG) and even NanoStructured (NS) materials. There are several size scales that all exhibit different amounts of strengthening based on grain size (Azushima et al., 2008). Figure 1, shows the terminology that corresponds to different ranges of grain size for the microstructure of fine grained materials. Severe Plastic Deformation (SPD) is an efficient method for producing Ultra-Fine Grain (UFG) or NanoStructure (NS) materials (Furukawa et al., 1998). Number of SPD technique for fabrication of UFG or NS materials has been developed; these are: Equal Channel Angular Pressing (ECAP) (Segal, 2002; Ding et al., 2010), Cyclic Extrusion Compression (CEC) (Peng et al., 2009), High Pressure Torsion (HPT) (Khatibi et al., 2010) and Accumulative Roll Bounding (ARB) (Krallics and Lenard, 2004) and so on. It is generally accepted that NS materials have high mechanical and super-plasticity properties (Kazeminezhad and Hosseini, 2010). Fig. 1: The terminology and grain size ranges used to describe the microstructure of UFG and NS materials (Furukawa et al., 1998) Among various SPD techniques, equal channel angular pressing is an especially attractive processing technique for several reasons. First, it can produce fairly large billets for a wide range of structural applications. Second, it is a relatively simple procedure as shown in Fig. 1 a sample is pressed through a die with two intersecting channels equal in the crosssection with a die channel angle of 90°. Third, reasonable homogeneity is attained through most of the ECAPed billets provided the pressings are continued to a sufficiently high strain. Forth, the process has the potential to be scaled up for use in commercial metal Corresponding Author: F. Djavanroodi, Department of Mechanical Engineering, Qassim University, Qassim, Saudi Arabia, Tel.: +966551539843 4910 Res. J. App. Sci. Eng. Technol., 7(23): 4910-4916, 2014 Fig. 2: ECAP die set-up used in this study processing procedures (Zebardast and Karimi Taheri, 2011; Djavanroodi et al., 2010; Djavanroodi and Ebrahimi, 2010; Djavanroodi et al., 2013a; Ebrahimi et al., 2013; Djavanroodi et al., 2013b). There are four fundamental routes in the ECAP process as is shown in Fig. 2. These are: route A; the sample is repetitively pressed without any rotation, route B A ; the sample is rotated by 90° in alternative direction between each pass, route B C ; the sample is rotated in the same sense by 90° and route C; the sample is rotated by 180° between each pass (Stolyarov et al., 2001). These routes create different slip systems during the pressing operation so that various microstructure and mechanical properties can be achieved (Xu et al., 2006; Tong et al., 2008). In this research, ECAP die with the channel angle of 90°, outer corner angle of 17° and channel diameter of 20 mm has been designed and manufactured. Then, commercial pure copper have been pressed up to four passes by route B C . Afterwards, the effect of severe plastic deformation by equal channel angular pressing method has been investigated on the microstructure and mechanical properties of deformed samples. Optical Microscopy (OM) and Scanning Electron Microscopy (SEM) have been utilized to examine micro-structural observations and also, hardness measurement, tensile strength and impact test have been applied to evaluate mechanical properties of ECAPed specimens. METHODOLOGY ECAP die set up was designed and manufactured from three steel blocks assembled according to the drawing shown in Fig. 3 where also, a photo of the die can be seen. The die angles are: Ψ = 17° and Ф = 90°. The die material is H13 tool steel heat treated to Hardness Rockwell C (HRC) of about 45. The ECAP operation caused flashing along the longitudinal axis of the billet. The flash was removed using a lath machine. Water coolant was used to reduce the heat induced during, because the temperature may cause the changes in the microstructure of the specimen. Four passes of ECAP process were done using route B C to achieve roughly homogeneous structure. The Copper billets were prepared from extruded rod. After cutting, 30 billets possessing circular cross-sections with the nominal dimensions of 20×140 mm were ready to be pressed. Table 1 shows the different parameters of the Fig. 3: Four fundamental processing routes during ECAP process (Segal, 2002) Table 1: Conditions of ECAP process Lubricant Ram speed (V) ECAPed temperature Die channel angle Outer corner angle Channel diameter Route MoS 2 2 mm/sec Room temperature (25±2°C) 90° 17° 20 mm BC ECAP deformation. Prior to operation, the pressing tool components and billets were lubricated in order to minimize friction during process. The copper billets were easily ECAPed at room temperature, because of the excellent ductility of materials with a punch speed of about 2 mm/sec. Metallography and micro-structural procedure: Commercial pure copper before and after ECAP process at each pass were prepared for microstructure analyses using Optical and Scanning Electron Microscopy (OM and SEM). Specimens were successively hand-ground with silicon carbide papers of 320, 600, 800 and 1200 Grit, respectively. All specimens were also mechanically polished using 3 and 1 μm diamond paste on a billard cloth for 3 min at each step. Chemical etching is used according to ASM handbook, volume 2: Metallography and microstructures. The samples were dipped into etchant for 20 to 40 sec at room temperature using a solution of distilled water and ammonium per sulfate ((NH 4 ) 2 S 2 O 8 . Optical microscopy with the maximum magnification of 1500 for optical analysis and scanning electron microscope, Hitachi SU3400, were used to observe the grain size before and after four passes ECAP. Mechanical testing procedure: Micro-hardness was measured in the samples before and after ECAP process using the Vickers scale. Vickers micro-Hardness (HV) measurements were conducted using a Buehler Micromet II micro-hardness tester on the transverse, flow and the longitudinal planes. A load of 500 g and a dwell time of 15 sec were used. Different samples were ground at 600 and 800 grits and followed by a rough polishing using a 3 µm diamond paste. Tensile specimens were prepared with nominal dimensions of 100×12 mm in the gage section as can be seen in 4911 Res. J. App. Sci. Eng. Technol., 7(23): 4910-4916, 2014 S = F/A 0 (2) σ = S (1+e) (3) ε = Ln (1+e) (4) where, A and A 0 are, respectively the instantaneous and initial cross-sections of the tension specimens. These relationships are valid only up to σ UTS where necking occurs. Charpy impact tests were performed according to ASTM E23. The samples dimensions were 55×10×2 mm; see Fig. 4. The long axis of the impact sample is parallel to the pressing direction. A 45° groove was machined on the longitudinal plane in the middle of the sample with a depth of 2 mm and a radius of 0.25 mm at the root. The tests were performed on an impact tester with maximum impact energy of 450J and an accuracy of ±1J, See Fig. 6. Each impact experiment was also repeated on three subsequent samples. In addition, SEM observation was employed to examine the fracture surfaces of the samples after impact test. Fig. 4: Tensile and impact test specimens RESULTS AND DISCUSSION The ultimate aim of the present study is to improve the mechanical properties of commercial pure copper. For this reason, ultrafine grained Cu was fabricated using a technique known as equal channel angular pressing process. Subsequently, micro-structure and mechanical tests have been carried out and the obtained results have been investigated here one by one. Fig. 5: Commercial pure copper sample during tensile test Microstructure evaluations: Optical Microscopy (OM) examinations: Figure 7 shows the OM images of the pure Cu samples before ECAP process. As can be observed, there are homogeneous structures before pressing operation. The grain size is about 3 μm. Fig. 6: Impact test machine using in this study Fig. 4. The annealed and deformed samples were cut using a wire Electrical Discharge Machining. Two tensile tests were conducted for each ECAP passes and the average values were taken for discussions. Tension test was performed at room temperature using servohydraulic MTS testing machine Fig. 5. True stress σ and true strain (ε) are calculated from their corresponding engineering strain (e) and engineering stress S values according to the following equations: σ = F/A (1) Scanning Electron Microscopy (SEM) examinations: Grain structure of ECAPed billets was observed by the Scanning Electron Microscopy (SEM) analysis. Grain size measurements show that the magnitudes of average grain size are about 800 nm after the final pass. Therefore, it is found that approximate 96% decreasing for the final pass at the grain size have been obtained as compared to the un-ECAPed condition (Fig. 8). The microstructure evolution of the ECAP materials is intensively studied and different concepts were developed. It has already been accepted that for the ultrafine grained materials, the main element of the deformation microstructure is the Grain Boundary (GB). Previous studies (Furuno et al., 2004; Sitdikov et al., 2008; Hoseini et al., 2010; Kim et al., 2008) give a more elaborated model for the grain refinement 4912 Res. J. App. Sci. Eng. Technol., 7(23): 4910-4916, 2014 Fig. 7: Optical microscopy of commercial pure copper before ECAP process Fig. 8: Scanning electron microscopy of commercial pure copper after four passes of ECAP 160 140 120 HV 100 80 60 during process. It seems that a gradual conversion of the Incidental Dislocation Boundaries (IDBs) into High Angle Grain Boundaries (HAGBs) takes place when the grain size refinement occurs. It is considered that the micro-structural features defined as Geometrical Necessary Boundaries (GNBs) which are glide induced lattice rotations associated with the HAGBs and IDBs associated with Low Angle GBs (LAGBs) have a separate role in the deformation strengthening of the material. It is believed that LAGBs can cause dislocation strengthening while HAGBs will contribute to GB strengthening. Mechanical properties: Hardness evaluations: The variations of average Vickers micro Hardness (HV) versus the number of ECAP passes up to 4 using route BC have been listed in Table 2. As can be observed, the HV magnitudes of pure Cu are 52 HV before ECAP process. Applying severe plastic deformation technique known as equal channel angular pressing on the as-received billets leads to significant improvements at the HV values. It is found that about 162% enhancements after the fourth pass have been achieved for Cu specimens as compared to the annealed condition. It can be seen that there is a sharp increase in hardness values after the first pass for the sample; see Fig. 9. In addition, it can be said that the increase in hardness magnitude diminishes with the number of passes. These increases at the HV magnitudes by imposing ECAP process after the first pass are considered to be caused by the formation of the ultrafine grained structure and increase in the dislocation density as mentioned above. Furthermore, HV values of the specimen have been slightly increased by adding pass number due to the saturation of the strengthening. 40 20 0 0 1 2 Pass number 3 4 Fig. 9: Hardness measurements versus ECAP pass number for Cu billets Table 2: HV magnitudes of commercial pure copper before and after ECAP process up to four passes by route B C Pass number --------------------------------------------------------------Material 0 1 2 3 4 Pure Cu 53 111 117 127 138 Table 3: Mechanical properties of commercial pure copper samples before and after ECAP process up to four passes Pass number --------------------------------------------------------------Material Property Pass 0 Pass 1 Pass 2 Pass 3 Pass 4 Cu σyp (MPa) 112 292 351 399 428 σUTS (MPa) 216 397 418 453 483 El (%) 28 19 18 18 17 Tensile evaluations: Tensile tests were carried out at room temperature on the samples before and after ECAP process up to four passes in a direction parallel to the pressing one. Generally, it can be found that the as-received samples have a more ductile behavior when compared with ECAP processed samples and the strengths of the samples are observed to be increased with ECAP process. Table 3 lists the yield strength, ultimate tensile strength and elongation to failure of commercial pure aluminum and copper before and after ECAP operations up to four passes by route BC. Yield strength of the as-received pure copper sample is increased by about 162% from 111 to 291 MPa in the first ECAP process and increased by about 285% to 427 MPa after the fourth pass as seen in Table 3. It can be seen that the both yield and ultimate strengths remain constant at the third and fourth passes. Ultimate tensile strengths show similar behaviors with yield strength but have lower increasing rates. As can be calculated, about (154 and 125%) increments have been achieved after 4913 Res. J. App. Sci. Eng. Technol., 7(23): 4910-4916, 2014 Fig. 10: Trend of yield strength, ultimate tensile strength and elongation to failure changes during ECAP process of commercial pure copper 70 Impact energy (J) 60 50 40 30 20 10 0 0 1 2 Pass number 3 4 Fig. 11: Impact energy of commercial pure Cu before and after ECAP process up to four passes the first and fourth passes as compared to the annealed condition. Finally, it can be concluded that these results are consistent with HV test results in terms of the changes in mechanical behaviors. Similar to hardness results, the reason of this behavior is caused from the decrease in the grain size due to the formation of the ultrafine grained structure and increase in the Fig. 12: Fracture surfaces of commercial pure copper before and after ECAP process as a function of pass numbers dislocation density. These results are also consistent with literature results (Furuno et al., 2004; Sitdikov et al., 2008; Hoseini et al., 2010; Kim et al., 2008). Ductility of the metals is known to be decreased with plastic deformation but ductility of severely deformed materials decreases much less when compared with conventional materials. Results obtained by this study shows that the ductility values of the samples are decreased by imposing ECAP passes with inversely proportional by strength values. As can be seen, the decrease in elongation is very large after the first pass; however, there is not much difference in elongation with further ECAP operation; Fig. 10. This indicates a pronounced loss of formability after the first pass of ECAP process. Impact evaluations: For impact testing, samples were cut from longitudinal (pressing) direction. The in-plane specimen dimensions are 10×55 mm with a 2 mm deep, 45° V notch having a 0.25 mm tip radius at the center of the specimen which is prepared according to the ASTM E23. Figure 11 shows the impact energy as a function of the number of ECAP passes. It is observed that the impact energy of the annealed samples Fig. 13: Fracture surfaces of commercial pure copper before and after ECAP process 4914 Res. J. App. Sci. Eng. Technol., 7(23): 4910-4916, 2014 decreases by adding pass numbers. Impact energy of starting bulk annealed sample is about 65J. The first pass is about 49J which is 25% less than the annealed condition. After four passes, the impact energy is 28.5J which is 56% less than that of the un-ECAPed state. The fracture surfaces the samples before and after four pass ECAP process have been shown in Fig. 12. The decrease in the impact energy upon ECAP process for both pure Al and Cu materials is related to the microstructure of the as-received and micro-structural changes during process. Figure 13 shows the fracture surfaces of the samples after impact testing using scanning electron microscopy. The as-received samples show a typical ductile fracture with higher plastic deformation consisting of well-developed dimples over the entire surface. In contrast, the fracture surface after fourth pass, indicating that the dimple size is much smaller compared to that observed in the initial materials. The average dimple size of the as-received materials is reduced by imposing ECAP process and then, they gradually decreases again by adding pass numbers due to the grain refinement and work hardening. This is indicative of the decrease in ductility and creation of large number of voids before necking. CONCLUSION In this study, equal channel angular pressing die set-up with the channel angle of 90°, outer corner angle of 17° and channel diameter of 20 mm was designed and manufactured. Then, commercial pure copper had been pressed up to four passes by route BC. Afterwards, micro-structural and mechanical tests had been carried out to investigate the effects of ECAP process on the grain size, tensile properties, hardness measurements and impact energy of specimens. The following conclusions can be drawn. It was observed that the mechanical properties of ECAPed samples were enhanced in terms of Vickers micro-hardness, yield strength and UTS due to the formation of the ultrafine grained structure and increasing of the dislocation density. The HV records showed that hardness value have been increased by about 161%, after the fourth ECAP passes as compared to the annealed state. In addition, about 285% enhancements in yield strength have been achieved after the final pass compared with the as-received conditions. Also, it is found that despite these huge increases in the yield strength, ultimate tensile strength has lower increase than the un-ECAPed specimens. There is about 125% increasing at the UTS value is obtained. Furthermore, it was observed that the highest increase at the mechanical properties is occurred after the first ECAP process. On the other hand, the impact test results indicated that the impact energy decreased by adding pass number. About 56% reductions at the impact energy value have been obtained by imposing four passes of ECAP process as compared to the annealed condition. Finally, images of samples by optical microscopy and scanning electron microscopy showed that the grain size of the as-received samples up to four ECAP passes decreases about 96%, although the grain structure could not be distinguished so clearly. ACKNOWLEDGMENT This research with the project number of 1895 is funded by the Qassim University. The financial support is greatly acknowledged. We thank Yousef Saleh AlOiairey, Head of Mechanical Technology Department at Buraidah College of Technology, for allowing us to use their laboratories. Thanks go to Yousef Ebrahim Al-Matrock for his assistance in Impact testing. REFERENCES Azushima, A., R. Kopp, A. Korhonen, D.Y. Yang, F. Micari, G.D. Lahoti, P. Groche, J. Yanagimoto, N. Tsuji, A. Rosochowski and A. Yanagida, 2008. Severe Plastic Deformation (SPD) processes for metals. CIRP Ann-Manuf. Techn., 57: 716-735. Ding, R., C. Chung, Y. Chiu and P. Lyon, 2010. Mat. Sci. Eng. A-Struct., 527: 3777-3784. Djavanroodi, F. and M. Ebrahimi, 2010. Effect of die parameters and material properties in ECAP with parallel channels. Mater. Sci. Eng., 527: 7593-7599. Djavanroodi, F., M. Ebrahimi, B. Rajabifar and S. Akramizadeh, 2010. Fatigue design factors for ECAPed materials. Mater. Sci. Eng., 528: 745-750. Djavanroodi, F., H. Ahmadian, K. Kohkan and R. Naseri, 2013a. Ultrasonic assisted-ECAP. Ultrasonics, 53: 1089-1096. Djavanroodi, F., A.A. Zolfaghari, M. Ebrahimi and K.M. Nikbin, 2013b. Equal channel angular pressing of tubular samples. Acta Metall. Sin. Engl. Lett., 26 (5): 574-580. Ebrahimi, M., B. Rajabifar and F. Djavanroodi, 2013. New approaches to optimize strain behavior of Al6082 during equal channel angular pressing. J. Strain Anal. Eng., 48: 395-404. Furukawa, M., Y. Ma, Z. Horita, M. Nemoto, R.Z. Valiev and T.G. Langdon, 1998. Mat. Sci. Eng. A-Struct., 241(1998): 122-128. Furuno, K., H. Akamatsu, K. Oh-Ishi, M. Furukawa, Z. Horita and T.G. Langdon, 2004. Microstructural development in equal-channel angular pressing using a 60 die. Acta Mater., 52: 2497-2507. Hoseini, M., M. Meratian, M.R. Toroghinejad and J.A. Szpunar, 2010. The role of grain orientation in microstructure evolution of pure aluminum processed by equal channel angular pressing. Mater. Charact., 61: 1371-1378. Kazeminezhad, M. and E. Hosseini, 2010. Mater. Design, 31: 94-103. 4915 Res. J. App. Sci. Eng. Technol., 7(23): 4910-4916, 2014 Khatibi, G., J. Horky, B. Weiss and M.J. Zehetbauer, 2010. High cycle fatigue behavior of copper produced by high pressure torsion. Int. J. Fatigue, 32: 269-278. Kim, K.J., D.Y. Yang and J.W. Yoon, 2008. Investigation of microstructure characteristics of commercially pure aluminum during equal channel angular extrusion. Mat. Sci. Eng. A-Struct., 485: 621-626. Krallics, G. and J.G. Lenard, 2004. J. Mater. Process. Tech., 152: 154-161. Peng, T., Q.D. Wang and J.B. Lin, 2009. Microstructure and mechanical properties of Mg10Gd-2Y-0.5Zr alloy recycled by cyclic extrusion compression. Mat. Sci. Eng. A-Struct, 516: 23-30. Segal, V.M., 2002. Severe plastic deformation: simple shear versus pure shear. Mat. Sci. Eng. A, 338: 331-344. Sitdikov, O., T. Sakai, E. Avtokratova, R. Kaibyshev, K. Tsuzaki and Y. Watanabe, 2008. Microstructure behavior of Al-Mg-Sc alloy processed by ECAP at elevated temperature. Acta Mater., 56: 821-834. Stolyarov, V.V., Y.T. Zhu, I.V. Alexandrov, T.C. Lowe and R.Z. Valiev, 2001. Mat. Sci. Eng. A, 299: 59-67. Tong, L.B., M.Y. Zheng, X.S. Hu, K. Wu, S.W. Xu, S. Kamado and Y. Kojima, 2008. Mat. Sci. Eng. A, Doi: 10.1016/j.msea.2010. 03.062. Xu, S., G. Zhao, Y. Luan and Y. Guan, 2006. J. Mater. Process. Tech., 176: 251-259. Zebardast, M. and A. Karimi Taheri, 2011. The cold welding of copper to aluminum using Equal Channel Angular Extrusion (ECAE) process. J. Mater. Process. Tech., 211: 1034-1043. 4916


