Access 2010 Quick Reference Card
advertisement

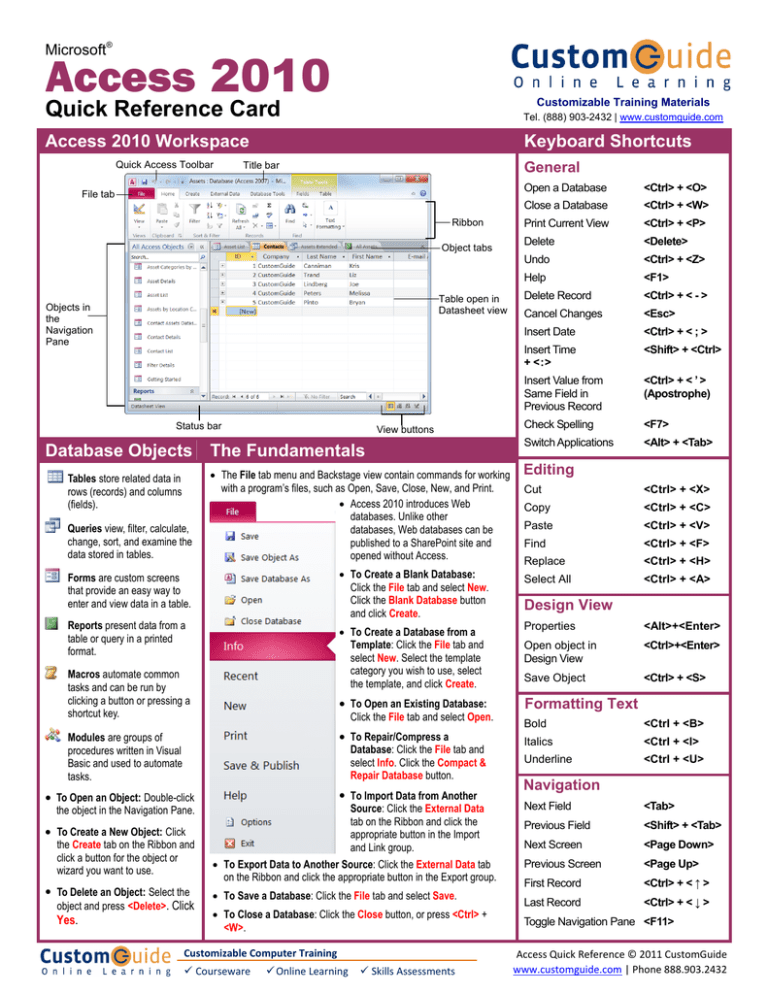
Microsoft® Access 2010 Quick Reference Card Tel. (888) 903-2432 | www.customguide.com Access 2010 Workspace Keyboard Shortcuts Quick Access Toolbar Customizable Training Materials General Title bar File tab Ribbon Object tabs Table open in Datasheet view Objects in the Navigation Pane Status bar View buttons Database Objects The Fundamentals Tables store related data in rows (records) and columns (fields). Queries view, filter, calculate, change, sort, and examine the data stored in tables. • The File tab menu and Backstage view contain commands for working with a program’s files, such as Open, Save, Close, New, and Print. • Access 2010 introduces Web databases. Unlike other databases, Web databases can be published to a SharePoint site and opened without Access. • To Create a Blank Database: Click the File tab and select New. Click the Blank Database button and click Create. Forms are custom screens that provide an easy way to enter and view data in a table. Reports present data from a table or query in a printed format. • To Create a Database from a Template: Click the File tab and select New. Select the template category you wish to use, select the template, and click Create. Macros automate common tasks and can be run by clicking a button or pressing a shortcut key. • To Open an Existing Database: Click the File tab and select Open. • To Repair/Compress a Modules are groups of procedures written in Visual Basic and used to automate tasks. Database: Click the File tab and select Info. Click the Compact & Repair Database button. • To Open an Object: Double-click the object in the Navigation Pane. • To Create a New Object: Click the Create tab on the Ribbon and click a button for the object or wizard you want to use. • To Delete an Object: Select the object and press <Delete>. Click Yes. • To Import Data from Another Source: Click the External Data tab on the Ribbon and click the appropriate button in the Import and Link group. • To Export Data to Another Source: Click the External Data tab on the Ribbon and click the appropriate button in the Export group. • To Save a Database: Click the File tab and select Save. • To Close a Database: Click the Close button, or press <Ctrl> + <W>. Customizable Computer Training 9 Courseware 9 Online Learning 9 Skills Assessments Open a Database <Ctrl> + <O> Close a Database <Ctrl> + <W> Print Current View <Ctrl> + <P> Delete <Delete> Undo <Ctrl> + <Z> Help <F1> Delete Record <Ctrl> + < - > Cancel Changes <Esc> Insert Date <Ctrl> + < ; > Insert Time + <:> <Shift> + <Ctrl> Insert Value from Same Field in Previous Record <Ctrl> + < ’ > (Apostrophe) Check Spelling <F7> Switch Applications <Alt> + <Tab> Editing Cut <Ctrl> + <X> Copy <Ctrl> + <C> Paste <Ctrl> + <V> Find <Ctrl> + <F> Replace <Ctrl> + <H> Select All <Ctrl> + <A> Design View Properties <Alt>+<Enter> Open object in Design View <Ctrl>+<Enter> Save Object <Ctrl> + <S> Formatting Text Bold <Ctrl + <B> Italics <Ctrl + <I> Underline <Ctrl + <U> Navigation Next Field <Tab> Previous Field <Shift> + <Tab> Next Screen <Page Down> Previous Screen <Page Up> First Record <Ctrl> + < ↑ > Last Record <Ctrl> + < ↓ > Toggle Navigation Pane <F11> Access Quick Reference © 2011 CustomGuide www.customguide.com | Phone 888.903.2432 Working with Tables Field Data Types Creating Table Relationships Linking Tables tells Access how two tables are related to each other. The fields that you use to link two tables must contain the same concept in two different tables. A primary key field from one table is often used when linking two tables. 1. Click the Table contextual tab on the Ribbon and click the Relationships button in the Relationships group. 2. If necessary, click the Show Table button in the Relationships group on the Design tab. In the Show Table window, select a table you want to link, click the Add button, and repeat for each table. Click Close. 3. Drag a field from one table and drop it on the related field in the second table. (Optional) Check the Enforce Referential Integrity box. Click Create. Working with Table Data • Database information can be directly added and modified from tables and some queries and forms. • To Add a Field to a Table: Enter data in the cell below the Add New Field column header. Or, click the Fields tab on the Ribbon under Table Tools, and click the button for the field you wish to add in the Add & Delete group. • To Add a New Record: Enter data in the bottom row of the table. Data Type Description Text (Default) Stores text, numbers, or a combination of both, up to 255 characters long. Number Stores numbers that can be used in calculations. Currency Stores numbers and symbols that represent money. Date & Time Stores dates, times, or both. Yes/No Stores only one of two values, such as Yes or No. Lookup & Relationship Stores values from a table, query, or value list. Can be multivalued. Rich Text Stores, text, numbers, or a combination of both that can be formatted using color and font controls. Memo Stores long text entries—up to 64,000 characters long. Attachment Allows you to attach files and images to your database. Hyperlink Stores clickable links to Web pages on the Internet or files on a network. Calculated Field Stores results of a calculation. The calculation must refer to other fields in the same table. Record selector Working with Queries and Reports Start adding a new record here. • To Select a Record: Click the Record selector to the left of the record. • To Delete a Record: Select the record, click the Home tab on the Ribbon, and click the Delete button in the Records group. Click Yes. • To Spell Check: Click the Home tab on the Ribbon and click the Spelling button in the Records group. • To Find Information: Place the cursor in the field that contains the value you want to search for, click the Home tab on the Ribbon, and click the Find button in the Find group. Or, press <Ctrl> + <F>. Type the value you want to search for in the Find What box and click Find Next. • To Replace Information: Place the cursor in the field that contains the value you want to replace, click the Home tab on the Ribbon and click the Replace button in the Find group. Or, press <Ctrl> + <H>. Type the value you want to search for in the Find What box and the new value in the Replace With box. Click Find Next until you’ve found what you’re looking for, then click Replace or Replace All to replace every instance of the value. • To Sort Information: Place the cursor in the field that you want to sort by, click the Home tab on the Ribbon, and click either the Ascending or Descending button in the Sort & Filter group. • To Filter Information: Place the cursor in the field that contains the values you want to filter by, click the Home tab on the Ribbon, and click the Filter button in the Sort & Filter group. Check the boxes for the values you want to filter for. • To Create a Select Query: Click the Create tab on the Ribbon and click the Query Wizard button in the Queries group. Click Simple Query Wizard and click OK. Follow the instructions to select the fields you want to use from the desired tables and create the query. If you want to filter records, view the query in Design view and enter the criteria in the Criteria row. • To Switch Views: Click the Home tab on the Ribbon and click the View button in the Views group. Or, right-click the tab and select the view you want to use in the contextual menu. • To Summarize Values: Open the Query in Datasheet View, click the Home tab on the Ribbon, and click the Totals button in the Records group. Click the list arrow in a column in the Total row in the query select a calculation type (Sum, Average, etc.). Criteria Example Description “London” Displays records where the field equals “London”. Between 1/1/00 and 12/31/00 Displays records where the date is between 1/1/00 and 12/31/00. NOT "USA" or <> "" Displays records where the field does not contain the text "USA" and is not blank. Like “S*” Displays records where the field text starts with an “S”. IS NULL Displays records where the field is blank. IS NOT NULL Displays records where the field is not blank. >100 Displays records whose field value is greater than 100. • To Remove a Filter: Click the Toggle Filter button in the Sort & Filter group. • To Change a Field’s Data Type: Select the field you want to change, click the Fields tab on the Ribbon under Table Tools, and click the Data Type list arrow in the Data Type & Formatting group. Select a data type. • To Create a Report: Click the Create tab on the Ribbon and click the Report Wizard button in the Reports group. Follow the instructions to select the fields you want to use from the desired tables and create the report. Customizable Computer Training 9 Courseware 9 Online Learning 9 Skills Assessments Access Quick Reference © 2011 CustomGuide www.customguide.com | Phone 888.903.2432

