Lecture One - Introduction The .NET Framework
advertisement

Visual Applications
Introduction to the Visual C# Environment
Lecture One
Lecture One - Introduction
The .NET Framework
The Microsoft .NET platform provides all of the tools and technologies that you
need to build distributed Web applications. It exposes a language independent,
consistent programming model across all tiers of an application while providing
seamless interoperability with, and easy migration from, existing technologies. The
.NET platform fully supports the Internet’s platform neutral, standards-based
technologies, including HTTP, Extensible Markup Language (XML), and Simple Object
Access Protocol (SOAP).
C# is a new language specifically designed for building applications in the .NET
environment. As a developer, you will find it useful to understand the rationale and
features that provide the foundation for the .NET platform before you start writing C#
code.
The .NET Framework is based on a new Common Language Runtime. The Common
Language Runtime provides a common set of services for projects built in Microsoft
Visual Studio.NET, regardless of the language. These services provide key building
blocks for applications of any type, across all application tiers.
Microsoft Visual Basic ®, Microsoft Visual C++®, and other Microsoft programming
languages have been enhanced to take advantage of these services. Third-party
languages that are written for the .NET platform also have access to the same
services.
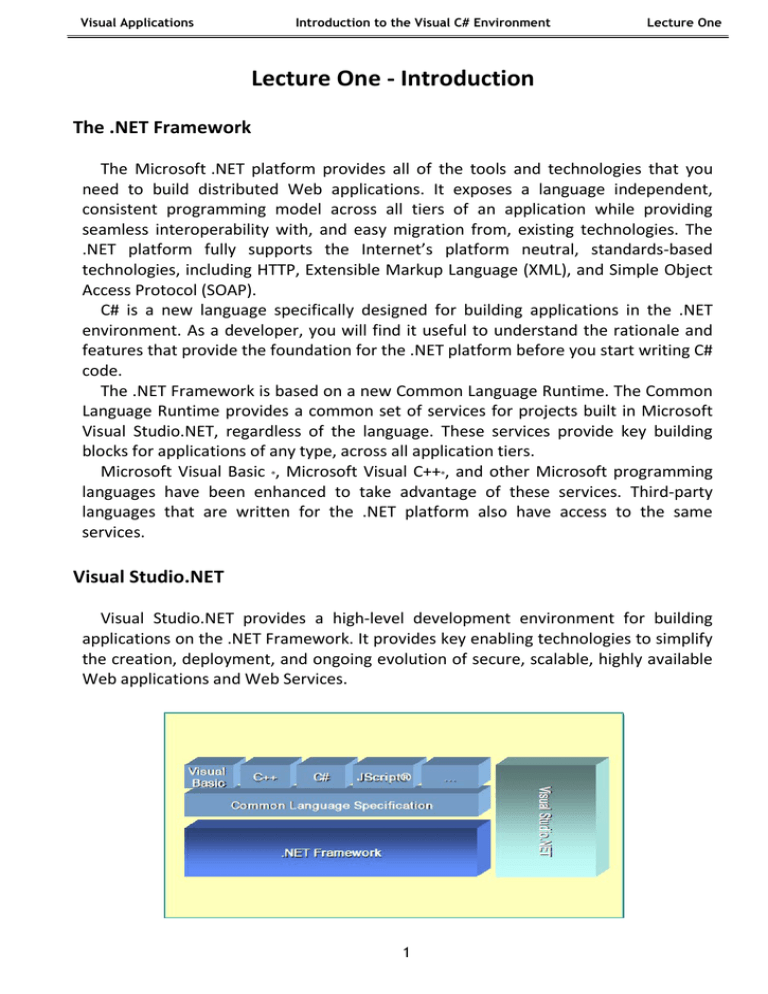
Visual Studio.NET
Visual Studio.NET provides a high-level development environment for building
applications on the .NET Framework. It provides key enabling technologies to simplify
the creation, deployment, and ongoing evolution of secure, scalable, highly available
Web applications and Web Services.
1
Visual Applications
Introduction to the Visual C# Environment
Lecture One
What is Visual C#?
Microsoft Visual C# is Microsoft’s powerful component-oriented language. C# plays
an important role in the architecture of the Microsoft .NET Framework, and some
people have compared it to the role that C played in the development of UNIX. If you
already know a language such as C, C++, or Java, you’ll find the syntax of C#
reassuringly familiar. If you are used to programming in other languages, you should
soon be able to pick up the syntax and feel of C#; you just need to learn to put the
braces and semicolons in the right place.
Visual C# is part of a grand new initiative by Microsoft. It is a complete reengineering of Visual C# for the Microsoft .NET framework. With Visual C#, you are
able to quickly build Windows-based applications (the emphasis in this course), webbased applications and software for other devices.
Windows applications built using Visual C# feature a Graphical User Interface (GUI).
Users interact with a set of visual tools (buttons, text boxes, tool bars, menu items) to
make an application do its required tasks. The applications have a familiar
appearance to the user. As you develop as a Visual C# programmer, you will begin to
look at Windows applications in a different light. You will recognize and understand
how various elements of Word, Excel, Access and other applications work. You will
develop a new vocabulary to describe the elements of Windows applications.
Visual C# Windows applications are event-driven, meaning nothing happens until
an application is called upon to respond to some event (button pressing, menu
selection, ...). Visual C# is governed by an event processor. As mentioned, nothing
happens until an event is detected. Once an event is detected, a corresponding event
method is located and the instructions provided by that method are executed. Those
instructions are the actual code written by the programmer. In Visual C#, that code is
written using the C# programming language. Once an event method is completed,
program control is then returned to the event processor.
Event?
C#
Code
C#
Code
Event processor
C#
Code
2
Event
Methods
Visual Applications
Introduction to the Visual C# Environment
Lecture One
All Windows applications are event-driven. For example, nothing happens in Word
until you click on a button, select a menu option, or type some text. Each of these
actions is an event.
The event-driven nature of applications developed with Visual C# makes it very
easy to work with. As you develop a Visual C# application, event methods can be
built and tested individually, saving development time. And, often event methods are
similar in their coding, allowing re-use (and lots of copy and paste).
A Brief Look at Object-Oriented Programming (OOP)
Visual C# is fully object-oriented. For this particular course, we don’t have to
worry much about just what that means (many sizeable tomes have been written
about OOP). What we need to know is that each application we write will be made
up of objects. Just what is an object? It can be many things: a variable, a font, a
graphics region, a rectangle, a printed document. The key thing to remember is that
these objects represent reusable entities that are used to develop an application.
This ‘reusability’ makes our job much easier as a programmer.
In Visual C#, there are three terms we need to be familiar with in working with
object-oriented programming: Namespace, Class and Object. Objects are what are
used to build our application. We will learn about many objects throughout this
course. Objects are derived from classes. Think of classes as general descriptions of
objects, which are then specific implementations of a class. For example, a class
could be a general description of a car, where an object from that class would be a
specific car, say a red 1965 Ford Mustang convertible (a nice object!). Lastly, a
namespace is a grouping of different classes used in the .NET world. One namespace
might have graphics classes, while another would have math functions. We will see
several namespaces in our work.
Structure of a Visual C# Windows Application
We want to get started building our first Visual C# Windows application. But, first
we need to define some of the terminology we will be using. In Visual C#, a Windows
application is defined as a solution. A solution is made up of one or more projects.
Projects are groups of forms and code that make up some application. In most of our
work in this course, our applications (solutions) will be made up of a single project.
Because of this, we will usually use the terms application, solution and project
synonymously.
As mentioned, a project (application) is made up of forms and code. Pictorially,
this is:
3
Visual Applications
Project
Introduction to the Visual C# Environment
Form 1
Lecture One
Form 3
Form 2
Control
Control
Control
Control
Control
Control
Control
{Code}
{Code}
{Code}
Control
Control
Application (Project) is made up of:
1. Forms - Windows that you create for user interface
2. Controls - Graphical features drawn on forms to allow user interaction (text
boxes, labels, scroll bars, buttons, etc.) (Forms and Controls are objects.)
3. Properties - Every characteristic of a form or control is specified by a
property. Example properties include names, captions, size, color, position,
and contents. Visual C# applies default properties. You can change
properties when designing the application or even when an application is
executing.
4. Methods - Built-in methods that can be invoked to impart some action to a
particular control or object.
5. Event Methods - Code related to some object or control. This is the code
that is executed when a certain event occurs. In our applications, this code
will be written in the C# language (covered in detail in Chapter 2 of these
notes).
6. General Methods - Code not related to objects. This code must be invoked
or called in the application.
The application displayed above has three forms. Visual C# uses a very specific
directory structure for saving all of the components for a particular application.
When you save a new project (solution), you will be asked for a Name and Location
(directory). A folder named Name will be established in the selected Location. That
folder will be used to store all solution files, project files, form files (cs extension) and
other files needed by the project. Two subfolders will be established within the
Name folder: Bin and Obj. The Obj folder contains files used for debugging your
application as it is being developed. The Bin\Debug folder contains your compiled
application (the actual executable code or exe file). Later, you will see that this
folder is considered the ‘application path’ when ancillary data, graphics and sound
files are needed by an application.
4
Visual Applications
Introduction to the Visual C# Environment
Lecture One
In a project folder, you will see these files (and possibly more):
1. AssemblyInfo.cs
Information on how things fit together
2. SolutionName.sln Solution file for solution named SolutionName
3. SolutionName.suo Solution options file
4. ProjectName.csproj Project file – one for each project in solution
5. ProjectName.csproj.user Another Project file – one for each project in
solution
6. FormName.resx
Form resources file – one for each form
7. FormName.cs Form code file – one for each form
8. App.ico Icon used to represent the application
Steps in Developing a Windows Application
The Visual C# Integrated Development Environment (IDE) makes building an
application a straightforward process. There are three primary steps involved in
building a Visual C# application:
1. Draw the user interface by placing controls on a Windows form
2. Assign properties to controls
3. Write code for control events (and perhaps write other methods)
These same steps are followed whether you are building a very simple application
or one involving many controls and many lines of code.
The event-driven nature of Visual C# applications allows you to build your
application in stages and test it at each stage. You can build one method, or part of a
method, at a time and try it until it works as desired. This minimizes errors and gives
you, the programmer, confidence as your application takes shape.
As you progress in your programming skills, always remember to take this
sequential approach to building a Visual C# application. Build a little, test a little,
modify a little and test again. You’ll quickly have a completed application. This ability
to quickly build something and try it makes working with Visual C# fun – not a quality
found in some programming environments! Now, we’ll start Visual C# and look at
each step in the application development process.
Starting Visual C#
We assume you have Visual C# installed and operational on your computer. In
these notes, we use a version of Visual C# included as a part of Microsoft Visual
Studio. Visual Studio includes not only Visual C#, but also Visual C++ and Visual Basic.
All three languages use the same Integrated Development Environment (IDE). If you
5
Visual Applications
Introduction to the Visual C# Environment
Lecture One
are using the stand-alone Visual C# product, some of the instructions and screens
shown for starting a project may differ slightly. To start Visual C#:
1. Click on the Start button on the Windows task bar.
2. Select Programs, then Microsoft Visual Studio.
3. Click on Microsoft Visual Studio.
(Some of the headings given here may differ slightly on your computer, but you
should have no trouble finding the correct ones.) Visual Studio will start and (among
other things) a start page similar to this will appear:
There is lots of useful information on this page. There are links to resources to
help with Visual C#, as well as lots of news on what’s happening in the Visual C# (and
Visual Studio) world. At some point, you might like to investigate some of these links.
For now, we want to start a project. Under the Recent Projects heading, there is a
sub-heading Create:, and another sub-heading Project …. Click that heading and the
following dialog box should appear:
6
Visual Applications
Introduction to the Visual C# Environment
Lecture One
Recall this screen is from Visual Studio, so we have selected Visual C# Projects
under Project types. We want to build a Windows Application, so make that choice
under Templates.
Assign a Name to your project (mine is named TestProject). Once done, click OK
and the Visual C# development environment will appear. Your project will consist of
a single Windows form.
Visual C# Integrated Development Environment (IDE)
The Visual C# IDE is where we build and test our application via implementation of
the three steps of application development (draw controls, assign properties, write
code). As you progress through this course, you will learn how easy-to-use and
helpful the IDE is. There are many features in the IDE and many ways to use these
features. Here, we will introduce the IDE and some of its features. You must realize,
however, that its true utility will become apparent as you use it yourself to build your
own applications.
Several windows appear when you start Visual C#. Each window can be viewed
(made visible or active) by selecting menu options, depressing function keys or using
the displayed toolbar. As you use the IDE, you will find the method you feel most
comfortable with
The title bar area shows you the name of your project. When running your project
you will also see one of two words in brackets: Running or Debugging. This shows
the mode Visual C# is operating in. Visual C# operates in three modes.
7
Visual Applications
Introduction to the Visual C# Environment
Lecture One
1. Design mode - used to build application (the mode if not Running or
Debugging)
2. Running mode - used to run the application
3. Debugging mode - application halted and debugger is available; also referred
to as Break mode
We focus here on the design mode. You should, however, always be aware of
what mode you are working in.
Under the title bar is the Menu. This menu is dynamic, changing as you try to do
different things in Visual C#. When you start working on a project, it should look like
this:
You will become familiar with each menu topic as you work through the course.
Briefly, they are:
File
Edit
Use to open/close projects and files. Use to exit Visual C#
Used when writing code to do the usual editing tasks of cutting,
pasting, copying and deleting text
View
Provides access to most of the windows in the IDE
Project
Allows adding files and objects to your application
Build
Allows you to compile and run your completed application (go to
Run mode)
Debug
Comes in handy to help track down errors in your code (works
when Visual C# is in Break mode)
Data
Used when building database applications (not covered in this
course)
Format
Useful for manipulating controls placed on your forms
Tools
Allows custom configuration of the IDE. Be particularly aware of
the Options choice under this menu item. This choice allows you to
modify the IDE to meet any personal requirements.
Window
Lets you change the layout of windows in the IDE
Community Provides links to the Visual Studio community
Help
Perhaps, the most important item in the Menu. Provides access to
the Visual C# on-line documentation via help contents, index or
search. Get used to this item!
The View menu also allows you to choose from a myriad of toolbars available in the
Visual C# IDE. Toolbars provide quick access to many features. The Standard
(default) toolbar appears below the Menu:
8
Visual Applications
Introduction to the Visual C# Environment
Lecture One
Properties Window
New
project
Add item
Open file
Save file
Save all
Solution Explorer
Code editor tasks
Debugger tasks
Toolbox
If you forget what a toolbar button does, hover your mouse cursor over the button
until a descriptive tooltip appears. We will discuss most of these toolbar functions in
the remainder of the IDE information.
In the middle of the Visual C# IDE is the Design Window. This window is central to
developing Visual C# applications. Various items are available by selecting tabs at the
top of the window. The primary use is to draw your application on a form and, later,
to write code. Forms are selected using the tab named FormName.cs [Design]:
The corresponding code for a form is found using the FormName.cs tab. The
design window will also display help topics and other information you may choose.
The Toolbox is the selection menu for controls used in your application. It is active
when a form is shown in the design window:
9
Visual Applications
Introduction to the Visual C# Environment
Lecture One
The Properties Window serves two purposes. Its primary purpose is to establish
design mode (initial) property values for objects (controls). It can also be used to
establish event methods for controls. Here, we just look at how to work with
properties. To do this, click the Properties button in the task bar:
Properties
button
The drop-down box at the top of the window lists all objects in the current form.
Under this box are the available properties for the active (currently selected) object.
Two property views are available: Alphabetic and Categorized (selection is made
10
Visual Applications
Introduction to the Visual C# Environment
Lecture One
using menu bar under drop-down box). Help with any property can be obtained by
highlighting the property of interest and pressing <F1>. We will examine how to
assign properties after placing some controls on a form.
The Solution Explorer Window displays a list of all forms and other files making up
your application. To view a form in this window, simply double-click the file name.
Or, highlight the file and press <Shift>-<F7>. Or, you can obtain a view of the form
(View Designer) or code (View Code) windows (window containing the actual C#
coding) from the Project window, using the toolbar near the top of the window. As
we mentioned, there are many ways to do things using the Visual C# IDE.
Saving a Visual C# Project
We recommend the first thing you do upon creating a new project is to save it.
This makes sure all the files and folders are in locations you have specified. To save a
Visual C# project, click the Save All button (looks like several floppy disks) in the IDE
toolbar. Clicking on this button will have different results, depending on when you
click it.
If you are working on a project that has never been saved, the following window
will appear:
11
Visual Applications
Introduction to the Visual C# Environment
Lecture One
This window asks where you want to save your project. In the Name box, enter
the name of the folder to save your project in. Location should show the directory
your project folder will be in. You can Browse to an existing location or create a new
directory by checking the indicated box. For this course, we suggest saving each of
your project folders in the same directory.
If you are working on a project that has been saved previously and you click on the
Save All button, Visual C# saves all your files in the same location without asking any
questions. Sometimes, you may want to ‘force’ a save. For example, if you are
making lots of changes, you might occasionally like to save your work prior to running
the project. Do this by clicking the Save All button at any time. And, always make
sure to save your project before running it or before leaving Visual C#.
12


