For Con-Tech Lighting ... Many Sirius rail fixtures are offered with three different installation...
advertisement

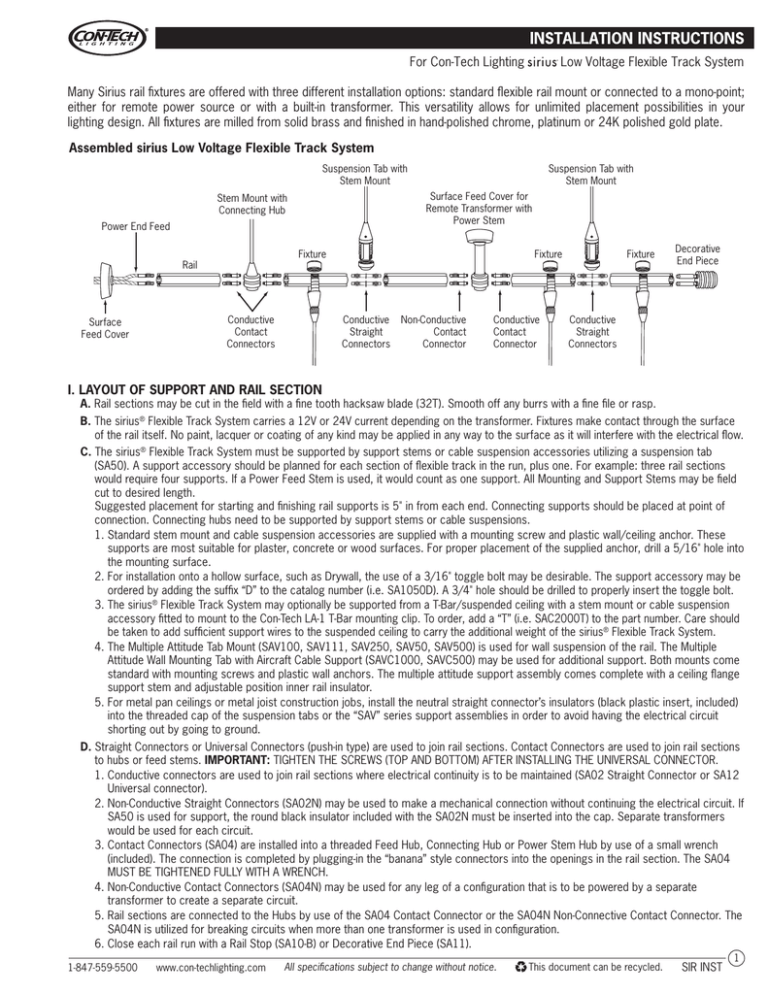
For Con-Tech Lighting Low Voltage Flexible Track System Many Sirius rail fixtures are offered with three different installation options: standard flexible rail mount or connected to a mono-point; either for remote power source or with a built-in transformer. This versatility allows for unlimited placement possibilities in your lighting design. All fixtures are milled from solid brass and finished in hand-polished chrome, platinum or 24K polished gold plate. Assembled sirius Low Voltage Flexible Track System Suspension Tab with Stem Mount Suspension Tab with Stem Mount Surface Feed Cover for Remote Transformer with Power Stem Stem Mount with Connecting Hub Power End Feed Surface Feed Cover Fixture Fixture Rail Conductive Straight Connectors Conductive Contact Connectors Non-Conductive Contact Connector Conductive Contact Connector Fixture Decorative End Piece Conductive Straight Connectors I. LAYOUT OF SUPPORT AND RAIL SECTION A. Rail sections may be cut in the field with a fine tooth hacksaw blade (32T). Smooth off any burrs with a fine file or rasp. B. The sirius® Flexible Track System carries a 12V or 24V current depending on the transformer. Fixtures make contact through the surface of the rail itself. No paint, lacquer or coating of any kind may be applied in any way to the surface as it will interfere with the electrical flow. C. The sirius® Flexible Track System must be supported by support stems or cable suspension accessories utilizing a suspension tab (SA50). A support accessory should be planned for each section of flexible track in the run, plus one. For example: three rail sections would require four supports. If a Power Feed Stem is used, it would count as one support. All Mounting and Support Stems may be field cut to desired length. Suggested placement for starting and finishing rail supports is 5" in from each end. Connecting supports should be placed at point of connection. Connecting hubs need to be supported by support stems or cable suspensions. 1. Standard stem mount and cable suspension accessories are supplied with a mounting screw and plastic wall/ceiling anchor. These supports are most suitable for plaster, concrete or wood surfaces. For proper placement of the supplied anchor, drill a 5/16" hole into the mounting surface. 2. For installation onto a hollow surface, such as Drywall, the use of a 3/16" toggle bolt may be desirable. The support accessory may be ordered by adding the suffix “D” to the catalog number (i.e. SA1050D). A 3/4" hole should be drilled to properly insert the toggle bolt. 3. The sirius® Flexible Track System may optionally be supported from a T-Bar/suspended ceiling with a stem mount or cable suspension accessory fitted to mount to the Con-Tech LA-1 T-Bar mounting clip. To order, add a “T” (i.e. SAC2000T) to the part number. Care should be taken to add sufficient support wires to the suspended ceiling to carry the additional weight of the sirius® Flexible Track System. 4. The Multiple Attitude Tab Mount (SAV100, SAV111, SAV250, SAV50, SAV500) is used for wall suspension of the rail. The Multiple Attitude Wall Mounting Tab with Aircraft Cable Support (SAVC1000, SAVC500) may be used for additional support. Both mounts come standard with mounting screws and plastic wall anchors. The multiple attitude support assembly comes complete with a ceiling flange support stem and adjustable position inner rail insulator. 5. For metal pan ceilings or metal joist construction jobs, install the neutral straight connector’s insulators (black plastic insert, included) into the threaded cap of the suspension tabs or the “SAV” series support assemblies in order to avoid having the electrical circuit shorting out by going to ground. D. Straight Connectors or Universal Connectors (push-in type) are used to join rail sections. Contact Connectors are used to join rail sections to hubs or feed stems. IMPORTANT: TIGHTEN THE SCREWS (TOP AND BOTTOM) AFTER INSTALLING THE UNIVERSAL CONNECTOR. 1. Conductive connectors are used to join rail sections where electrical continuity is to be maintained (SA02 Straight Connector or SA12 Universal connector). 2. Non-Conductive Straight Connectors (SA02N) may be used to make a mechanical connection without continuing the electrical circuit. If SA50 is used for support, the round black insulator included with the SA02N must be inserted into the cap. Separate transformers would be used for each circuit. 3. Contact Connectors (SA04) are installed into a threaded Feed Hub, Connecting Hub or Power Stem Hub by use of a small wrench (included). The connection is completed by plugging-in the “banana” style connectors into the openings in the rail section. The SA04 MUST BE TIGHTENED FULLY WITH A WRENCH. 4. Non-Conductive Contact Connectors (SA04N) may be used for any leg of a configuration that is to be powered by a separate transformer to create a separate circuit. 5. Rail sections are connected to the Hubs by use of the SA04 Contact Connector or the SA04N Non-Connective Contact Connector. The SA04N is utilized for breaking circuits when more than one transformer is used in configuration. 6. Close each rail run with a Rail Stop (SA10-B) or Decorative End Piece (SA11). 1-847-559-5500 www.con-techlighting.com All specifications subject to change without notice. This document can be recycled. SIR INST 1 For Con-Tech Lighting Low Voltage Flexible Track System II. LAYOUT AND RAIL INSTALLATION sirius® Flexible Track System layouts may be made using straight rail sections, joined by connectors or hubs. Curved rail sections may also be used to create arc, serpentine, round, or other configurations. Rails can be curved in both the vertical or horizontal plane. A. Use the following procedure to correctly layout and support the system: 1. Lay out the sirius® Flexible Track System design on the floor and connect the rails together, mark rails where they should be cut (as necessary). Cut rails at this time, following the directions in Section I-A of these instructions. Align the mounting points on the ceiling using a plumb line or laser device. 2. Install all the support stems and power connections on the ceiling. 3. Starting at the power connection, begin with a single Rail piece and attach it to its designated support(s) and/or power stem(s). Tighten contact connectors and support accessories with the wrench and locking keys provided. 4. Install the connectors that the adjoining rail will be attached to. 5. Bring the second rail into position and attach it to the first rail, securing this second rail to its ceiling support(s). 6. Repeat this procedure until all rails have been installed. 7. Once all of the rails have been installed, ensure that all connections and connector screws are tightly secured. NEVER ATTEMPT TO RAISE THE ASSEMBLED LAYOUT OR MULTIPLE CONNECTED RAILS TO THE CEILING AS A SINGLE PIECE. DAMAGE TO THE SYSTEM MAY OCCUR. III. BRINGING POWER TO THE RAIL SYSTEM A. The sirius® Flexible Track System carries a 12V or 24V current depending on the transformer. Fixtures make contact through the surface of the rail itself. No paint, lacquer or coating of any kind may be applied in any way to the surface as it will interfere with the electrical flow. B. Power End Feed with Plug-In Termination (SA560, SA5200, SA5400) may be used to connect the rail system to the remote surface transformer(s). The hole in the wall/ceiling for the passage of the cable should be covered with the Surface Feed Cover Canopy (SA54). If the power feed comes through an outlet box (8B octagon box, etc.), then an adapter plate must be used (SA54A) with the Surface Feed Cover Canopy. C. Power may be introduced in line by use of the Power Feed Hub (SA5360,SA53200) supported by a Stem Mount or Cable Suspension. D. The Power Stem Hub (SA5305/180, SA5325/180, SA5350/180, SA5310/180, SA5320/180) is used for ceiling mount installations in conjunction with the SA54 Surface Feed Cover or SA54T canopy with built-in 12V Electronic Transformer. 1. Remove the power stem from the cardboard sleeve, wrapping or plastic bag. 2. Using the special 1.5mm metric Allen wrench provided, loosen the hex screw closest to the black wire with the white insulator. NOTE: The other hex screw holds the other black wire to the top retaining ring. 3. Remove the top retaining ring. 4. Loosen the hex screw on the bottom retaining ring. 5. Slide the bottom retaining ring to the lower portion of the power stem. 6. Slide the center post/stem of the power stem through the black rubber grommet of the SA54. 7. Re-attach the top retaining ring to the center port. 8. Slide the bottom retaining ring up to the support for the Feed Stem and coverage for the ceiling opening. 9. ENSURE ALL HEX SCREWS ARE TIGHTENED SECURELY. Black Wire feeds top portion of Hub Feed Assembly Black Wire feeds lower portion of Hub Feed Assembly White Insulator Top Retaining Ring Bottom Retaining Ring Center Post/Stem Black Insulator ADJUSTING POWER STEM LENGTH Power Stem Hub Assembly 1. Follow steps 1-4 above. 2. Slide the bottom retaining ring off the center post of the power stem. 3. Slide the combination white insulator/center post/top portion of hub feed assembly over the black wire. 4. Loosen the hex screw that holds the top portion of the hub feed assembly to the center post. 5. Slide the top portion of the hub feed assembly off the center post. 6. Remove the white insulator. 7. Mark the center post where the stem must be cut. 8. Using the proper tubing cutter with rollers, slowly cut the stem to the correct length. 9. Ream out the center of the stem for any burrs and finish with a fine file. 10. Insert the white insulator onto the top of the stem. 11. Re-attach the top portion of the hub feed assembly. ENSURE THE HEX SCREW IS TIGHTENED SUFFICIENTLY. 12. Slide this assembly over the black center feed wire. 13. Then, slide the bottom retaining ring over the center post. 14. Re-attach the top retaining ring to the center post. 1-847-559-5500 www.con-techlighting.com All specifications subject to change without notice. This document can be recycled. SIR INST 2 For Con-Tech Lighting Low Voltage Flexible Track System IV. USE OF REMOTE TRANSFORMERS Choose from 150W or 300W Remote Transformers that may be used to power up to (6) 50W fixtures, based on a 12V system. Con-Tech transformers are sized to carry the full rated load (down sizing is not required). The transformer must be installed in an accessible location to allow for resetting of the breaker in the event of overload. The use of 10 gauge conductors between the transformer and power feed is recommended. NOTE: Maximum allowable voltage drop should not exceed 5%. Sufficient wire size should be maintained in order to provide a proper operating voltage to all lamps. A. Transformer size should be determined by number of fixtures on the circuit (include any possible future planned additions). 1996 NEC allows 25A per circuit for systems 30VA or under. On 12V systems, the maximum is 300W/circuit. On 24V systems, the maximum is 600W/circuit. B. Con-Tech transformers are sized to carry the full rated load (down sizing is not required). Limit remote location to within 12' to minimize voltage drop (10 AWG guage). C. A built-in magnetic circuit breaker is provided on the 12V or 24V (secondary) circuit. D. The Surface Mount Transformer (SA54T) is available for direct connection to power feeds with built-in 12V electronic transformer. E. Electronic low voltage transformers are available: Models LVT-303 and LVT-303-24V (300W maximum). F. The DC model transformer (LVT-303-DC) is recommended for use with rail; 300W maximum with DC secondary output to minimize voltage drop restrictions. V. ATTACHING FIXTURES TO THE FLEXIBLE TRACK A. Unscrew fixture connection cap from fixture. B. Slide fixture up to overlap the rail, reconnect fixture connection cap above the rail. C. Thread properly; do not over tighten to avoid short circuit. VII. ADJUSTING PENDANT LENGTH A. STEM PENDANTS Stem pendant length may only be adjusted if the pendant is used as a mono-point B. STRING PENDANTS 1. Determine the proper length (drop) of the string fixture from the flexible track; add 1/2" to the length of the cable. Adjustments are made from the top suspension tab. 2. Cut the aircraft cable/clear insulated cable to the necessary length. 3. Remove the top cap from the suspension tab; unscrew the knurled nut from below the suspension tab. 4. Push the cable up through the suspension tab. 5. Using the hex key, partially back out the recessed screw in the brass contact point of the suspension tab. 6. Remove the clear insulated cable and aircraft cable; slide the knurled nut over the new length of aircraft cable/clear insulated cable. 7. Push the clear insulated cable through the suspension tab; insert into brass contact point after stripping the necessary insulation from the cable. 8. Tighten down the recessed screw in the brass contact point; push the brass contact point into its seat. 9. Bring the knurled nut up and tighten onto the suspension tab. 10. Fixture is ready for installation onto the system/mono-point. IX.CARE AND MAINTENANCE sirius® Flexible Track System Products are made to the highest standards. Clean with a soft cloth. Do not use any abrasive cleaners. IMPORTANT SAFETY INSTRUCTIONS: • The system is to be used ONLY with fixtures identified for use with the sirius® Flexible Track System. • Read all the instructions before installation. Save instructions for later use. • Turn off power at fuse or circuit breaker box before installation or before doing any maintenance work. • Product must be grounded to avoid potential electric shock and any other potential hazards. • Product must be mounted in locations and at heights and in a manner consistent with its intended use, and in compliance with National Electrical Code and local codes. Use of accessory equipment is not recommended. • Installing contrary to instructions may cause unsafe conditions. • Do not install any fixture assembly closer than 6 in. from any curtain, or similar combustible material. • Warning: Risk of fire. Most dwellings built before 1985 have supply wire rated at 60°C. Consult a qualified electrician before installation. • To avoid hazards to children, account for all parts and properly dispose of all packing materials. • Call the Technical Support department at Con-Tech Lighting with any installation questions: 847.559.5500. 1-847-559-5500 www.con-techlighting.com All specifications subject to change without notice. This document can be recycled. SIR INST 3


