How to make a Wind Speed Sensor
advertisement

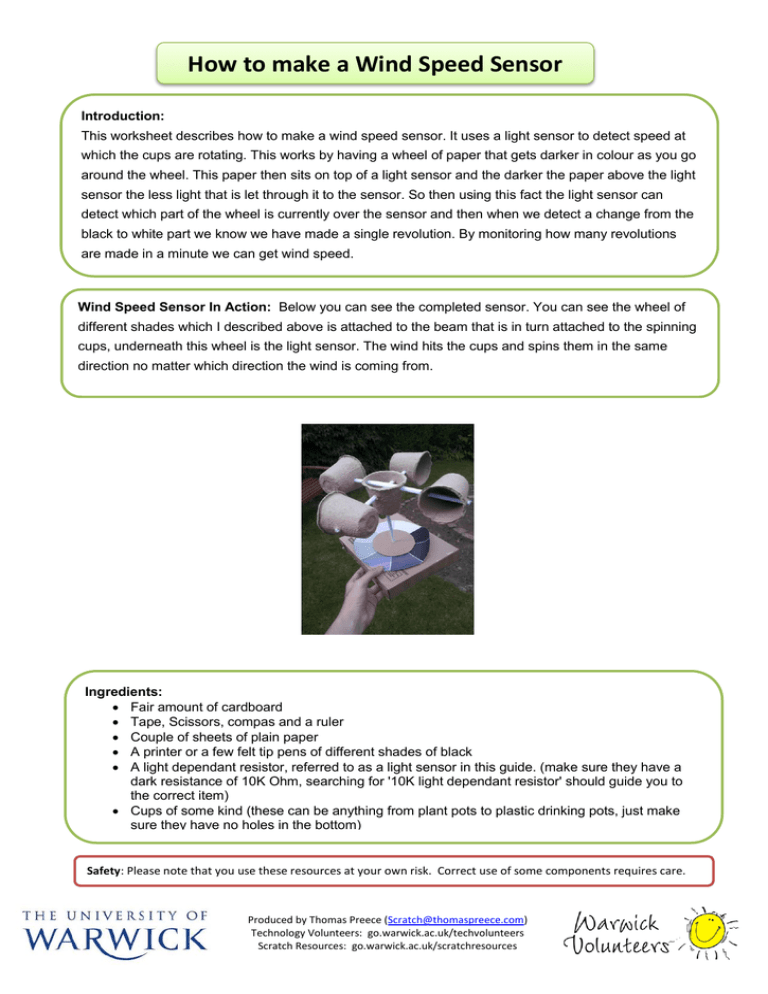
How to make a Wind Speed Sensor Introduction: This worksheet describes how to make a wind speed sensor. It uses a light sensor to detect speed at which the cups are rotating. This works by having a wheel of paper that gets darker in colour as you go around the wheel. This paper then sits on top of a light sensor and the darker the paper above the light sensor the less light that is let through it to the sensor. So then using this fact the light sensor can detect which part of the wheel is currently over the sensor and then when we detect a change from the black to white part we know we have made a single revolution. By monitoring how many revolutions are made in a minute we can get wind speed. Wind Speed Sensor In Action: Below you can see the completed sensor. You can see the wheel of different shades which I described above is attached to the beam that is in turn attached to the spinning cups, underneath this wheel is the light sensor. The wind hits the cups and spins them in the same direction no matter which direction the wind is coming from. Ingredients: Fair amount of cardboard Tape, Scissors, compas and a ruler Couple of sheets of plain paper A printer or a few felt tip pens of different shades of black A light dependant resistor, referred to as a light sensor in this guide. (make sure they have a dark resistance of 10K Ohm, searching for '10K light dependant resistor' should guide you to the correct item) Safety: that you use(these these resources at your own risk. Correct of somedrinking components requires care. Please Cupsnote of some kind can be anything from plant potsuse to plastic pots, just make sure they have no holes in the bottom) Safety: Please note that you use these resources at your own risk. Correct use of some components requires care. Produced by Thomas Preece (Scratch@thomaspreece.com) Technology Volunteers: go.warwick.ac.uk/techvolunteers Scratch Resources: go.warwick.ac.uk/scratchresources Step 1: First we are going to construct the base of the Wind Speed Sensor. You can make your base smaller or larger than the one I am making but note that a larger base makes the vane much more stable and allows you to make a more sensitive sensor. Firstly take a square-ish piece of cardboard (mine was about 30cm x 30cm) and draw using a ruler a border of the same width around the cardboard and mark the centre of the cardboard with a cross like shown in the left image below. Next using your scissors score the cardboard along the lines and cut along one of the two lines at each corner as show below in the right image. Then fold the sides up and tape securely the corners to the sides to form an open top box as shown in the next step. Step 2: Next you need to cut a similar sized lid for your open top box. Make sure to make it slightly larger than your box so that it can rest on your box without falling inside. After that mark a cross in the centre of your lid. Very carefully use a pen/pencil to make a small hole where you made a cross on your open top box and on your lid. These holes are where your beam attached to the cups will go through. Tape the lid on to the box so that the holes line up. Produced by Thomas Preece (Scratch@thomaspreece.com) Technology Volunteers: go.warwick.ac.uk/techvolunteers Scratch Resources: go.warwick.ac.uk/scratchresources Step 3: Take your compass and on the bottom of your open top box draw the largest circle you can without the edges of the circle touching the edge of the bottom of the box. On the left side of the bottom face of the box and inside the circle you draw make a hole big enough to tightly fit your light sensor into. You should have something like the left image below. Fit the light sensor into the hole and tape it to the box on the outside and inside as shown in the right image. Make sure that when you tape it down so that the light sensor is flush with the rest of the box on the outside face. You will also want to cut a hole in the side for easy access to attach Picoboard/Scratchboard sensor leads to the light sensor as show in the right side of the right image. Step 4: Next we assemble the spinning part of the sensor. Get a sheet of paper and fold it in half along the longest side. The fold it in half again in the same direction. Next take the longest side and fold it over about a single cm in width, fold it over again and again until your entire sheet is just a single cm wide (like in the fourth image below). Now tightly tape it together making sure to tape all the way along the edge. Now pick it up and press on the two long sides to change it from a flat long object to a round long object (like a cylinder) like in the last two images. Repeat this step 3 times to get 3 paper beams. Produced by Thomas Preece (Scratch@thomaspreece.com) Technology Volunteers: go.warwick.ac.uk/techvolunteers Scratch Resources: go.warwick.ac.uk/scratchresources Step 5: Get your 4 cups. For each one poke a hole through the right side and then through the left side so that we can stick our paper beam constructed in step 4 through them. The holes should be roughly half way up the cup from the bottom. I have circled my holes in orange in the image below: Step 6: Next get two of your cups with holes in and poke a beam made in step 4 through the holes leaving one cup at either end of the beam. Also one cup should point in the opposite direction to the one on the other end. Use tape to securely fasten the cups to the beam. Repeat this step twice to get two sets of two cups. Step 7: Now fasten the two sets of cups together with the beams crossing in the middle of each set. Make sure that as you go around in a circle that all the cups are pointing in the same direction (See the image below). Now lay the cups down on your table with all four cups touching the table. Attach your final beam that you made in step 4 to the cross point of the two beams holding the cups and make sure it points directly up from the table. See the image below for a picture of the completed step (note I used an extra cup to make my sensor more sturdy). Produced by Thomas Preece (Scratch@thomaspreece.com) Technology Volunteers: go.warwick.ac.uk/techvolunteers Scratch Resources: go.warwick.ac.uk/scratchresources Step 8: Next we need to cut a cardboard circle to stabilize our cups. The larger the circle the more stable the sensor will be but when the cups and beams are placed in the base it must not overlap the light sensor so we should make the circle a few centimetres smaller in diameter than the circle drawn on our base (I used a circle of diameter 11cm but I could of used a circle of up to about 16cm diameter). See in the right image how the cardboard circle doesn't overlap the light sensor. Step 9: You will then need to put a hole in the circle so that our paper beam can pass through the circle. Now put the pole through the circle we just cut, then through the top of the box (same side as the light sensor) and then out the bottom. Make sure the pole comes out the bottom of the box with an inch or two to spare (as shown in image below) then push the circle as close to the box as possible and tape it to the beam securely. Now if you hold the box the cups and beams should stay upright and should turn freely and easily. If it doesn't turn easily you will need to take the pole out of the box and make the holes in it bigger. Produced by Thomas Preece (Scratch@thomaspreece.com) Technology Volunteers: go.warwick.ac.uk/techvolunteers Scratch Resources: go.warwick.ac.uk/scratchresources Step 9: The final step is to produce a wheel like the one on the left below (My printer was low on ink so that is why it looks a bit odd on the top left, just ignore that). You can use felt tip for this but I highly recommend using a printer to do it. If you go to http://thomaspreece.com/ColourWheel.doc you will find Word document with a resizable wheel in it. After you have made/printed your wheel you simply need to make a hole in the centre of it and attach it to the underside of our cardboard circle made in step 7. You now have a fully functional weather vane, Well Done! Safety: Please note that you use these resources at your own risk. Correct use of some components requires care. Produced by Thomas Preece (Scratch@thomaspreece.com) Technology Volunteers: go.warwick.ac.uk/techvolunteers Scratch Resources: go.warwick.ac.uk/scratchresources


