For the ConTech Lighting 6” and 8” Flexible Cable Mount... INSTALLATION PROCEDURES Before installation, please refer to your local electrical code.
advertisement
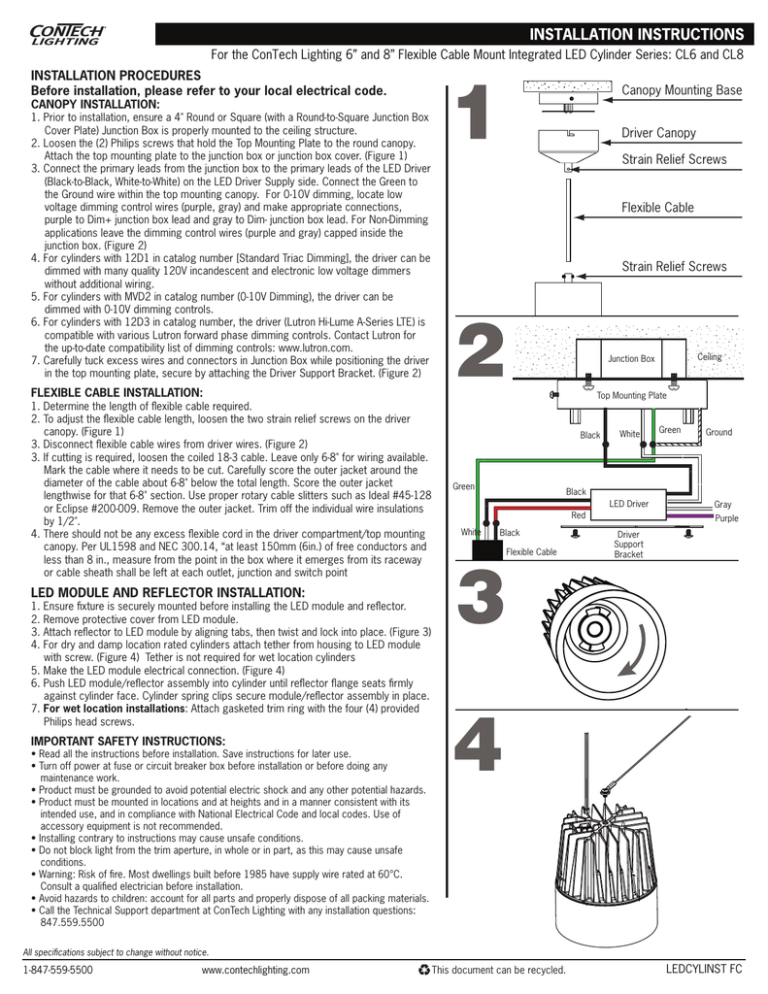
For the ConTech Lighting 6” and 8” Flexible Cable Mount Integrated LED Cylinder Series: CL6 and CL8 INSTALLATION PROCEDURES Before installation, please refer to your local electrical code. Canopy Mounting Base CANOPY INSTALLATION: 1. Prior to installation, ensure a 4" Round or Square (with a Round-to-Square Junction Box Cover Plate) Junction Box is properly mounted to the ceiling structure. 2. Loosen the (2) Philips screws that hold the Top Mounting Plate to the round canopy. Attach the top mounting plate to the junction box or junction box cover. (Figure 1) 3. Connect the primary leads from the junction box to the primary leads of the LED Driver (Black-to-Black, White-to-White) on the LED Driver Supply side. Connect the Green to the Ground wire within the top mounting canopy. For 0-10V dimming, locate low voltage dimming control wires (purple, gray) and make appropriate connections, purple to Dim+ junction box lead and gray to Dim- junction box lead. For Non-Dimming applications leave the dimming control wires (purple and gray) capped inside the junction box. (Figure 2) 4. For cylinders with 12D1 in catalog number [Standard Triac Dimming], the driver can be dimmed with many quality 120V incandescent and electronic low voltage dimmers without additional wiring. 5. For cylinders with MVD2 in catalog number (0-10V Dimming), the driver can be dimmed with 0-10V dimming controls. 6. For cylinders with 12D3 in catalog number, the driver (Lutron Hi-Lume A-Series LTE) is compatible with various Lutron forward phase dimming controls. Contact Lutron for the up-to-date compatibility list of dimming controls: www.lutron.com. 7. Carefully tuck excess wires and connectors in Junction Box while positioning the driver in the top mounting plate, secure by attaching the Driver Support Bracket. (Figure 2) Driver Canopy Strain Relief Screws Flexible Cable Strain Relief Screws FLEXIBLE CABLE INSTALLATION: 1. Determine the length of flexible cable required. 2. To adjust the flexible cable length, loosen the two strain relief screws on the driver canopy. (Figure 1) 3. Disconnect flexible cable wires from driver wires. (Figure 2) 3. If cutting is required, loosen the coiled 18-3 cable. Leave only 6-8" for wiring available. Mark the cable where it needs to be cut. Carefully score the outer jacket around the diameter of the cable about 6-8" below the total length. Score the outer jacket lengthwise for that 6-8" section. Use proper rotary cable slitters such as Ideal #45-128 or Eclipse #200-009. Remove the outer jacket. Trim off the individual wire insulations by 1/2". 4. There should not be any excess flexible cord in the driver compartment/top mounting canopy. Per UL1598 and NEC 300.14, “at least 150mm (6in.) of free conductors and less than 8 in., measure from the point in the box where it emerges from its raceway or cable sheath shall be left at each outlet, junction and switch point Ceiling Junction Box Top Mounting Plate Black Green White Ground Black LED Driver Red White Green Black Flexible Cable Gray Purple Driver Support Bracket LED MODULE AND REFLECTOR INSTALLATION: 1. Ensure fixture is securely mounted before installing the LED module and reflector. 2. Remove protective cover from LED module. 3. Attach reflector to LED module by aligning tabs, then twist and lock into place. (Figure 3) 4. For dry and damp location rated cylinders attach tether from housing to LED module with screw. (Figure 4) Tether is not required for wet location cylinders 5. Make the LED module electrical connection. (Figure 4) 6. Push LED module/reflector assembly into cylinder until reflector flange seats firmly against cylinder face. Cylinder spring clips secure module/reflector assembly in place. 7. For wet location installations: Attach gasketed trim ring with the four (4) provided Philips head screws. IMPORTANT SAFETY INSTRUCTIONS: • Read all the instructions before installation. Save instructions for later use. • Turn off power at fuse or circuit breaker box before installation or before doing any maintenance work. • Product must be grounded to avoid potential electric shock and any other potential hazards. • Product must be mounted in locations and at heights and in a manner consistent with its intended use, and in compliance with National Electrical Code and local codes. Use of accessory equipment is not recommended. • Installing contrary to instructions may cause unsafe conditions. • Do not block light from the trim aperture, in whole or in part, as this may cause unsafe conditions. • Warning: Risk of fire. Most dwellings built before 1985 have supply wire rated at 60°C. Consult a qualified electrician before installation. • Avoid hazards to children: account for all parts and properly dispose of all packing materials. • Call the Technical Support department at ConTech Lighting with any installation questions: 847.559.5500 4 All specifications subject to change without notice. 1-847-559-5500 www.contechlighting.com This document can be recycled. LEDCYLINST FC
