uShop Quick Reference Guide Tracking an Orde
advertisement

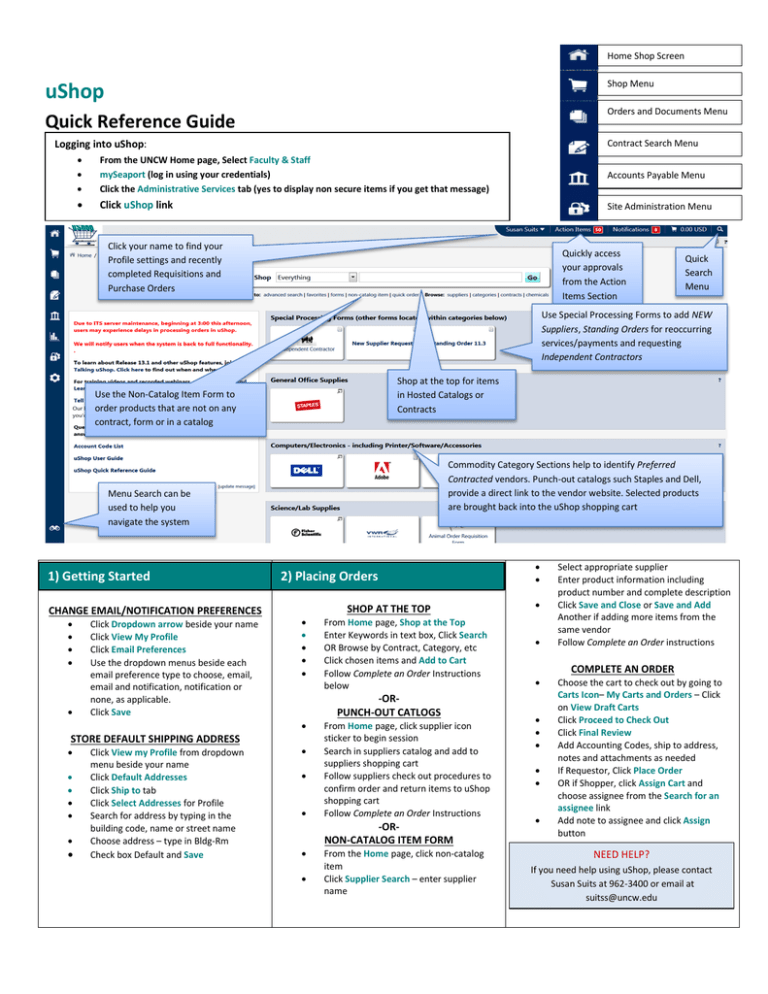
Home Shop Screen uShop Shop Menu Orders and Documents Menu Quick Reference Guide Contract Search Menu Logging into uShop: • • • From the UNCW Home page, Select Faculty & Staff mySeaport (log in using your credentials) Click the Administrative Services tab (yes to display non secure items if you get that message) Accounts Payable Menu • Click uShop link Site Administration Menu Click your name to find your Profile settings and recently completed Requisitions and Purchase Orders Quickly access your approvals from the Action Items Section Quick Search Menu Use Special Processing Forms to add NEW Suppliers, Standing Orders for reoccurring services/payments and requesting Independent Contractors Shop at the top for items in Hosted Catalogs or Contracts Use the Non-Catalog Item Form to order products that are not on any contract, form or in a catalog Commodity Category Sections help to identify Preferred Contracted vendors. Punch-out catalogs such Staples and Dell, provide a direct link to the vendor website. Selected products are brought back into the uShop shopping cart Menu Search can be used to help you navigate the system Tracking an Orde 1) Getting Started CHANGE EMAIL/NOTIFICATION PREFERENCES • • • • • Click Dropdown arrow beside your name Click View My Profile Click Email Preferences Use the dropdown menus beside each email preference type to choose, email, email and notification, notification or none, as applicable. Click Save 2) Placing Orders • • • • • • STORE DEFAULT SHIPPING ADDRESS • • • • • • • Click View my Profile from dropdown menu beside your name Click Default Addresses Click Ship to tab Click Select Addresses for Profile Search for address by typing in the building code, name or street name Choose address – type in Bldg-Rm Check box Default and Save • • • • • SHOP AT THE TOP From Home page, Shop at the Top Enter Keywords in text box, Click Search OR Browse by Contract, Category, etc Click chosen items and Add to Cart Follow Complete an Order Instructions below -ORPUNCH-OUT CATLOGS From Home page, click supplier icon sticker to begin session Search in suppliers catalog and add to suppliers shopping cart Follow suppliers check out procedures to confirm order and return items to uShop shopping cart Follow Complete an Order Instructions -ORNON-CATALOG ITEM FORM From the Home page, click non-catalog item Click Supplier Search – enter supplier name • • • • • • • • • • • Select appropriate supplier Enter product information including product number and complete description Click Save and Close or Save and Add Another if adding more items from the same vendor Follow Complete an Order instructions COMPLETE AN ORDER Choose the cart to check out by going to Carts Icon– My Carts and Orders – Click on View Draft Carts Click Proceed to Check Out Click Final Review Add Accounting Codes, ship to address, notes and attachments as needed If Requestor, Click Place Order OR if Shopper, click Assign Cart and choose assignee from the Search for an assignee link Add note to assignee and click Assign button NEED HELP? If you need help using uShop, please contact Susan Suits at 962-3400 or email at suitss@uncw.edu 3) Accounting Splits • AT THE HEADER LEVEL – Code affects all lines of PO • • • • • • • • • On the draft requisition, click Final Review Scroll down to Accounting Code section and click Edit button Click add split link Enter the appropriate Fund and Account codes for each FOPA Select the type of split from the dropdown menu Enter value of the split Click recalculate/validate link Click Save AT THE LINE LEVEL – To override code for particular lines of the PO • • • • • • On the draft requisition, click Final Review Scroll to the Accounting Codes section and click View/edit by line item link (bottom right of Accounting box) Scroll to the line item requiring the split and click edit button Enter the appropriate Account and Fund for the line Click recalculate/validate link Click Save ACROSS DEPARTMENTS – when departments are sharing the cost of an order Requestor A: Creates Cart • Create cart and click Proceed to Checkout • Click Final Review • Enter Accounting information • Click Save • Click Assign Cart – choose Requestor B as the assignee Requestor B: Completes split • From Navigation tabs, choose Carts – Draft Carts – Carts assigned to me • Open Cart and Proceed to Checkout • Click Final Review • Scroll to Accounting Code section, click edit • Click add split link • Enter second fund and account code • Apply appropriate type of split from the dropdown menu • Click recalculate/validate link • Click Save • From Final Review screen, click Assign Cart – Choose Carol Page as assignee 4) Finding an Order • • • DOCUMENT SEARCH Simple Search • From Home/Shop Screen, click Orders and Documents Menu icon from main navigation ribbon then Search Documents • Choose Document type from dropdown menu or search all documents • Choose Dates to search from dropdown menu or search all dates • Enter search terms in search box • Click Go • Results can be filtered after search is performed. Advanced Search • Choose advanced search link from the Simple search screen • Choose document type from the dropdown menu or search all documents • IF document type other that All documents was chosen then, click Go • Apply search filters – filters will change dependent on document type chosen • Click Go button • Further filters can be applied after search is performed 5) Receiving • • • • • • • • • • From Home/Shop Page – Dropdown Menu beside your name Click Recently Completed – Purchase Orders or Requisitions Click the document number (Requisition Number or Purchase order number) to open QUANTITY RECEIVING Follow Finding an Order instructions From Available Actions dropdown menu, chose Create Quantity Receipt Remove lines from the receipt document, if needed, for items that have not been received – Click Remove Line button or check box on each line and chose Remove Selected Items from dropdown menu Click Go button Adjust quantities on each line to reflect the actual quantities received Click Save Updates button Click Complete button • • • • • • • • • Follow Finding an Order instructions From Available Actions dropdown menu, chose Create Cost Receipt Enter the exact dollar amount in dollars and cents Click Complete button CORRECTING/CANCELING RECEIPT **ONLY WHEN NO INVOICE HAS BEEN ENTERED** • Follow Finding an Order instructions • From PO view, click Receipts tab • Click the receipt number that needs correction • Click Reopen Receipt button – upper right hand corner of screen Type in reason to reopen receipt in pop up window Click Reopen Receipt button in pop up window To DELETE – Click Delete button To CORRECT – Make corrections to receipt document Click Save Updates button Click Complete button 6) Create a New Draft Cart • • • • • • Click Carts Menu icon from Navigation ribbon, then My Carts and Orders Click View Draft Shopping Carts Click Create Cart button Enter Cart Name, Optional Click Update button Follow Placing Orders instructions to begin shopping 7) Favorites From a draft cart: • Click in check box for items to save • From action dropdown menu, chose Add to Favorites • Chose a saved folder • OR Click New button to create a new folder (personal or shared) • Enter Name for the new folder • Click Save button • Click Submit button From requisition: • Click check box on line items to add • From For selected line items dropdown box, chose Add to Favorites • Follow same instructions above Ordering from Favorites • Click Favorites link located just below the Shop box • Click the folder name • Enter quantities for items to be added • Click Add to Cart button • Go to draft carts to complete order 8) Viewing Order Status • • COST RECEIVING FOR STANDING ORDERS • RECENTLY COMPLETED – LAST 90 DAYS QUICK SEARCH From Home/Shop Screen – Upper right hand corner magnify glass Quick Search Menu Use dropdown menu to choose the document type Tab to search field Type in the document number Press Go button • • • • Follow Finding an Order instructions to find a requisition (Pending, Returned or Completed) OR Purchase Order To Find current workflow step – Click on PR or PO Workflow tab – Flow chart will indicate the Current Step and the approvers for that step To find all information associated with a PR or PO including why the request has been returned – Click on History tab To find comments – Click on Comments tab – Use dropdown menu to find all comments To add a comment to an order – Click on Comments tab – Click Add Comment button - Click add email recipient link (if email needed) - Enter Comment in box – Click Add Comment button To add a document to an order – Click on Comments tab – Enter Comment in comment box - Choose Attachment Type from dropdown menu – Browse for file to attach – Click Add Comment button

