Instructions for Putting Materials on a Web Page Using FrontPage 2003
advertisement
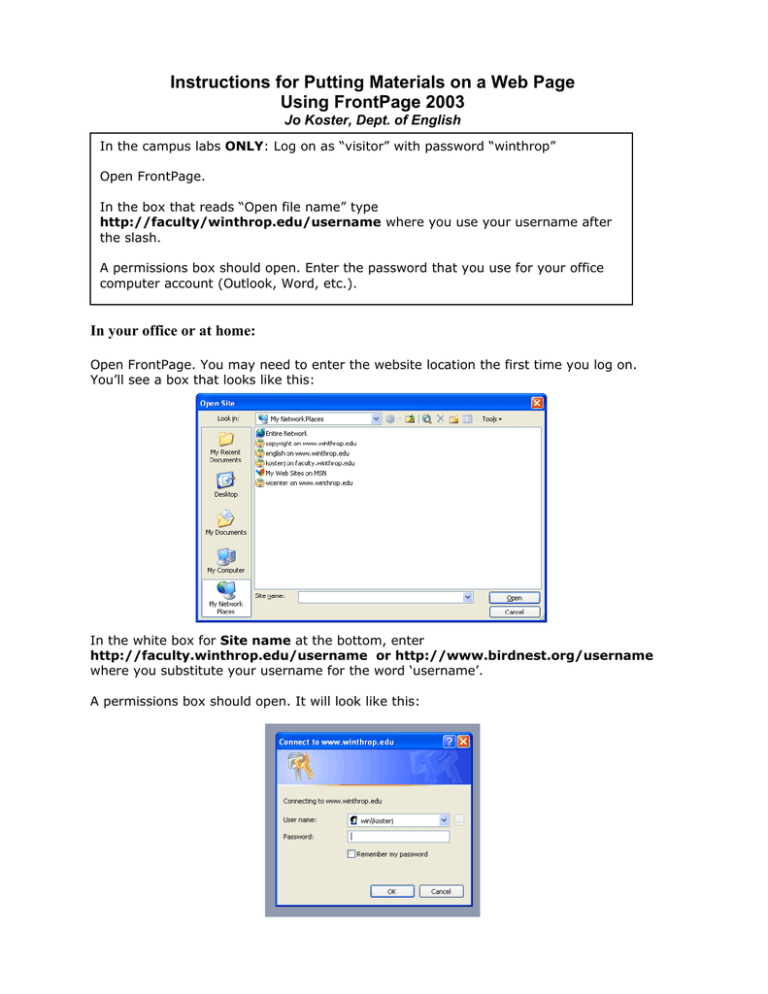
Instructions for Putting Materials on a Web Page Using FrontPage 2003 Jo Koster, Dept. of English In the campus labs ONLY: Log on as “visitor” with password “winthrop” Open FrontPage. In the box that reads “Open file name” type http://faculty/winthrop.edu/username where you use your username after the slash. A permissions box should open. Enter the password that you use for your office computer account (Outlook, Word, etc.). In your office or at home: Open FrontPage. You may need to enter the website location the first time you log on. You’ll see a box that looks like this: In the white box for Site name at the bottom, enter http://faculty.winthrop.edu/username or http://www.birdnest.org/username where you substitute your username for the word ‘username’. A permissions box should open. It will look like this: 2 Enter win\username or acc\username, typing your username after the slash; TAB down and enter your password. (After the first time you do this in your office or at home, all you should have to enter is your password on subsequent uses. Windows should ‘default’ to this web location and permissions box for you.) What happens next? A page will appear. This is your “default” page—the page your account will open to when someone clicks on your web address. It is important to save this page with the page name default and to never change the name of this page. So do it now: File— save—and give the page the name default. This will become your table of contents page. Here are some good examples of default pages used by your colleagues: http://faculty.winthrop.edu/fikem http://faculty.winthrop.edu/macric http://faculty.winthrop.edu/geralda http://faculty.winthrop.edu/dannellys/ Because different browsers interpret space differently, the best way to keep things lined up on any web page is to use a table. A faculty webpage that uses table format for organization is http://faculty.winthrop.edu/richardsonk. EDUC 275 has a great FrontPage cheat sheet developed by Marshall Jones and Lisa Harris that covers all the ins and outs of making tables; they are willing to share with proper attribution. http://coe.winthrop.edu/educ275/handouts/front_page_cheat_sheet.htm How do I make a new page? Same as you would in Word—click on the little “new page” icon or click FILE -> NEW -> PAGE. Now here’s the difference: when you create a new page in FrontPage, make sure you are saving it in “My Network Places”, not “My Documents” or “My Files.” You want to save it to your website, not to your hard drive or other media. Naming pages in FrontPage is a two-part affair. Create a new page; let’s name it fred. (or FILE -> SAVE), you need to give it both a File When you click the SAVE icon Name and a Page Title. The file name becomes part of the URL, so just type in fred (remember, no spaces); then TAB up to page title and give it a descriptive name (e.g. practice page number 1). The page title can have spaces, and it’s the title that will print out at the top of the page if you print the web page. Once you’ve filled in both boxes, then click the save button. (If you forget to put in a page title or want to change it, you can go back in and edit it using save as.) How do I put things on this page? Just start typing. Everything in FrontPage works pretty much like it does in Word. You can type whatever you want on the page. A good idea on your default page is to start with your contact information (name, office number, phone #, e-mail address). Note: When you hit ENTER in FrontPage you’ll get a double-space. If you want single-spaced lines, hold down the SHIFT key when you hit ENTER. What next? Hit Save. Get in the habit of doing this often; it prevents disasters. I try to save about every five minutes when I’m working in FrontPage. If you see an asterisk on the page name’s tab, it hasn’t been saved yet! 3 I already have things typed in a Word file. Can I put them on a web page? Yes, and there are three ways to do this. First, let’s make a place to put the file. Click on “new” and create a new page in FrontPage. Name it crtw201 (or whatever your course is called) and save the page. You’ll be putting your material on this page, not on your default page. Now, to transfer materials from Word/PDFs. 1. You can open the file in Word, highlight the material you want to copy, hit CONTROL + C, and then put your cursor in your FrontPage file and hit CONTROL + V. This should copy and paste your material into the web page. Note: This is useful when you’re combining several files to make one web page. Advantage: it’s quick and easy. Disadvantage: sometimes the formatting gets messed up. 2. You can go into the file in FrontPage, choose Insert File, and use the Select File box to find the file in My Documents (you may have to change the “Files of Type” to “All Files (*.*)” to find your file). Highlight the file you want, click “Open,” and it should appear in FrontPage. Note: You need to start and name a new page in FrontPage for every file you transfer! (e.g. crtwsyllabus, crtwcalendar, etc.) Advantage: You copy a complete file quickly. Disadvantages: sometimes the formatting gets messed up and FrontPage may keep asking for your username/password to open Word. 3. If you have a number of Word files to upload, it may be easier to drag and drop them. First, save the Word files to your Desktop (using Save As). Then re-open FrontPage, open your page, and choose View -> Folders. Shrink this view to 2/3 screen by clicking the little box in the right-hand upper corner (next to the red x closing box). Then drag and drop the Word files from your desktop into your web page folder. When you’re through, switch FrontPage back to full size and click View -> Page to go back to the normal FrontPage look. Advantage: lets you move a number of files quickly. Disadvantages: files are copied in their original format, not as web pages, and FrontPage will probably keep asking for your username/password to open Word. Dragging and dropping is the best way to upload PDF files to FrontPage. When you’re done inserting, save the page into the website. Don’t forget! Now how do I link these files to my default page? Go back to your default page. Type in some text that will identify what you’re linking— for instance Click here for a link to my practice page #1. on the grey bar at the top of Highlight that text. Now click on the hyperlink icon the page. This will bring up a grey dialogue box. You can type the address (URL) of the page you want in the white box at the bottom, or you can click the box for “existing file or web page” and scroll down to find the page you have already created (fred) and select it, then click “OK.” When the box closes, you should see the default page with the text you just hyperlinked underlined in blue. 4 What if I want to establish a link to some other page on the web? You’ll use the same process, but you can cheat a little bit. Try this: on your default page, type Click here to read “The Correct Use of Borrowed Information Handout.” Then highlight it and click the hyperlink icon. Now choose the little “Browse This should open up Internet Explorer for you. Enter the Web” icon. http://www.winthrop.edu/english/plagiarism.htm and hit enter; the “Correct Use” page should open up. Highlight the URL at the top of the page by left-clicking on it once; then choose Edit – Copy. Click back on FrontPage, put your cursor in the white address box, and hit Control + V. The URL should appear. Hit “OK” and the link will be established. Hint: Control + V is particularly helpful if you have a long URL, such as an JSTOR reference; it saves mistakes when you type out the full URL in the address box. Hint 2: If you know you are going to be establishing a lot of links, first find the pages and save them in your “Favorites” file in Internet Explorer. Then when you use the little Browse icon to open Internet Explorer, you can just click on your favorites list and find the page quickly instead of searching for it again. Hint 3: If you are copying in a very long URL (e.g. the URL to an article in JSTOR), you can highlight the URL and click ALT + TAB very quickly. This in theory should throw you back into the Frontpage screen with the URL already posted in the Make a Hyperlink box. It works about 90% of the time. OK, I want to get fancy. How do I put a picture on my page? Well, there’s the cheater’s way and the official way. The cheater’s way is simple. Find the picture you want on the web and right-click on it. Left-click on Copy. Move your cursor to FrontPage, put it where you want the picture, and hit Control + V. Voíla! (This works pretty consistently for .jpg and .gif images.) Drawbacks? If the picture you’re copying is hyperlinked, you’ll get the hyperlinked copy and not the picture itself. You may not want that—and if the picture goes away for some reason, you’ll have one of those blank spaces with the little box with the red x in it. No fun. So get used to the official way. On the top grey menu bar, click Insert and then Picture. Single-click on From File. This will bring up My Pictures. If the picture is saved in that file, just highlight it and click Insert. Voila. Or if you need to find it on the web, click on the Search the Web and search for the picture you want (MSN Images or Google Images are fast icon ways to find pictures). Right-click on it, left-click on Copy, move your cursor to where you want the picture in FrontPage and hit Control + V. Voíla encore! You can also rightclick and use Save Picture As to save it to “My Pictures” as a .jpg or .gif file. (Use .jpgs for photos, .gifs for simpler drawings.) Remember that pictures on the web may be subject to copyright. Be careful what you borrow. See www.winthrop.edu/copyright if you have questions about legalities. Since some readers need to use assistive technologies to read text on the web, it’s important to put an ALT tag on any images you use. This will create those little words 5 you see in the pop-up box when you run your mouse over a picture on the web, and it’s easy to do. When you insert a picture, right-click on the picture and choose Picture Properties. Choose the General Tab. The screen you see will look like this: Click the box next to Text: and then type in a few words describing your picture. Click OK and the image is tagged for assisted reading. If you’re importing photographs, it’s pretty usual to have them be way too big for the page. You adjust this on the Picture Properties screen as well. This time, right-click on the picture and choose Picture Properties. Choose the Appearance Tab. The screen you see will look like this: 6 If you make the photo width 600 pixels, the height will automatically reset to 450 pixels (or thereabouts), and then you can drag the corner of the picture to size it more effectively. The wrapping style buttons at the top of this menu are used to allow you to put text next to the picture; wrapping left puts the picture on the left margin, while wrapping right puts the picture on the right margin. The alignment button allows you to control where the picture appears on the page, regardless of text. How do I make the background of my page a pretty color? Right-click on the page and choose Page Properties. From the 'Page Properties' menu, navigate to the Formatting tab and click on the pulldown menu on Background and then click on a color you want for the background. Then click on OK. You can also check the Background Picture box and pick an image to use for your background, but remember that a busy background makes it hard to read text. What about copying a background from another page? FrontPage makes this easy. Supposing you want to copy the nice Victorian paper on Evelyne Weeks’s page. In Internet Explorer, go to http://faculty.winthrop.edu/weekse. Put your cursor on the background you want to copy. Right click the mouse. Choose Save background As. Your My pictures folder should open. Give the background a filename like evelynegreen and click the Save button. Now return to FrontPage. Go to the page where you want to use Evelyne’s background (e.g. ethel). Right-click on the page and choose Page Properties. From the 'Page Properties' menu, navigate to the Formatting tab and click on the pulldown menu on Background and then click Background picture. Click on Browse and choose My Documents. Find the My Pictures folder, click on evelynegreen, and click Open, then click the Okay button on the bottom right. The background should appear on your page. (If you do this a lot, you may want to make a folder for backgrounds in the My Pictures folder and keep them all together—it saves time.) (Evelyne’s background comes from Travis Beckham’s great website, http://www.squidfingers.com/patterns/; if you want great patterns to use, try his selections! 7 Saving Images When you go to save a page that has an image on it, you’ll get a box that asks you where to save your images. If the folder name is not images, click on the Change Folder box and choose the images folder and click okay and then okay again. This puts your images in a special folder on your web page that will help them load faster. (There’s a geek-speak explanation for this but I’ll spare you.) It also helps you keep your images organized—you can have one folder for CRTW images, another folder for World Lit images, etc. It’s a little trick, but it will make your web page behave better and load more quickly. Make sure you save the image to your files. If you simply link to a picture on someone else’s page, it may disappear if the page owner removes it. Placing a PowerPoint presentation on your web page This isn’t hard to do. Open the presentation in PowerPoint. Choose File -> Save as Web Page and click on the button Publish. Click the button for Complete Presentation. Click the button for Web Options, make sure the boxes for Add Navigation Controls and Resize Graphics to Fit Browser Window are checked, and click OK. (It’s up to you whether to leave animations turned on; I usually turn them off because they tend to screw up in some browsers.) You may want to check the options button to make sure that you’re getting the presentation colors instead of black-andwhite. Check the box for Open Published Web Page in Browser so that you’ll be able to tell right away if this worked. Then choose Browse, My Network Places, select your website, log in when prompted, and choose the folder where you want the presentation to go. It will have the suffix .mht following the file name, not .htm—this is correct! Then click OK and then Publish. (You may be asked to give FrontPage your username and password at this point again— don’t argue. Just do it.) And your PowerPoint presentation should appear on your web page. Now you can make a link to it from any other page, just like you would to any other file on the web site. If you clicked the Open Published Web Page In Browser box, the page will automatically launch so that you can see it. 8 Keeping a Tidy Web Page One of the biggest challenges in managing a web page is remembering where you put something. That’s why it helps to make subfolders for each category of information you put on your page. When you go to save a web page, one of the options you have at the top of the page is a “create new folder” icon. You can use this to create tidy subfolders into which you can save your pages. As you’ll see from the illustration of the architecture of the English Department web page below, we have divided the department page up into various subfolders so that we can keep like items (for instance course descriptions, syllabi, information on the writing program, etc.) together. Get in the habit of creating folders now and storing relevant material in them. It will really simplify the job of keeping track of “where something went” as your website evolves. Hint: Just like filenames, try not to leave spaces in a folder name: thus, researchpaper instead of research paper. It makes the URL tidier and less likely to cause trouble. Troubleshooting By far the biggest problem in bringing in files from Word is that FrontPage frequently misinterprets the formatting, especially when that formatting is in TABs. FrontPage reads tables differently (as percents of the whole page width) and it makes them easier to load. If you import text from Word and the formatting goes kerblooey, try backspacing to take out those phantom TABs. You may also have to use the decrease indent key to get the text to look right. If you want your page in FrontPage to look nice and balanced no matter whose screen it appears on, use a table (see Kelly Richardson’s default page as an example). This will keep columns nicely lined up no matter what size screen or what kind of browser a reader uses. 9 If a hyperlink doesn’t show up in blue after you import it, just put your cursor at the end of the hyperlink and hit the space bar. This will almost always cause the hyperlink to come alive. If this doesn’t work, just highlight the text and hyperlink it. Free help Students are the best resource. I’ve had very few questions in FrontPage that one of my students couldn’t answer with a pitying “Oh, that’s easy; you just…..” Microsoft Office’s online help page: http://office.microsoft.com/enus/assistance/CH063546291033.aspx A nice overview page for K-12 teachers: http://www.kent.k12.wa.us/KSD/IT/wwwdev/frontpage/ Clinton-Muscatine-Scott Community Colleges (in eastern Iowa) have a nice resource site for more complex FAQs: http://it.eicc.edu/frontpage.cfm Expression Web Microsoft is institutionally incapable of leaving well enough alone. Instead of calling the web development software in Office 2007 “FrontPage 2007,” they have renamed the program “Expression Web.” They have also changed the interface to make it look more like Dreamweaver and Adobe’s GoLive! Software packages, which are the category leaders in this software. Most of what you know in FrontPage will work in Expression Web, but it will probably be under a different icon, so get used to using the Help Icon ( or or the F1 key). The student labs have been upgraded to Office 2007, so they have Expression Web installed (and no FrontPage). You will get Expression Web when the computer in your office gets upgraded to Office 2007 on the replacement cycle. There is no stopping Microsoft; we can only hope to survive it. EDUC 275 has an Expression Web cheat sheet developed by Marshall Jones, who is happy to share it as long as proper credit is given: http://coe.winthrop.edu/educ275/06_ROLO/EXP_Web_cheat_sheet.pdf 10 Geekspeak Glossary HTML: Hypertext Markup Language. The computer coding language used to convert words and images into a web page. FrontPage allows you to create web pages without knowing any HTML. If you are insatiably curious, however, you can click the HTML tab at the bottom of the FrontPage screen and see what you created looks like in code. Then click “Normal” and forget you ever saw it. Fine point: Web page addresses that end in .htm were created in a Windows HTML environment; web page addresses that end in .html were created in an Apple HTML environment. That’s the only difference. URL: Uniform Resource Locator. The page’s call number on the World Wide Web. It can have many combinations of letters and numbers; but the only punctuation you should use is hyphens. DO NOT leave a space in a URL; the computer will try to fill it with code, which gives you a confusing URL. If you MUST leave a space in a page name, you should fill it with an underscore. It makes it much easier for computers to deal with the page name. Official webpages at Winthrop all begin with the extension http://www.winthrop.edu/departmentname or a college server Faculty webpages at Winthrop all begin with the extension http://faculty.winthrop.edu/username. Personal and Staff webpages at Winthrop begin with the extension http://www.birdnest.org/username BROWSER: The program that a computer uses to display web pages. The most common are Internet Explorer (IE) and Netscape Navigator and Apple’s Safari; some people now use Linux browsers like Firefox. AOL’s proprietary browser is the biggest pain in the butt in all of cyberspace. Remember that there are browser wars: what displays in IE may not display in Navigator and vice versa. There is no guarantee WHAT will display in AOL. SERVER: The name of the computer where a web page lives. Pages at Winthrop are on servers such as www.winthrop.edu, faculty.winthrop.edu, and www.birdnest.org. “The server is down” is the all-purpose excuse of the 21st century. Your web page will live on a server, not on the computer in your office (*unless you screw up while saving it*). ISP: Internet Service Provider. The company that runs the server and connects it to the web—usually a phone company. Winthrop’s ISP is Comporium. WYSIWYG (pron. “wizzy-wig”): What you see is what you get. FrontPage is a WYSIWYG program because it lets you see exactly how your page will appear before you load it onto a server. You do this by clicking the “Preview” tab at the bottom of the page. Winthrop Web Services Page: http://www.winthrop.edu/web/
