The SPAR Modification History Screen provides the user with the... Web-based SPAR – SPAR Modification History SPAR Modification History Purpose
advertisement

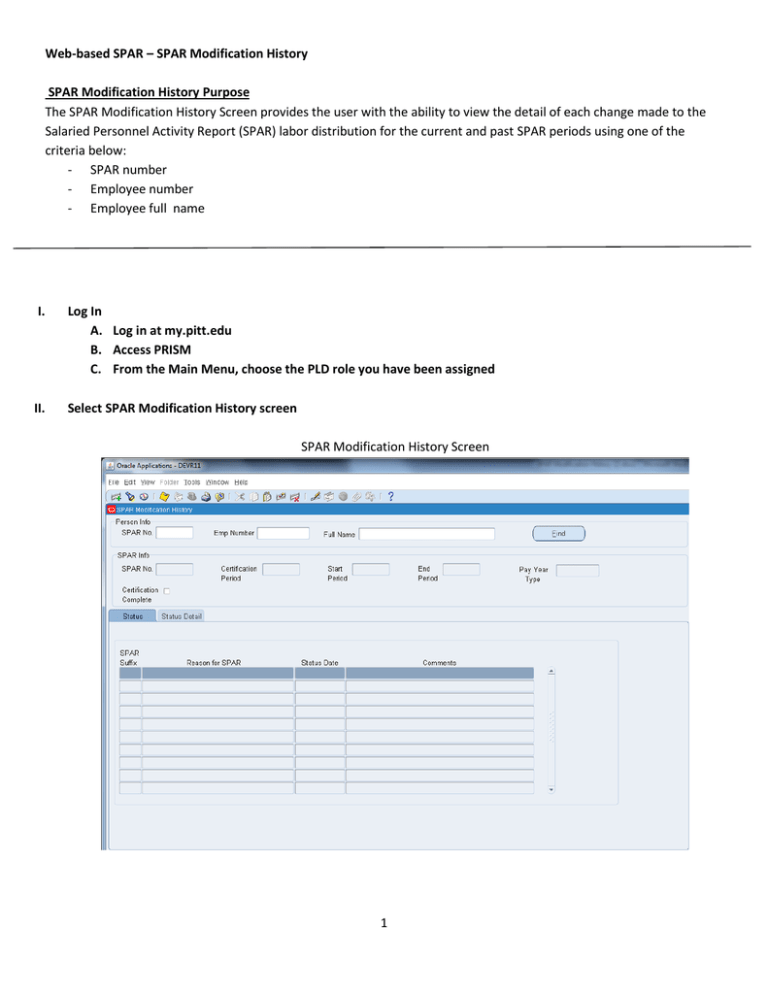
Web-based SPAR – SPAR Modification History SPAR Modification History Purpose The SPAR Modification History Screen provides the user with the ability to view the detail of each change made to the Salaried Personnel Activity Report (SPAR) labor distribution for the current and past SPAR periods using one of the criteria below: - SPAR number - Employee number - Employee full name I. Log In A. Log in at my.pitt.edu B. Access PRISM C. From the Main Menu, choose the PLD role you have been assigned II. Select SPAR Modification History screen SPAR Modification History Screen 1 III. SPAR Modification History Input: The SPAR Info and Status Detail sections of the screen will be populated upon input to the Person Info section by one of the below three methods. A. SPAR No. i. Input: Enter the unique six-digit SPAR number directly in the SPAR No. field and click Find. TIP: Enter the exact six-digit SPAR number, excluding suffix number. TIP: Partial or invalid SPAR numbers will return no results. B. Emp Number i. Input Option 1: Type an individual’s full or partial employee number directly in the Employee Number field and Click Find. a. If more than one result is returned, a pop-up box will list the results b. Highlight the desired selection c. Click OK TIP: Enter a partial value to limit the list. TIP: Enter % (wildcard symbol) to display all values. WARNING: Entering % to view all values may result in a long processing time. Entering a partial value along with % should be used to reduce the list and decrease processing time. TIP: If an invalid employee number is entered, error message “FRM-40212: Invalid value for field FULL_NAME” will be returned. Click OK and enter a valid number. ii. Input Option 2: Click in the Employee Number field and click on the three dots on the right side of that field. Employee number may be entered using any of the below 3 methods. Click OK. a. Directly type the full employee number into the Find box and click Find 1. If more than one result is returned, a pop-up box will list the results 2. Highlight the desired selection 3. Click OK b. Type a partial employee number followed by a % and click Find 1. Highlight the desired selection 2. Click OK c. Type % in the Find box and click Find 1. Highlight the line for the desired employee 2. Click OK TIP: Enter a partial value to limit the list to all employees with that character string in their employee number. TIP: Enter % to display all values. WARNING: Entering % to view all values may result in a long processing time. Entering a partial value along with % should be used to reduce the list and delete processing time. 2 Employee Number Input Screen C. Full Name i. Input Option 1: Type an individual’s full or partial name directly in the Full Name field. a. If more than one result is returned, a pop-up box will list the results b. Highlight the desired selection c. Click OK TIP: Format should be last name, first name (include a comma followed by a space). TIP: Last name only or partial last name can be entered to search for all last names with that character string. ii. Input Option 2: Click in the Full Name field and click on the three dots on the right side of that field. The individual’s name may be entered by any of the below three options. a. Directly type the full name (last, first) into the Full Name field if known 1. Click Find 2. Highlight the desired selection 3. Click OK b. Type a partial name in the Full Name field and click Find 1. Highlight the desired selection 2. Click OK c. Type a partial name followed by the % symbol 1. Click Find 2. Highlight the line for the correct name 3. Click OK TIP: Format should be last name, first name (include a comma and a space). TIP: Last name only or partial last name can be entered to search for all last names with that character string. TIP: If nothing is returned after a search, there is no name that matches the limits that were entered. TIP: Enter a partial name to limit the list. TIP: Enter % to display all values. WARNING: Entering % to view all values may result in a long processing time. Entering a partial value with % should be used to reduce the list and decrease processing time. 3 Full Name Input Screen IV. Output Screens Once the data is entered into the Person Info section and the desired employee has been selected from the drop down menu, the SPAR Info and Status sections will be populated. TIP: The Person Info section can be changed at any time by following the steps in Section III. C. Click Find to update the data in the bottom half of the screen. Changing the name without clicking Find will not cause the data to update. A. SPAR Info: The fields in this section will populate with the most recent SPAR information. i. ii. iii. iv. v. vi. SPAR No. - unique, system-generated number to identify each SPAR Certification Period - date representing the last day of the SPAR period indicating that a certification period of 60 days follows Start Period - start date of the SPAR period End Period- end date of the SPAR period Pay Year Type - Stated as a fraction, this indicates the length of employee appointment over the number of months paid. For example 8/8 indicates an 8 month contract paid over the 8-month period; 8/12 indicates an 8 month contract paid over 12 months Certification Complete box - a check in this box indicates that this effort distribution has been certified TIP: Switch between SPAR periods by clicking in any of the fields in this section and using the up and down arrow keys on your keyboard. B. Status Tab: The fields populate based upon the period selected in the SPAR Info box. Four fields of data are returned: i. SPAR suffix – a unique number representing the version of the SPAR within a SPAR period. Each SPAR period begins with suffix #1. 4 ii. iii. iv. Reason for SPAR – the reason for the creation of this version of the SPAR. Appendix I provides a list of reasons. Status Date – the date the SPAR was created or modified Comments: Identifies how the SPAR was generated to include descriptions such as: 1. Created by Monthly Cert Build, Summer Term, Default Record 2. Created by Percentage Screen 3. Created by Monthly Certification, Scheduled Process 4. Created by Subcode Validation Process TIP: Be sure to scroll through the lines using the scrollbar to the right of the Comments column to be sure all rows are being viewed. TIP: Double click on a row to switch to the Status Detail tab for that line, or highlight the row and click on the Status Detail tab. SPAR Modification History Screen - Status C. Status Detail Tab: The data in this tab is populated based on the SPAR Suffix selected from the Status tab. Two subcategories of data and four functional buttons for moving through the available SPAR changes (suffixes) are provided. i. Summary of information from the Status Screen a. SPAR No. b. Status Date c. Reason for SPAR 5 ii. Detail from the Effort Reporting and Distribution Screen (includes cost share information) a. Line # b. Type – Regular or Joint c. Start Date d. End Date e. Account Number f. Previous Actual % g. Current Actual % h. Previous Dist%/CS% i. Current Dist%/CS% iii. Functional buttons a. First SPAR b. Next SPAR c. Previous SPAR d. Last SPAR TIP: Use the functional SPAR buttons to move between SPAR versions for the selected SPAR period. SPAR Modification History Screen – Status Detail, Line 1 6 SPAR Modification History Screen – Status Detail, Line 2 V. Export Data: Only information on the Status screen will export, the Status Detail screen will not. A. Click Export from the file menu in the upper left hand corner. B. Follow directions for Exporting files found in Appendix II, Web based SPAR – Exporting Data, included with this user guide. VI. Exit Account Inquiry Screen A. Click the upper right hand corner X to exit, or B. Click the red box in upper left hand corner and click Close 7 Appendix I: Reason for SPAR CREATED BY PROCESS Process which will be run after receiving data from HURON Subcode Validation process SPAR REASON CODE CC CVCCNR Subcode Validation process CVCCR Termination process ERTCNR Termination process ERTCR Termination process ETCNR Termination process ETCR Process which is run after Hire Date in HR is changed so that SPAR matches new hire date Process which is run after Hire Date in HR is changed so that SPAR matches new hire date SPAR screen HDCCNR SPAR screen NCFCR New certification build process NCPCNR New certification build process NCPCR New hire process NHCNR New hire process NHCR SPAR screen PCCNR SPAR screen PCCR SPAR screen PCRCR SPAR needed to be changed if the pay year type of the employee changed-- this process will not create a new spar suffix anymore, will just update the pay year type SPAR needed to be changed if the pay year type of the employee changed-- this process will not create a new spar suffix anymore, will just PYTCNR 8 HDCCR NCFCNR PYTCR SPAR REASON Certification Complete Cross Validation Change Cert Not Required Cross Validation Change Cert Required Employee Reverse Termination - Certification Not Reqd Employee Reverse Termination - Certification Reqd Employee/SPAR Termination Certification Not Required Employee/SPAR Termination Certification Required Hire Date Change Certification Not Required Hire Date Change Certification Required New Cert Period Certification Not Reqd - LD % Form New Cert Period Certification Reqd - LD % Form New Certification Period Certification Not Required New Certification Period Certification Required New Hire - Certification Not Required New Hire - Certification Required LD % Change - Certification Not Required LD % Change - Certification Required Percentage Change - ReCertification Required Pay Year Type Change Cert. Not Required Pay Year Type Change Cert. Required update the pay year type Process which will be run after receiving data from HURON SPAR screen -- these will not be created anymore SPAR screen -- these will not be created anymore RCC RRC RRCC SPAR screen -- these will not be created anymore RRCNR SPAR screen -- these will not be created anymore RRCR SPAR screen -- these will not be created anymore RRRCC SPAR screen -- these will not be created anymore RRRCR Process which was run one time when LD system was implemented in Jan 2003 Process which was run one time when LD system was implemented in Jan 2003 Process which was run one time when LD system was implemented in Jan 2003 Subcode Validation process SSCC Subcode Validation process SVCCR 9 SSCNR SSCR SVCCNR Re-Certification Complete Reprint for Re-Certification Reprint Request Certification Complete Reprint Request Certification Not Required Reprint Request Certification Required Reprint Request - ReCertification Complete Reprint Request - ReCertification Required Start-Up SPAR Certification Complete Start-Up SPAR Certification Not Required Start-Up SPAR Certification Required Subcode Validation Change - Cert Not Required Subcode Validation Change - Cert Required Appendix II: Web-based SPAR – Exporting Data from the Web-based SPAR This function can be used for Account Inquiry (with or without subcodes), Person Inquiry, SPAR Modification History, and Labor Distribution and Cost Sharing screens. TIP: On the SPAR History Modification screen, only the Status screen will export, the Status Detail screen will not. To export from the Labor Distribution and Cost Sharing Screens, you must export the Effort Reporting and Distribution (top) and the Cost Sharing (bottom) sections separately. Click in the section to be exported. I. For Computers with Adobe Reader: A. Go to File on Toolbar at top of page. B. From drop down menu, select Export. C. The Oracle Application page will open. On the bottom you will see a message “Do you want to open or save XXXXX”. Select Open. D. A notepad will open with all the data you requested. E. To date stamp the version of information you are using, go to Edit and select Time/Date. F. To print data in the notepad format, select Print from the File menu. G. To export the data, go to Edit and select Select All or manually select the data lines you are interested in by holding down the left click button while you move the cursor over the lines selected. Right click on the highlighted data and select Copy. H. Open an Excel spreadsheet and right click in the upper most left cell you want to work with, right click and select Paste. II. For Computers with Adobe Acrobat: A. Go to File on Toolbar at top of page. B. From drop down menu, select Export. C. The Oracle Application page will open. On the bottom you will see a message “Do you want to open or save XXXXX”. Select SAVE. D. You will receive a message box that the download is complete. Select OPEN E. The View Downloads window will open, select the download you created and from the drop down menu select OPEN WITH. F. Select Microsoft Notepad. G. A notepad will open with all the data you requested. H. To date stamp the version of information you are using, go to Edit and select Time/Date I. To export the data, go to Edit and select Select All or manually select the data lines you are interested in by holding down the left click bottom while you move the cursor over the lines selected. Right click on the highlighted data and select Copy. J. Open an Excel spreadsheet and right click in the upper most left cell you want to work with, right click and select Paste. 10


