GEOL 3402 • Structural Geology • Prelab 01 v. 2015
advertisement
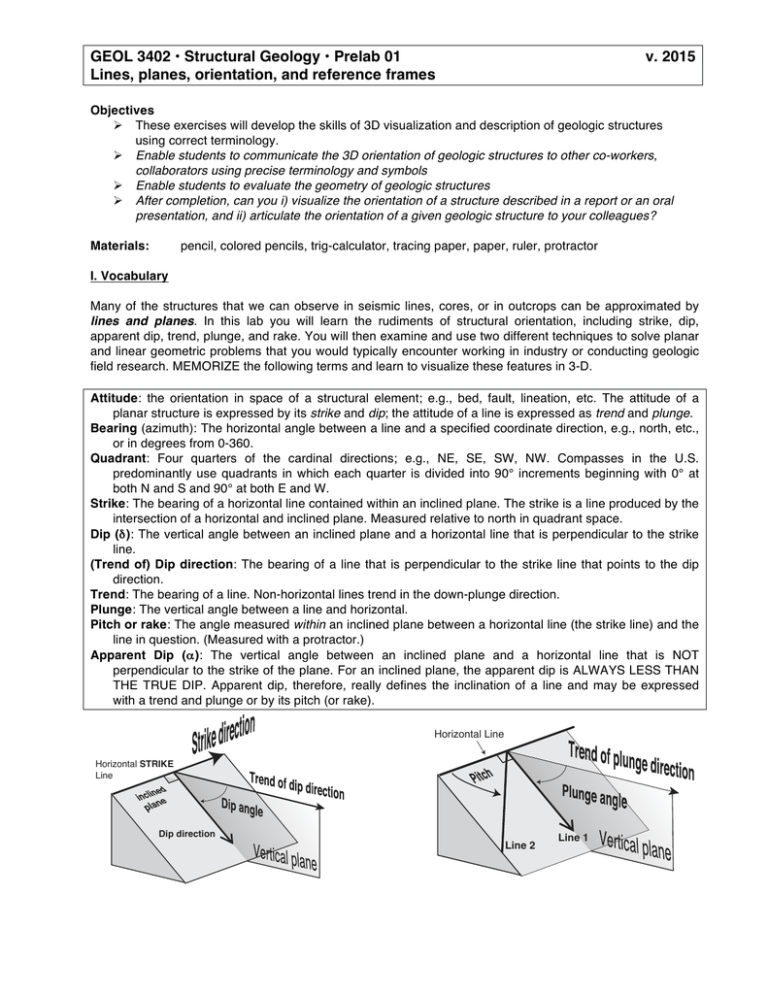
GEOL 3402 • Structural Geology • Prelab 01 Lines, planes, orientation, and reference frames v. 2015 Objectives Ø These exercises will develop the skills of 3D visualization and description of geologic structures using correct terminology. Ø Enable students to communicate the 3D orientation of geologic structures to other co-workers, collaborators using precise terminology and symbols Ø Enable students to evaluate the geometry of geologic structures Ø After completion, can you i) visualize the orientation of a structure described in a report or an oral presentation, and ii) articulate the orientation of a given geologic structure to your colleagues? Materials: pencil, colored pencils, trig-calculator, tracing paper, paper, ruler, protractor I. Vocabulary Many of the structures that we can observe in seismic lines, cores, or in outcrops can be approximated by lines and planes. In this lab you will learn the rudiments of structural orientation, including strike, dip, apparent dip, trend, plunge, and rake. You will then examine and use two different techniques to solve planar and linear geometric problems that you would typically encounter working in industry or conducting geologic field research. MEMORIZE the following terms and learn to visualize these features in 3-D. Attitude: the orientation in space of a structural element; e.g., bed, fault, lineation, etc. The attitude of a planar structure is expressed by its strike and dip; the attitude of a line is expressed as trend and plunge. Bearing (azimuth): The horizontal angle between a line and a specified coordinate direction, e.g., north, etc., or in degrees from 0-360. Quadrant: Four quarters of the cardinal directions; e.g., NE, SE, SW, NW. Compasses in the U.S. predominantly use quadrants in which each quarter is divided into 90° increments beginning with 0° at both N and S and 90° at both E and W. Strike: The bearing of a horizontal line contained within an inclined plane. The strike is a line produced by the intersection of a horizontal and inclined plane. Measured relative to north in quadrant space. Dip (δ): The vertical angle between an inclined plane and a horizontal line that is perpendicular to the strike line. (Trend of) Dip direction: The bearing of a line that is perpendicular to the strike line that points to the dip direction. Trend: The bearing of a line. Non-horizontal lines trend in the down-plunge direction. Plunge: The vertical angle between a line and horizontal. Pitch or rake: The angle measured within an inclined plane between a horizontal line (the strike line) and the line in question. (Measured with a protractor.) Apparent Dip (α): The vertical angle between an inclined plane and a horizontal line that is NOT perpendicular to the strike of the plane. For an inclined plane, the apparent dip is ALWAYS LESS THAN THE TRUE DIP. Apparent dip, therefore, really defines the inclination of a line and may be expressed with a trend and plunge or by its pitch (or rake). Horizontal Line Horizontal STRIKE Line Dip direction Line 2 Line 1 GEOL 3402 • Structural Geology • Prelab 01 Lines, planes, orientation, and reference frames v. 2015 II. Conventions for expressing strike & dip of a PLANE Strike and dip can be expressed in a number of different ways and it is advantageous to be able to conceptualize these conventions. In the U.S., strike is measured using the quadrant method in which the compass is divided into four quadrants (NE, SE, SW, NW). A fault plane that strikes north-west/southeast and dips 42° southwest would be expressed as N45W/42SW; meaning that the line produced by the intersection of an imaginary horizontal plane and the inclined fault plane trends 45° west of north. The dip of this plane, measured perpendicular to the strike, is 42° in the southwest direction. Quadrant data should always be recorded and displayed relative to north in the following way: e.g., NxW/ySW, where x is the measured strike and y is the measured dip. The other convention is the azimuthal method, in which the compass is divided into 360° (0°/360° at the top, counting in a clockwise direction). Using the azimuthal method, the fault plane noted above would have a strike of either 315° or 135°. You would then have to specify the dip direction: 315/42SW. Dip direction may be specified in two ways: 1) The ‘right-hand rule’: looking in the direction of the strike the plane should dip to your right. Therefore, in the above case, the strike would be 135° and the dip would be 42°. The convention for displaying ‘right-hand rule’ data is strike first, then dip; e.g., 135°/42°. 2) Alternatively, you could specify the dip direction; e.g., 315° 42W. In this case, you do not have to look down the strike line and worry about the ‘right-hand rule’ because the dip direction, “W”, is noted. III. Conventions for expressing plunge & trend of a LINE The convention for noting the trend of a line is that it should always be measured in the ‘down-plunge’ view, and the plunge is always recorded first. For example, 36°/S54W means that a line plunges 36 degrees in a direction 54 degrees west of due south. When measuring a line in quadrant notation, you may use all quadrants, not just the north half. IV. Map symbols and notation conventions PLANES The symbols to the left represent strike and dip symbols for planes of the various orientations noted. The long line represents the strike direction; the shorter tick points toward the dip direction. The bold italics notation is in quadrant form; the regular font is in azimuth with “right hand rule”. GEOL 3402 • Structural Geology • Prelab 01 Lines, planes, orientation, and reference frames v. 2015 LINES The symbols to the left represent plunge and trend symbols for lines of the various orientations noted. The bold italics notation is in quadrant form; the regular font is in azimuth. Note that the direction of trend for a given line is always measured toward the plunge direction. For example, the measurement of 30°/S45°E defines a line that plunges 30° from horizontal toward the direction of S45°E. V. True vs. Apparent Dip The block diagram below (A) displays the difference between apparent dip and true dip. Apparent dip, α, is the vertical angle measured from horizontal down to an inclined plane in a vertical plane that is NOT perpendicular to ion the strike line. The horizontal angle rect i d ke between the apparent dip direction and the stri strike line is β. A α The true dip, δ, is equal to the maximum dip of the plane and is therefore always greater than α. δ VI. Putting it all together B Notice how the profile plane in Fig. B containing the apparent dip (α = 56°) is not perpendicular to strike. a C N ike β angle: 60° (acute angle) Map View str Example based on oblique block diagram and associated map view. Strike & Dip Quadrant: N30°W/60°SW Azimuthal: 330°/60°SW; 150/60SW Oblique Perspective Azimuthal, r.h.r.: 150°/60° Dip Direction: Quadrant: S60°W Azimuthal: 240° n io Apparent Dip Direction: ct re i d p Quadrant: N90°W; di ue r t S90°W; or due W tion irec ip d d t Azimuthal: 270° ren ppa e tru n ctio ire d p di apparent dip direction VII. Website Resources: http://earthsci.org/education/fieldsk/compass/compass.html http://www.geo.utexas.edu/courses/420k/PDF_files/Brunton_Compass_09.pdf This shows some examples of how geologists measure strike and dip. http://www.fault-analysis-group.ucd.ie/structurecontours/contours/strike.html GEOL 3402 • Lab 01 Name: R#: Day: Cut out along bold line prior to lab True versus apparent dip model. Cut out along bold perimeter line. Redrafted from the Fault Analysis Group, University College Dublin. Name: stirike/dip symbol B ap pa re nt dip β A line parallel to strike line normal to strike ke true dip 45° A tr i α Cut-out model to display strike/dip, plunge/trend and apparent dip. Cut out along perimeter line. Redrafted from the Fault Analysis Group, University College Dublin. bli qu et os B eo γ lin trend GEOL 3402 • Lab 01 R#: Day: Cut out along bold line prior to lab plunge/trend symbol 29°
