GETTING STARTED WITH WEBEX Innovation in Learning Center
advertisement

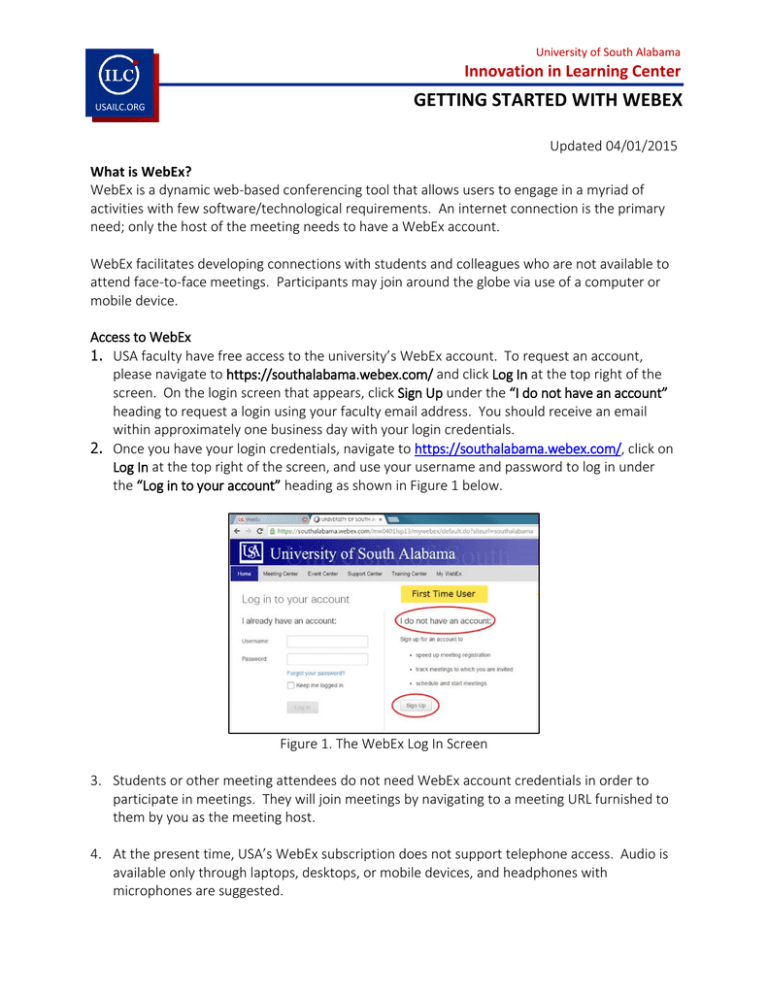
University of South Alabama Innovation in Learning Center USAILC.ORG GETTING STARTED WITH WEBEX Updated 04/01/2015 What is WebEx? WebEx is a dynamic web-based conferencing tool that allows users to engage in a myriad of activities with few software/technological requirements. An internet connection is the primary need; only the host of the meeting needs to have a WebEx account. WebEx facilitates developing connections with students and colleagues who are not available to attend face-to-face meetings. Participants may join around the globe via use of a computer or mobile device. Access to WebEx 1. USA faculty have free access to the university’s WebEx account. To request an account, please navigate to https://southalabama.webex.com/ and click Log In at the top right of the screen. On the login screen that appears, click Sign Up under the “I do not have an account” heading to request a login using your faculty email address. You should receive an email within approximately one business day with your login credentials. 2. Once you have your login credentials, navigate to https://southalabama.webex.com/, click on Log In at the top right of the screen, and use your username and password to log in under the “Log in to your account” heading as shown in Figure 1 below. Figure 1. The WebEx Log In Screen 3. Students or other meeting attendees do not need WebEx account credentials in order to participate in meetings. They will join meetings by navigating to a meeting URL furnished to them by you as the meeting host. 4. At the present time, USA’s WebEx subscription does not support telephone access. Audio is available only through laptops, desktops, or mobile devices, and headphones with microphones are suggested. Learning to Use WebEx 1. A variety of instructional aids are available online for learning to use WebEx, including onscreen help, video tutorials, job aids, user guides, and self-paced online courses. In each Center, you may access the instructional aids by clicking New User Reference, User Guides, and/or Training. Figure 2. Location of Online WebEx Instructional Aids 2. The WebEx interface provides access to four Centers: Meeting Center, Event Center, Support Center, and Training Center. Faculty members are granted access to all but the Support Center which is reserved for use by technology support personnel only. 3. Each of the Centers have similar interfaces but significantly different functions and applications. A comparison of the features of the Centers appears at the end of this guide. 4. Because the Meeting Center is the most often used interface for interactive meetings and instructional sessions, this introductory guide is based on the Meeting Center tool. Scheduling and Hosting WebEx Meetings 1. On the WebEx Meeting Center page, you may schedule an “instant” meeting by clicking on Meet Now under the Host a Meeting Heading. By providing the URL or Meeting Number generated by clicking Meet Now, attendees can instantly join your meeting. 2. Basic instructions for scheduling and hosting a meeting are provided in Figure 3. A “Getting Started” guide can be found under New User Reference on the WebEx page. 2 GETTING STARTED WITH WebEx 1. 2. 3. 4. 5. 6. 7. 8. Schedule and start a meeting. Log in to your WebEx site. Under Host a Meeting, click Schedule a Meeting. If you see the Advanced Scheduler page, click Quick Scheduler. Select a Meeting Type, enter a Meeting Topic, then enter and confirm the meeting password. Specify the Date, Time and Duration. (Setting duration is for planning only — the meeting will continue until you end it.) Enter the email addresses of people you want to invite. Click the green Start button to begin the meeting now or click Schedule Meeting if you changed the time or date. To start a meeting you scheduled, click My Meetings, then locate the meeting and click Start. Share content in your meeting. 1. Click the button at the bottom of the sharing panel on the Quick Start tab. 2. Select what you want to share with everyone in your meeting, such as a whiteboard or file. 3. Use Annotation Tools if you want to highlight or mark on shared content. You can also enable the tools for others. From the Participant menu, select Assign Privileges and check the box next to Annotate. 1. 2. 3. 4. Share your video feed. From the Meeting menu, select Options to check that video is enabled. Click the video button next to your name in the Participants panel. (If you have an external camera in addition to a built-in one, click the gear icon to select one.) Double-click the speaker's video to display it in full screen. To stop sharing your video feed, click the video button again. Figure 3. Instructions for Scheduling and Starting a Meeting Best Practices for WebEx Meetings 1. As Meeting Host, you will need the email addresses of all meeting participants in order invite them to the event. You should inform participants that they will need to attend the conference via a reliable internet connection in a quiet environment with a computer equipped with audio for both listening and speaking (i.e., headphones with microphone, earbuds with microphone, or laptop). If you plan to include video in the meeting, participants will need to be informed that they will need to also have a webcam available. 2. Ideally, you might suggest that attendees attend a test meeting in order to verify that their hardware and software are working properly with the WebEx interface. Instructions to give to attendees for joining a test meeting are shown in Figure 4 below. 3 GETTING STARTED WITH WebEx 1. 2. 3. 4. 5. To join a test meeting: Click on the following link to access a test meeting: https://www.webex.com/test-meeting.html. Enter your Name and Email Address, then click Join. Follow the instructions that appear on your screen to download WebEx. Your test meeting will load. This is followed by a dialog box stating 'The host has not yet joined the meeting'. Click OK to close the dialog box. At this point, you have joined successfully, and the WebEx Meeting Center client for the test meeting is successfully installed. 6. Click on the File menu, and choose Leave Meeting. If you are unable to join or having difficulty running the test, please contact WebEx Support at 866.229.3239 Option 1 or visit support.webex.com for helpful support information. Figure 4. Instructions for Joining a Test Session 3. Additionally, you may want to schedule the first meeting of a group as a short “Practice Meeting” in order to be sure that everyone has a chance to solve connectivity issues before you conduct your first content-rich WebEx meeting with a new group. 4. You, as Meeting Host, will need to have all materials you intend to share during the Meeting prepared and available on your desktop. 5. If you intend to save documents (such as whiteboard annotations) while the meeting is in session, you may want to create a destination folder for the meeting on your desktop prior to beginning the meeting. 6. If you would like to record the meeting, open the Meeting menu in the upper left and select “Start Recording.” The session will be stored as a link on the WebEx site. To access your recorded session, while logged in to WebEx, navigate to My WebEx>MyFiles>My Recordings. You can share the link with attendees and/or with others who did not attend the session. If you need to convert the session to an .mp4 file format, please contact the ILC at 251-461-1888 for assistance with the file conversion protocol. WebEx Product Comparison Chart 4 GETTING STARTED WITH WebEx Product Comparison Cisco WebEx Meeting Center Description Usage Scenarios Present information, share applications, and collaborate on projects. Streamline the meeting process with a centralized space for managing activities and information. Recommended number of attendees Collaborative sessions Internal and external meetings Product and project coordination, demos Sales presentations Cisco WebEx Training Center Cisco WebEx Event Center Cisco WebEx Support Center Deliver highly interactive and effective online training and elearning. Stage large-scale online events. Deliver efficient, personalized customer service and IT support. Employee, partner, and customer training Webinars Marketing events and conferences Product rollouts Product launches Certification and IT training Employee communications Distance learning Remote employee and customer IT support Personalized customer service through the Internet Up to 500 Up to 1,000 Up to 1,000; additional capacity available Up to eight concurrent sessions with five participants in each Cisco WebEx Meeting Center Cisco WebEx Training Center Cisco WebEx Event Center Cisco WebEx Support Center Real-time desktop, application, document, and web browser sharing Yes Yes Yes Desktop and application sharing only Whiteboards and annotation tools Yes Yes Yes Annotation tools only Information Sharing 5 GETTING STARTED WITH WebEx Video streaming only Yes Yes Yes No Text chat and Q&A (managed and moderated) Text Chat Yes Yes Text Chat File transfer Yes Yes Available on request Yes Audio and Video Cisco WebEx Meeting Center Cisco WebEx Training Center Cisco WebEx Event Center Cisco WebEx Support Center Audio Phone, VoIP, WebEx Cloud Connected Audio Phone, VoIP, WebEx Cloud Connected Audio Phone, VoIP, audio broadcast, WebEx Cloud Connected Audio Phone, VoIP, WebEx Cloud Connected Audio Video HD video; multipoint; fullscreen view; expanded fullscreen view HD video; multipoint; fullscreen view; expanded fullscreen view High-quality video; multipoint; fullscreen video High-quality video; single-point only Specialized Features Cisco WebEx Meeting Center Cisco WebEx Training Center Cisco WebEx Event Center Cisco WebEx Support Center Polling Instant only Yes Yes No Program and campaign management and post-event surveys No No Yes No Lead source tracking and enrollment scoring No No Yes No Registration management Yes Yes Yes No Testing, instant grading, and instructor scoring No Yes No No Breakout sessions and hands-on labs No Yes No No Permissions-based remote control Yes Yes Yes Yes Reports Yes Yes Yes Yes 6 GETTING STARTED WITH WebEx

