Experiment 35B SILVER AND NON-SILVER PHOTOGRAPHIC CHEMISTRY
advertisement
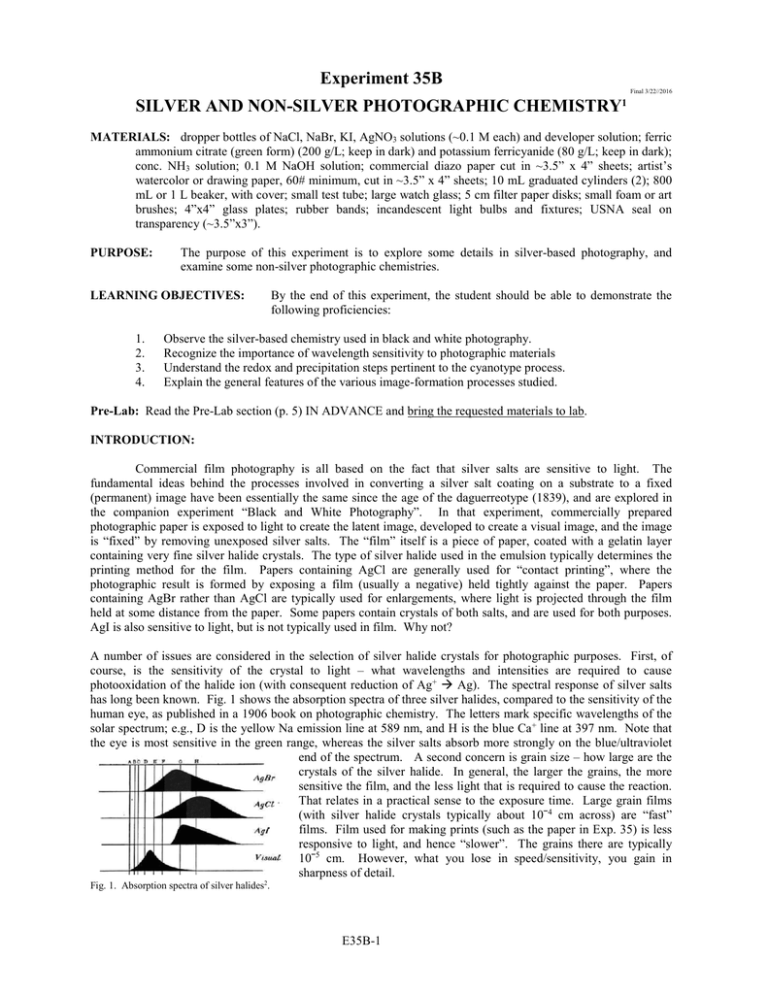
Experiment 35B Final 3/22//2016 SILVER AND NON-SILVER PHOTOGRAPHIC CHEMISTRY 1 MATERIALS: dropper bottles of NaCl, NaBr, KI, AgNO3 solutions (~0.1 M each) and developer solution; ferric ammonium citrate (green form) (200 g/L; keep in dark) and potassium ferricyanide (80 g/L; keep in dark); conc. NH3 solution; 0.1 M NaOH solution; commercial diazo paper cut in ~3.5” x 4” sheets; artist’s watercolor or drawing paper, 60# minimum, cut in ~3.5” x 4” sheets; 10 mL graduated cylinders (2); 800 mL or 1 L beaker, with cover; small test tube; large watch glass; 5 cm filter paper disks; small foam or art brushes; 4”x4” glass plates; rubber bands; incandescent light bulbs and fixtures; USNA seal on transparency (~3.5”x3”). PURPOSE: The purpose of this experiment is to explore some details in silver-based photography, and examine some non-silver photographic chemistries. LEARNING OBJECTIVES: 1. 2. 3. 4. By the end of this experiment, the student should be able to demonstrate the following proficiencies: Observe the silver-based chemistry used in black and white photography. Recognize the importance of wavelength sensitivity to photographic materials Understand the redox and precipitation steps pertinent to the cyanotype process. Explain the general features of the various image-formation processes studied. Pre-Lab: Read the Pre-Lab section (p. 5) IN ADVANCE and bring the requested materials to lab. INTRODUCTION: Commercial film photography is all based on the fact that silver salts are sensitive to light. The fundamental ideas behind the processes involved in converting a silver salt coating on a substrate to a fixed (permanent) image have been essentially the same since the age of the daguerreotype (1839), and are explored in the companion experiment “Black and White Photography”. In that experiment, commercially prepared photographic paper is exposed to light to create the latent image, developed to create a visual image, and the image is “fixed” by removing unexposed silver salts. The “film” itself is a piece of paper, coated with a gelatin layer containing very fine silver halide crystals. The type of silver halide used in the emulsion typically determines the printing method for the film. Papers containing AgCl are generally used for “contact printing”, where the photographic result is formed by exposing a film (usually a negative) held tightly against the paper. Papers containing AgBr rather than AgCl are typically used for enlargements, where light is projected through the film held at some distance from the paper. Some papers contain crystals of both salts, and are used for both purposes. AgI is also sensitive to light, but is not typically used in film. Why not? A number of issues are considered in the selection of silver halide crystals for photographic purposes. First, of course, is the sensitivity of the crystal to light – what wavelengths and intensities are required to cause photooxidation of the halide ion (with consequent reduction of Ag+ Ag). The spectral response of silver salts has long been known. Fig. 1 shows the absorption spectra of three silver halides, compared to the sensitivity of the human eye, as published in a 1906 book on photographic chemistry. The letters mark specific wavelengths of the solar spectrum; e.g., D is the yellow Na emission line at 589 nm, and H is the blue Ca+ line at 397 nm. Note that the eye is most sensitive in the green range, whereas the silver salts absorb more strongly on the blue/ultraviolet end of the spectrum. A second concern is grain size – how large are the crystals of the silver halide. In general, the larger the grains, the more sensitive the film, and the less light that is required to cause the reaction. That relates in a practical sense to the exposure time. Large grain films (with silver halide crystals typically about 10ˉ4 cm across) are “fast” films. Film used for making prints (such as the paper in Exp. 35) is less responsive to light, and hence “slower”. The grains there are typically 10ˉ5 cm. However, what you lose in speed/sensitivity, you gain in sharpness of detail. Fig. 1. Absorption spectra of silver halides2. E35B-1 In analogy to modern digital photography, smaller grains are like having more pixels in the image, with consequent better resolution. The size of the grain depends on how it is formed and processed, which are closely guarded secrets of film manufacturers. Another feature of the normal silver photographic process is that it produces a “negative” image, where the bright and dark regions of the image are reversed from those of the original. To make a “positive”, you actually have to perform the whole process twice. The reason that a negative image is generated with each exposure is based on the silver process itself, and it is, in some ways, a limitation of the method. Essentially, the overall photographic process can be broken down into four steps, some detailed in that lab: 1. 2. 3. 4. forming a latent image in the photosensitive material by a light-induced reaction developing the image by a chemical redox step to create a macroscopic (visible) image fixing the image by removal of unreacted photosensitive material toning the image (if desired) to provide other colors When you look at the steps expressed in such a general way, it is apparent that photographic processes do not have to be limited to systems based on silver. After all, many chemicals interact with light (e.g., chlorophyll in plants; dyes in curtains or carpets), and many chemicals change color because of redox reactions (think of the effect of bleach on clothing, for example). So, it should not be a surprise that photography can be done with other chemistries, and, indeed, there are about a dozen different well-developed photographic methods that do not use silver at all. These are often lumped together under the heading of “alternative photographic methods”. Because silver-based films have been highly commercialized (and therefore relatively easy to use and inexpensive), these alternative techniques are much less common today, but many are still done for the distinct artistic effects rendered in their images. In this experiment, we will explore two of these alternative methods, cyanotype and diazo prints. Cyanotypes (Blueprint Process) The cyanotype process was first developed in the 1840s. It was one of the original methods used for making blueprints for engineers, architects and draftsmen, employing essentially the same contact process we will use. The cyanotype process is one of several iron-based photographic chemistries. Its distinctive blue images (see Fig. 2) are based on the formation of the insoluble compound “Prussian blue” through photoreduction of Fe3+ (later written as Fe(III)) to Fe2+ (Fe(II)). The process is not completely understood, but the basic reactions are illustrated below. The two most common photosensitive agents used in iron photography are ferric ammonium citrate (Fe(NH4)(C6H6O7)2) and ferric ammonium oxalate (Fe(NH4)(C2O4)2). Note that in both compounds the iron is in the +3 oxidation state. The processes are essentially the same in both cases, although it is easier to visualize with the simpler oxalate compound, so the discussion will focus on that compound (even though we will use the citrate in the experiment). Fig. 2. Cyanotype, contact print, 3 min exposure, full sun Both citrate and oxalate are the conjugate bases of weak acids, citric acid and oxalic acid respectively. The structure of the oxalate ion (one resonance form) is: O C O - C O O- When exposed to ultraviolet light, both citrate and oxalate release CO2 and an electron (i.e., undergo photooxidation). For oxalate, it is particularly easy to see the bond reorganization and electron loss C2O42ˉ + hν 2 CO2 + 2 eˉ This can only happen in the presence of an electron acceptor, the Fe3+, which undergoes reduction: E35B-2 Fe3+ + eˉ Fe2+ The overall light-induced process is just the sum of these steps, balanced for conservation of electrons: 2 Fe3+ + C2O42ˉ 2 Fe2+ + 2 CO2 The net result is the conversion of iron(III) ammonium oxalate to iron(II) ammonium oxalate. This results in only a very slight color change (pale yellow-green to pale yellow-brown), and the result is not permanent at this stage because air can re-oxidize the iron and essentially reverse the reaction. Another reaction is necessary to make it permanent. Although the ferric ammonium citrate or ferric ammonium oxalate is the light-sensitive agent, it is not the only chemical on the substrate, which also contains a developer compound. The initial “film” is created by drying a mixture of the citrate (or oxalate) compound and another iron compound, potassium ferricyanide, K3Fe(CN)6. You can see that iron is in the +3 state in this compound. For the cyanotype process, developing and fixing take place nearly together, when the exposed “film” is washed with water. This causes several changes: 1. The iron(III) in the ferricyanide oxidizes the iron (II) initially formed photochemically: Fe(CN)63ˉ + Fe2+ Fe(CN)64ˉ + Fe3+ 2. The iron(III) reacts with the ferrocyanide (Fe(CN)64ˉ) to make an insoluble salt called “Prussian blue”. Chemically, it is a compound with two iron ions in two different oxidation states: 3 [Fe(CN)6]4ˉ + 4 Fe3+ Fe(III)4[Fe(II)(CN)6]3 The deep blue color is due to the presence of iron in the two oxidation states. Because the compound is insoluble in water, it remains trapped in the paper substrate. Note that this reaction could not occur in the solid state because the ions were immobile. 3. Any unexposed photosensitive compounds are washed away because they are water soluble. This makes the resulting image stable. As the developed print dries, it may darken further as air oxidation and loss of hydration alters the structure of the Prussian blue slightly. Exposure of the developed print to household hydrogen peroxide can also darken the color because of the oxidizing effect. The net result is the characteristic deep blue color of the cyanotype in regions that were exposed to light, and no color (or the color of the substrate) in regions not exposed. Cyanotype prints can be colored (“toned”) to give a gold image background by treatment with aqueous sodium hydroxide solution (Fig. 3). The product is FeO(OH), a mixed oxide-hydroxide salt sometimes called “yellow iron oxide”. Commercially, it is used in cosmetics and tattoo inks under the name “Pigment Yellow 42”. Other chemical bath combinations can “tone” cyanotypes to brown and purple. The cyanotype process has several interesting advantages over the silver process you have used. First, the “film” is very simple to prepare – you just mix solutions of ferric ammonium citrate and potassium ferricyanide together, paint it onto a piece of paper, and let it dry Second, the film is only sensitive to ultraviolet (UV) radiation, not to visible light. Thus, we can operate in the lab with ordinary incandescent lights on, since they emit no UV radiation. (Because of the mercury in fluorescent lamps, however, they emit a small amount of UV light, and must be left off.) Finally, the exposed films can be developed simply by holding them under running water. Because of these features, this cyanotype method has a new application in the form of the Sunprint© kit, an educational toy you can find at many toy stores. Fig. 3. Cyanotype, contact print, 7 min. exposure, partial sun; 5 sec. tone 0.1 M NaOH. E35B-3 Diazo Prints (Whiteprint or Blueline Process) Silver-based black and white photography, and the iron-based cyanotype process described above, all involve inorganic chemicals. Modern color photography utilizes silver salts for the initial photo-induced reactions, but then uses redox reactions to effect a color change in some organic dyes called couplers. Diazo prints involve an allorganic method, where the product is a strongly absorbing molecule called a “diazo” dye. The diazo process was (and still is) used for construction blueline drawings or whiteprints. It provided a way to make very sharp multiple copies of large complicated drawings in a very short time. Also, the diazo print is an instant-print, dry process; no washing, etc. was necessary after the development step. It was the method of choice until the 1950s, when large scale dry copiers (i.e., Xerox© machines) became widespread. In spite of advances in digital imaging, there are still thousands of blueline machines in operation today. Unlike the cyanotype method, which gives white lines on a blue background, “whiteprints” provided colored (blue) lines on a white background; these were much easier to read (Fig. 4), and more closely resemble the original, since it is a “positive” image. Only photography could offer similar quality images, and that was much slower and more expensive. In addition, because the image quality of ordinary (silver) photography depends on the size of the silver salt grains, diazo prints had an additional advantage of higher resolution, by about a factor of ten. The photosensitive compounds in the diazo coating are dispersed at the molecular level, so the grain size is essentially zero. The basic steps in the diazo process are again a light-induced change in the photosensitive material, followed by a redox reaction to create the image. The photosensitive film coating on diazo paper has two important types of compounds, a “diazonium salt” and an azo dye coupler. The photosensitive salt is yellow, which gives the color to the unexposed original diazo paper. When the paper is exposed to UV radiation, the diazonium salt loses N2; the remaining product is colorless. Thus, immediately after the exposure, the undeveloped paper shows a pale yellow image (due to the unexposed salt) where no light reached the coating, on a white background. H3C H3C O O Fig. 4. Diazotype contact print, 15 sec. exposure, full sun + N2 Cl N O hν O N Cl O N2 + O CH3 CH3 diazonium salt (yellow) (colorless) The original image is still not permanent, because the remaining salt would be changed on subsequent exposure to light, and the color is quite pale. This situation is remedied by developing the exposed film in a tank containing NH3 vapor. In the alkaline environment of the development chamber, the unexposed diazo salt reacts with a coupler molecule (in the film coating) to form the highly colored diazo compound, the final dye in the process. H3C H3C O O O + N2 Cl N O NH3 (g) + O HO R HO CH3 coupler (colorless) E35B-4 + N N O CH3 diazonium salt (yellow) N diazo product (blue) R HCl Small changes to the group marked “R” on the coupler can result in different colors of the final diazo compound. The result is a nearly instant copy of the original, with dark lines on a white background. PRE-LAB: Read the materials required. If you will need an Instructor’s help to obtain a transparency, see them several days in advance of the lab. 1. BRING A HARDCOVER TEXTBOOK TO LAB. The use of “contact print” methods requires a flat heavy object for stability and a cover to limit exposure. Your chemistry textbook (or any hardcover textbook) will provide a convenient base and cover simply by fastening the original and paper to an inner page; you can control exposure just by opening to that page. EACH midshipman needs a book of his or her own. 2. BRING A PERSONALIZED ORGINAL (optional). In this experiment you will produce cyanotype and diazotype images. In each case, the subject of the image can be one of your own choosing. Transparencies of the USNA seal (as used for Figs. 2-4) will be provided, but you may bring your own originals if desired. Various types of material will work, but the original must have a transparent background (if you want an image) or be solid and opaque (if you only want a silhouette). Generally, simpler originals work better for images, such as the line drawing in the 4th Company logo (Fig. 5). However, photographic negatives, or copier-produced transparencies of photographs will also work, such as the Blue Angels photo below. You can also turn your Exp. 35 pinhole camera negative into a positive, just by using a transparency of that as the original. The cyanotype of Bancroft Hall is just the image on p. 1 of Exp. 35 treated as the original. Fig. 5. Sample cyanotypes and diazotypes. If you have an artistic bent, you can create your own drawing on transparency and use that. As mentioned above, you can also use solid objects as the original, and obtain a silhouette of the object. Plant leaves, religious icons, uniform devices, etc. will all work. (In the latter case, use a spare – don’t be out of uniform to do this!) The anchor cyanotype above is just the uniform insignia placed upside down on the paper for exposure. While the fine detail is lost in such silhouettes, it still provides an interesting image. In every case, the original MUST BE A MAXIMUM SIZE OF 3.0” x 3.5” to fit on the prepared “films”. PROCEDURE: NOTE: For this lab, DO NOT turn on the fluorescent lights in the room or in the fume hoods. You should be able to see well enough with the incandescent lights set up in the lab. Part A. Photosensitivity of Silver Salts – Instructor Demonstration 1. To a small test tube in a test tube rack, add 10 drops of NaCl solution, and then 5 drops of AgNO3 solution. Record your observations. 2. Clean and dry a small area of the hood workspace, close to the sash. Lay down a paper towel and place three small filter paper disks on it, separated from each other. Place an additional filter paper disk on top of each. Mark the filters with the salts you will form on them – “AgCl”, “AgBr”, and “AgI”. 3. With a dropper bottle, add 10 drops of NaCl solution to the center of the filter disk stack marked “AgCl”, 10 drops of NaBr solution to the disks marked “AgBr”, and 10 drops of KI solution to the disks marked “AgI”. E35B-5 4. In the center of each treated disk stack, add 5 drops of AgNO3 solution. 5. Pick up the disk stacks by their edges and arrange them on a large watch glass. Hold your hand over the assembly to provide a crude light shield and take the watch glass, the test tube and a notebook outside (preferred) or into a well-lighted hallway. Observe closely for several (up to 5) minutes. Note color or size of any visible crystals, the order in which the samples darken, and the relative darkness of each after the total exposure time. Save the samples and check again near the end of lab. 6. To the test tube exposed to light, add one drop of photographic developer solution. Record your observations. Part B. Diazotype Creation and Printing – Work Individually 1. The diazo paper is made by a rather complicated process, and has been obtained commercially. The photosensitive paper sheet is already prepared for you. Obtain a sheet from the lab supply. Use your original transparency, or obtain the small transparency of the USNA seal. Open the front cover of your textbook, and place the diazo paper on the book side (not on the cover itself). See Figure 6. Place the transparency on top of the paper, FACE UP, making sure that the image region is fully on the paper. Obtain the 4” square of thin plate glass. BE CAREFUL! The edges may be sharp and the glass is easily breakable! Place the glass square over the transparency and diazo paper. Use the two large rubber bands to firmly fix the assembly to your textbook. (By properly orienting the layers, you should be able to keep the rubber bands clear of the image area.) Close the cover to serve as a light shield. Fig. 6. Cyanotype or Diazotype mounting (Cyanotype shown) 2. Go outside, find a stable spot exposed to light, and open the book cover. Watch the paper carefully as the exposure progresses; it will change from the original yellow to colorless in exposed regions. This may take a few seconds or a few minutes, depending on conditions. Once you begin the exposure, be sure not to move the glass, transparency or paper relative to each other. (It’s OK to move the whole book if necessary.) When the exposed area has turned white, close up the book and bring the film inside for development. 3. Back indoors, under incandescent lights only, disassemble your materials. Return the USNA transparency to the class supply, as it will be used again. Return the rubber bands to the class supply for reuse. Examine your exposed diazotype paper. You should be able to see the pale yellow image remaining in unexposed areas. Bring the paper to the developing station. 4. Grasp the paper with tongs in a region outside of the image area. Uncover the development container and lower the paper into it to expose the paper to NH3 vapor. (DO NOT place the paper in the NH3 solution!) The developed image will form almost immediately. If necessary for uniformity, you can take the paper out, grip it from the other end, and then expose to NH3 vapor again. The finished diazotype is ready as soon as it is removed from the tank. Put the cover back on the NH3 developing bath. Part C. Cyanotype Creation and Printing – Work in Groups of Four. 1. Obtain four small sheets (about 3.5” x 4.0”) of artist’s watercolor paper or drawing paper, one sheet for each midshipman. Use a pen or pencil to draw a line along the short edge, about ½” from the top. This will provide a space without chemicals so you can handle the paper, and also room to record exposure information. 2. (NOTE: the single batch of reagents mixed in this step should provide enough solution for all four members of the group.) At the hoods where the cyanotype chemicals are located, label a 10 mL graduated cylinder “C” (for ferric ammonium citrate) and label a separate 10 mL graduated cylinder “K” (for potassium ferricyanide). In the proper cylinders, measure out 2.0 mL each of the ferric ammonium citrate and potassium ferricyanide solutions. Pour the measured amounts into a single small beaker and mix well with a clean glass stirring rod. 3. Put down a clean paper towel on a clean area of the lab bench. Use a foam brush to uniformly coat the solution onto the paper as follows. (NOTE: the idea is to get a thin uniform coating, not a soaking wet piece of paper!). Holding the paper on the towel by the ½” margin, dip the brush once into the solution. Start in the upper right E35B-6 corner and make 4-5 strokes along the long edge, moving left. (Stroke the full length of the paper each time; the illustration below is just to show sequence.) Dip again and, starting in the lower left corner, make cross strokes 1 dip 1 dip don’t dip! 1 from left to right, moving up, again covering the full length each time. Finally, without dipping the brush, repeat the strokes along the long edge again. Each stroke leaves a pale yellow coloration to the paper, so you can check for uniformity. If you spot uncoated spaces, try to blend in from adjacent areas, rather than dipping the brush again. 4. Allow the cyanotype paper to dry completely. The airflow of the hood will help, but make sure that your sheet is not sucked into the hood and soiled (or lost!). There may also be hair dryers available. It should only take a minute or two to dry. 5. Use your original object or transparency, or obtain the small transparency of the USNA seal. Open the front cover of your textbook, and place the dry cyanotype paper on the book side (not on the cover itself). See Figure 6 above. Use two large rubber bands to secure it to the book. 6. This step depends on the nature of your original: a. If using a transparency, do this: Place the transparency on top of the paper, FACE UP, making sure that the image region is within the coated area of the paper. Slide the rubber bands out of the way if necessary. Obtain the 4” square of thin plate glass. BE CAREFUL! The edges may be sharp and the glass is easily breakable! Place the glass square over the transparency and cyanotype paper. Use the two large rubber bands to firmly fix the assembly to your textbook. (By properly orienting the layers, you should be able to keep the rubber bands clear of the image area.) Close the cover to serve as a light shield. b. If using a solid object, do this: Spread the rubber bands out to provide as much coated image area as possible. Make sure the object will fit in the image area. Close up the book to provide a light shield. When you get in the sun, quickly place the object where you want it, and then do not move it. 7. Go outside, find a stable spot exposed to light, and open the book cover. If using a solid object, place the object directly on the paper at this time. Once you begin the exposure, be sure not to move the object, glass, transparency or paper relative to each other. (It’s OK to move the whole book if necessary.) Watch the paper as it exposes. The exposed regions should turn from a pale greenish yellow to an olive green, possibly with tints of blue. Exposure times will vary, depending on conditions, but might take from 2 min on a sunny day to 10 minutes on a cloudy day. When you get the olive color, or see no more changes, close up the book and bring the film inside for development. 8. Back indoors, under incandescent lights only, disassemble your materials. Return the USNA transparency to the class supply, as it will be used again. Return the rubber bands to the class supply for reuse. Examine your exposed cyanotype paper. You should be able to see the pale yellow image remaining in unexposed areas. Run the paper under tap water for about one minute; the image will form as the soluble salts mix and the insoluble colored Prussian blue forms by reaction. Allow the final cyanotype to dry. It may darken slightly more with time. 9. (Optional). If you would like to “tone” the cyanotype, replacing the blue color with gold, do the following. Use tongs on the uncoated “handle” to pick up the paper. Dip it into a bath of 0.1 M NaOH for about 5 seconds, or until the blue has fully converted to gold. Remove from the bath and wash under running water. Allow to dry. REFERENCES: 1. This laboratory is an adaptation developed from three main sources: “Photography”, http://www.wellesley.edu/Chemistry/Chem&Art/Topics/Photography/photography.html, Wellesley College, accessed 14 March 2007.; J. Chem. Educ. 76, 1199 (1999).; “Lab 2: Redox Chemistry”, http://ocw.mit.edu/NR/rdonlyres/Chemistry/5-302January--IAP--2005/C9B352FB-888B47D5-BE6C-3A740A2F6C2E/0/II_Redox_chem_2005b.pdf, MIT Open Courseware, accessed 14 March 2007. 2. “Photography for Students of Physics and Chemistry”, http://books.google.com/books?id=AN6d4zTjquwC&pg=RA5-PA97&lpg=RA5PA97&dq=%22color+sensitiveness%22+of+silver+salts&source=web&ots=RKisKcYIXk&sig=0iOHYvJO6YAJyyxH_D23 rC7Noto, Louis Derr, 1906 (original), digitized by Google; accessed 14 March 2007. E35B-7 Name Section Partner Date PRE-LAB / POST-LAB QUESTIONS Experiment 35B Part A. Silver-Based Photographic Chemistry 1. Write out the “molecular” and “net ionic” equations for the precipitation of the three silver salts from solutions of AgNO3(aq) and NaX or KI (aq) solutions. Molecular Net Ionic AgCl(s) AgBr(s) AgI(s) 2. Write out the oxidation and reduction reactions that take place when the AgCl-coated filter paper (or AgCl solid in the test tube) is exposed to light. (You might wish to consult the section on “Latent Image Formation” in Exp. 35, “Black and White Photography”.) Oxidation Reduction 3. A black solid forms when you add developer solution to the test tube containing AgCl(s) exposed to light, just as it did when you placed your exposed film from Exp. 35 into the developer bath. What is the black solid? Explain in terms of the overall oxidation-reduction reaction. (You might wish to consult the section on “Developing the Latent Image” in Exp. 35, “Black and White Photography”.) 4. Based on Fig. 1, which would you predict to be the silver salt that darkens most quickly when exposed to sunlight? Which would be the slowest? Explain. Check your predictions after you complete the experiment. E35B-8 Part B. Cyanotypes 1. Why is it possible to make the photosensitive cyanotype paper under full-range incandescent lights, but handing the silver-based photographic paper in Exp. 35 required dark-room conditions? 2a. Write out the chemical reaction that represents formation of the final blue colored compound characteristic of cyanotype prints. b. What are the signs of the thermodynamic quantities ΔGrxn and ΔSrxn for this step? ΔSrxn : ΔGrxn : c. Do you think this reaction proceeds by a one-step mechanism? (i.e., is this an “elementary reaction”?) Explain. Part C. Diazotypes 1. Consider the structure of a blue diazo product that provides the developed image in a diazo print: 2 H3C O O N N N CH3 HO O 1 3 CH3 a. What is the full formula and molar mass of the compound shown? (Remember the convention introduced in the textbook discussion of Lewis Structures and Organic Chemistry: any unmarked vertex is a C atom, bonded to as many H atoms as necessary to give the carbon an octet. Also, non-carbon atoms other than hydrogen are all shown, even though their lone pairs of electrons are not. Each non-C atom has as many lone pairs as necessary to give it an octet.) Formula: Molar Mass: b. What is the hybridization of the central atom, and bond angles around the marked atoms? 1 2 3 E35B-9
