Contents Thermal oxidation procedure
advertisement
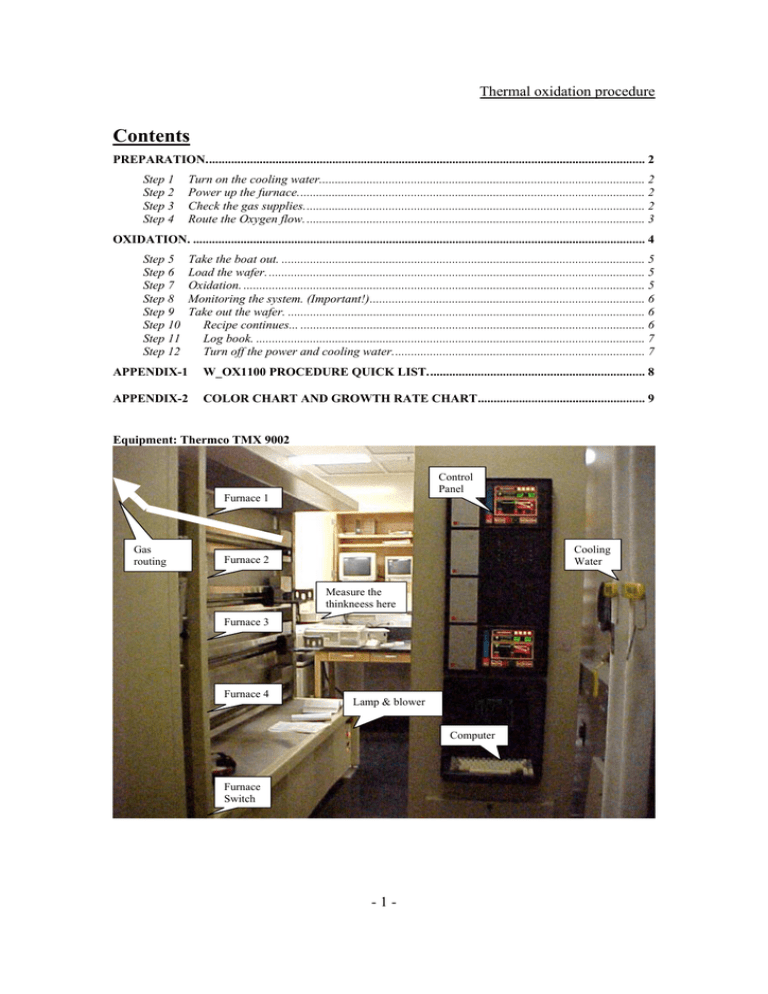
Thermal oxidation procedure Contents PREPARATION........................................................................................................................................... 2 Step 1 Step 2 Step 3 Step 4 Turn on the cooling water....................................................................................................... 2 Power up the furnace.............................................................................................................. 2 Check the gas supplies............................................................................................................ 2 Route the Oxygen flow. ........................................................................................................... 3 OXIDATION. ............................................................................................................................................... 4 Step 5 Step 6 Step 7 Step 8 Step 9 Step 10 Step 11 Step 12 Take the boat out. ................................................................................................................... 5 Load the wafer. ....................................................................................................................... 5 Oxidation. ............................................................................................................................... 5 Monitoring the system. (Important!)....................................................................................... 6 Take out the wafer. ................................................................................................................. 6 Recipe continues... ............................................................................................................. 6 Log book. ........................................................................................................................... 7 Turn off the power and cooling water................................................................................ 7 APPENDIX-1 W_OX1100 PROCEDURE QUICK LIST..................................................................... 8 APPENDIX-2 COLOR CHART AND GROWTH RATE CHART..................................................... 9 Equipment: Thermco TMX 9002 Control Panel Furnace 1 Gas routing Cooling Water Furnace 2 Measure the thinkneess here Furnace 3 Furnace 4 Lamp & blower Computer Furnace Switch -1- Thermal oxidation procedure Preparation. The preparation procedure sets up the power, gas supplies, cooling water, (DI water for Wet Oxidation) and etc. Step 1 Turn on the cooling water User • Turn on the cooling water on the wall. Explanation Open the RETURN at first. Picture 1: The cooling water is off now. Step 2 Power up the furnace. User • Turn on the furnace switch. Tube 1 for oxidation. Explanation Tube 1 is for oxidation. Tube 4 is for curing. It takes a while for the furnace to heat up. (our starting point is 400°C) Check the gas supply and DI water during this time. Step 3 Check the gas supplies. User Turn on the nitrogen and oxygen in the east room. (Picture 2) Explanation • Provide the gas supply for the system. • Check the diagram on the wall. We need high purity Nitrogen and Oxygen. Picture 2: The gas supply. -2- Thermal oxidation procedure Step 4 Route the Oxygen flow. User Route the oxygen flow at the far end of the furnace. • Dry oxidation: Oxygen goes directly into the furnace w/o water. • Wet oxidation: Let it pass through the DI water. (Picture 3-4), also make sure there is enough DI water. Explanation • Route the oxygen for dry/wet oxidation. • Keep in mind before the final oxidation stage, the DI water should be boiled (up to 110°C) to supply water vapor. • Refer to Picture 4 for the usage of the green valves. • The idle state is for Dry oxidation Picture 3: Routing the oxygen. This is NOT a correct routing. Picture 4: Green valves. (Courtesy of Yael) here to check all the supplies. Cooling water Gas supplies Routing DI water for wet oxidation We start the recipe at 400°C. Wait … until the Profile temperature reaches 400°C -3- Thermal oxidation procedure Oxidation. After initialization, we are ready to go. To do the oxidation, we need take out the boat (by computer), load in the wafer (manually) and run the recipe (by computer) and be sure to monitor the system during the oxidation. Here is the command list for the computer. Table 1, command list for thermoco furnace. There are two basic modes: Command line: one command each time, it goes through three steps. 1) [c-E] to edit the command. 2) [c-C] to compile it. 3) [c-W] to run it. Recipe: A batch of commands, there are two steps: 1) [c-C] to load the recipe, some time you need fill in the variables. 2) Push Start on the control panel to run it. Here are some commands commonly used: • GASFLOW: open/close the gas. • BOAT IN/OUT: push-in /take-out the boat. • MFTEMP: Ramp up/down the Main-Furnace-Temperature. Check the reference for more information. -4- Thermal oxidation procedure Step 5 Take the boat out. User When the furnace heat up is 400°C, we can get started. First take the boat out. • [c-E], tube 1, press [return] and wait until the cursor drops to the first line. Key in “Boat In 100”. You need press [return] to switch to the next column, use [arrows] and [space bar] to erase and revise. • [c-C] to compile it, make sure the cursor is still in the first line. • When prompted for recipe, [c-W] to run it. If asked for the second recipe and you don’t have it, just press [return]. Fill in the correct tube ID, for oxidation, it’s “1” Explanation • Now we are running in the command line mode. So it’s [c-E]/[cC]/[c-W] in sequence. For different command the system will prompt with different parameters. Read it on the screen or refer to the manuals. • The speed of Boat In/Out depends on the temperature of the furnace. 100 for 400°C and 10-15 for 800°C. Step 6 Load the wafer. User Load the wafer. Explanation Make sure you have the dummy wafer in both ends. Important! Put the wafer in the middle of zone 2! (Picture 5). Important! 1 2 3 Picture 5. The three zones in the furnace. Step 7 Oxidation. User • Explanation • • • [c-C] to load the recipe, type “W_OX1100” and press [return]. When prompted for the variable, fill in the time (HR:MN:SC) you want to oxidize. Look up the log book for reference. Press [Start] on the control panel above the computer. Now we are running at Recipe mode. The system will run a batch of commands in sequence. Be sure to monitor the system; don’t run away! For w_ox1100: the furnace is ramped up to 1100°C, stay a while for stabilizing, then open the oxygen. After oxidizing for the time -5- Thermal oxidation procedure you set, it will close the oxygen, ramp down to 800°C, take the boat out and hold for next step. After you load off the wafer, push START on the control panel to continue the recipe. It will then ramp down the furnace to 400°C and shut off N2 finally. Step 8 User Monitoring the system. (Important!) • • • • • Explanation • • • Step 9 User Take out the wafer. • • • Step 10 User For wet oxidation, make sure you got the DI water boiled before the system open the oxygen. Make sure there is enough DI water. Monitoring the gas supply (on the screen). Some time you need go to adjust the regulator. 1. Press [c-T] to display the Tube Status screen, wait… 2. When prompted for tube ID, enter ID and [return] 3. It will display the furnace and gas information alternately. 4. Press [M] to switch to Main Furnace information. 5. Press [G] to switch to Gas Status. 6. Press [A] to switch back and forth. Whenever the alarm rings, there is something wrong or abnormal. Find it out. Don’t just “MUTE” it. After the oxidation at 1100°C is done, you may turn off the DI water supply and O2 supply. Make sure the system is working properly. There are two time-indicators on the screen. One is the total time left for the recipe, which is also showed on the control panel. The other is the step time. After the oxidation at 1100°C, we don’t need O2 or DI water anymore Wait while monitoring the system. When the furnace is cooled down to 800°C, it will take out the boat automatically. Load off the wafers. Recipe continues... • After you take off the wafers, push start on the control panel to continue the recipe. • You may power off the furnace now. Explanation The recipe will: • Boat in • Ramp down the furnace • Shut down N2 at appropriate time. It will take the furnace about 1 hour to ramp down. -6- Thermal oxidation procedure Step 11 User Log book. • • Measure the thickness and index of the oxide. Write the logbook. Explanation Wait…until the furnace ramp down to 400°C. Usually it takes 2 hours. Step 12 Turn off the power and cooling water. User Monitor the system (furnace and gas) on the screen, when the temperature is 400°C • Turn off the cooling water. Close IN at first. • Go to the east room to turn off N2 • Also turn off O2 if you haven’t done it yet. Explanation DONE -7- Thermal oxidation procedure Appendix-1 1. 2. 3. 4. 5. 6. W_OX1100 procedure quick list. Turn on the Blower and Lamp Turn on the cooling water. Both valves! Open the RETURN first Power up the furnace. It takes about 20mins to reach 400°C Open high purity O2 and high purity N2 in east room Supply DI water for wet oxidation. 2/3 for 25 min Route O2. Idle state is for dry oxidation Wait… until the furnace reaches 400°C 7. At 400°C (profile), take the boat out 8. Load the wafers. Dummy wafers! Be sure to put it in the middle of the two blocks 9. Load the W_OX1100 recipe. Input the oxidation time. (For your reference: 25min for 4300A) 10. Push START on the control panel 11. Fill in the schedule Time Start +40min +5min +20min +10min +15min +oxidati on time you set +1hour What you do Status Furnace 400°C, go to 800°C 800°C, stay for 5min 800°C, go to 1100°C 1000°C, go to 1100°C 1100°C, stay for 15min 1100°C 1100°C, go to 800°C N2 √ √ √ √ 800°C √ O2 12. Turn on the heater Close vent √ √ √ √ 13. Turn off the heater Open vent 14. Close O2 in east room 15. Load off wafers Turn off the BLOWER Power off the furnace 16. Measure the thickness Write the log book The recipe is on hold now. After you load off the wafers Push start on the control panel to continue the recipe. Boat in automatically +2hour Shut down the system 400°C 17. Close N2 in east room 18. Turn off the lamp 19. Turn off the cooling water. Both valves! Close the IN first 20. DONE -8- Thermal oxidation procedure Appendix-2 Color Silver Brown Yellow-brown Red Deep blue Blue Pale blue Very Pale blue Silver Light yellow Yellow Orange-red Red Dark Red Blue Blue-green Light green Orange-yellow Red Color chart and growth rate chart SiO2 Thickness (A) 270 530 730 970 1000 1200 1300 1500 1600 1700 2000 2400 2500 2800 3100 3300 3700 4000 4400 Si3N4 (A) 200 400 550 730 770 930 1000 1100 1200 1300 1500 1800 1900 2100 2300 2500 2800 3000 3300 Color chart for thermal dioxide (refractive index of 1.48) and silicon nitride (1.97) From Stephen A. Campell, The Science and Engineering of Microelectronic Fabrication, Oxford University Press, 1996 Growth Rate for Wet Oxidation Growth Rate for Dry Oxidation From S.K. Ghandi, VLSI Fabrication Principles, Wiley, 1983. -9-
