UT Southwestern Medical Center at Dallas, Southwestern Center for Minimally Invasive Surgery Robotic Basic Skills Curriculum
advertisement

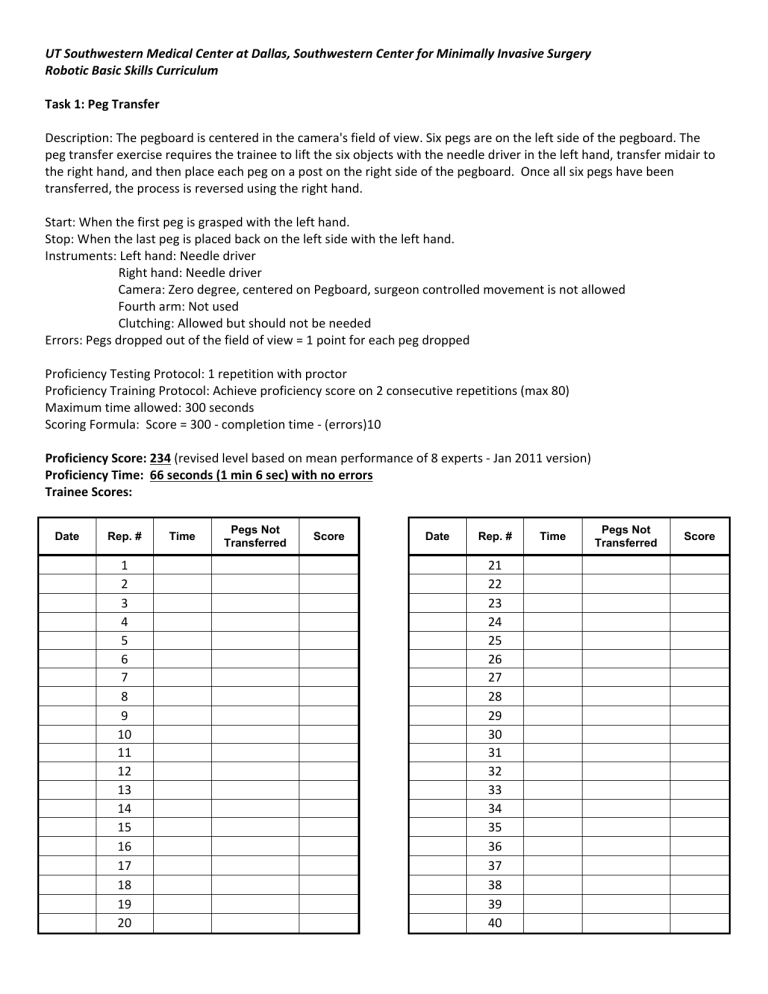
UT Southwestern Medical Center at Dallas, Southwestern Center for Minimally Invasive Surgery Robotic Basic Skills Curriculum Task 1: Peg Transfer Description: The pegboard is centered in the camera's field of view. Six pegs are on the left side of the pegboard. The peg transfer exercise requires the trainee to lift the six objects with the needle driver in the left hand, transfer midair to the right hand, and then place each peg on a post on the right side of the pegboard. Once all six pegs have been transferred, the process is reversed using the right hand. Start: When the first peg is grasped with the left hand. Stop: When the last peg is placed back on the left side with the left hand. Instruments: Left hand: Needle driver Right hand: Needle driver Camera: Zero degree, centered on Pegboard, surgeon controlled movement is not allowed Fourth arm: Not used Clutching: Allowed but should not be needed Errors: Pegs dropped out of the field of view = 1 point for each peg dropped Proficiency Testing Protocol: 1 repetition with proctor Proficiency Training Protocol: Achieve proficiency score on 2 consecutive repetitions (max 80) Maximum time allowed: 300 seconds Scoring Formula: Score = 300 ‐ completion time ‐ (errors)10 Proficiency Score: 234 (revised level based on mean performance of 8 experts ‐ Jan 2011 version) Proficiency Time: 66 seconds (1 min 6 sec) with no errors Trainee Scores: Date Rep. # 1 2 3 4 5 6 7 8 9 10 11 12 13 14 15 16 17 18 19 20 Time Pegs Not Transferred Score Date Rep. # 21 22 23 24 25 26 27 28 29 30 31 32 33 34 35 36 37 38 39 40 Time Pegs Not Transferred Score UT Southwestern Medical Center at Dallas, Southwestern Center for Minimally Invasive Surgery Robotic Basic Skills Curriculum Task 2: Clutch and Camera Movement Description: This task requires the trainee to move and navigate the camera (in a clockwise manner beginning and ending with shape “A”). Using the camera, follow the path from target A to target B. At each square target, the camera will be frozen before moving on to the next target and the trainee will notify the proctor that the shape is completely in view with no red dots seen and all corners visible. Only after notification can the trainee move on to the next target. This is continued until all targets have been visualized. Start: When trainee moves the camera for the first time Stop: Trainee returns to target “A” and notifies proctor of visualization. Instruments: Left hand: No instrument Right hand: No instrument Camera: Zero degree, centered on middle of hexagon Fourth arm: Not used Clutching and camera required Errors: Red dot visualized = 1 point for each dot seen. Corners of target not in view = 1 point for each occurrence Proficiency Testing Protocol: 1 repetition with proctor Proficiency Training Protocol: Achieve proficiency score on 2 consecutive repetitions (max 80) Maximum time allowed: 300 seconds Scoring Formula: Score = 300 ‐ time ‐ (sum of errors)10 Proficiency Score: 248 (revised level based on mean performance of 8 experts ‐ Jan 2011 version) Proficiency Time: 52 seconds with no errors Trainee Scores: Date Rep. # 1 2 3 4 5 6 7 8 9 10 11 12 13 14 15 16 17 18 19 20 Time Dots Corners Score Date Rep. # 21 22 23 24 25 26 27 28 29 30 31 32 33 34 35 36 37 38 39 40 Time Dots Corners Score UT Southwestern Medical Center at Dallas, Southwestern Center for Minimally Invasive Surgery Robotic Basic Skills Curriculum Task 3: Rubberband Transfer Description: The trainee must grasp the rubberband placed at the base of the copper wire model (position "A") with the left needle driver, transfer it to the right needle driver, and place it on the model on the right side (position "B"). This task must be performed in a left‐to‐right direction from “A” to “B” and “C” to “D”, then reversed from a right‐to‐left direction from “D” to “C” and “B” to “A”. Time starts: When the first rubberband is grasped Time stops: When the last rubberband is placed back at position "A" Instruments: Left hand: Needle driver Right hand: Needle driver Fourth arm: Not used Camera: Zero degree, centered, surgeon controlled movement is not allowed Clutching: Allowed but should not be needed Errors: Dropping rubberbands outside field of view = 1 point. Avulsion of model = 1 point Proficiency Testing Protocol: 1 repetition with proctor Proficiency Training Protocol: Achieve proficiency score on 2 consecutive repetitions (max 80) Maximum time allowed: 300 seconds Scoring Formula: Score = 300 ‐ time ‐ (sum of errors)10 Proficiency Score: 229 (revised level based on mean performance of 8 experts ‐ Jan 2011 version) Proficiency Time: 75 seconds (1 min 15 sec) with no errors Trainee Scores: Date Rep. # 1 2 3 4 5 6 7 8 9 10 11 12 13 14 15 16 17 18 19 20 Time Rubber Bands Dropped Avulsion Score Date Rep. # 21 22 23 24 25 26 27 28 29 30 31 32 33 34 35 36 37 38 39 40 Time Rubber Bands Dropped Avulsion Score UT Southwestern Medical Center at Dallas, Southwestern Center for Minimally Invasive Surgery Robotic Basic Skills Curriculum Task 4: Simple Interrupted Suture. Description: The trainee must perform a simple interrupted suture on the Penrose drain (FLS suturing model). The FLS model is oriented perpendicular with a 2cm vertical slit. The trainee must pass the needle (2‐0 silk, 12cm length, tapered needle) through both 2mm marked targets, located 5 mm away from the incision on opposite sides of the Penrose drain. Using instrument ties the trainee performs a surgeon's knot, followed by 2 square knots; (3 knots total) and then cuts the suture tails to 1cm in length using fourth arm scissors. The FLS laparoscopic suturing protocol must be used (i.e. alternating hands). Care must be taken not to avulse the model. Start: When needle is grasped. Stop: When both suture tails have been cut to 1cm in length. Instruments: Left hand: Needle driver Right hand: Needle driver Camera: Zero degree, centered on FLS model, surgeon movement not allowed Fourth arm: Curved Scissors Clutching required only for the fourth arm Errors: Accuracy: Sum of distances in (mm) needle passed outside of each colored target Gap (air knot): Distance in (mm) between targets on FLS suturing model (minimum = 2mm = no error) Breakage of suture: 10 points Bunny Ears: Incorrect knot = 1 point Frayed Suture: 1 point if outside of knot, 10 points if within knot Avulsion of model = a score of zero. Slippage of knot: 10 points for slip >3 mm Tails: Fails to cut tails to 1 cm = 1 point for each occurrence Proficiency Testing Protocol: 1 repetition with proctor Proficiency Training Protocol: Achieve proficiency score on 2 consecutive repetitions (max 80) Maximum time allowed: 600 seconds Scoring Formula: Score = 600 ‐ completion time ‐ 10(sum of errors) Proficiency Score: 509 (revised level based on mean performance of 8 experts ‐ Jan 2011 version) Proficiency Time: 91 seconds (1 min 31 sec) with no errors Trainee Scores: Date Rep. # 1 2 3 4 5 6 7 8 9 10 11 12 13 14 Time Accuracy Gap Error Breakage Bunny ears Frayed within Knot Frayed outside Knot Avulsion Knot Slippage Tail Length Score Date Rep. # 15 16 17 18 19 20 21 22 23 24 25 26 27 28 29 30 Time Accuracy Gap Error Breakage Bunny ears Frayed within Knot Frayed outside Knot Avulsion Knot Slippage Tail Length Score UT Southwestern Medical Center at Dallas, Southwestern Center for Minimally Invasive Surgery Robotic Basic Skills Curriculum Task 5: Clutch and Camera Peg Transfer Description: This task requires the trainee to grasp the rubber peg at position “A” with the left needle driver and place it at position “B”; then pick up the peg with the right needle driver and place it at position "C". This process is repeated until the peg has been returned to position "A". Clutching and camera movement are required to complete this task. Care must be taken not to drop the peg outside of the field of view. Time starts: When the camera is first moved by the trainee Time stops: When the peg is placed at position "A" Instruments: Left hand: Needle driver Right hand: needle driver Camera: Zero degree, centered and zoomed out, surgeon adjustments as needed Fourth arm: Not used Clutching is required Errors: Peg dropped out of field of view Proficiency Training Protocol: Achieve proficiency score on 2 consecutive repetitions (max 80 reps) Proficiency Testing Protocol: 1‐proctored repetition Maximum time allowed: 300 seconds Scoring Formula: Score = 300 ‐ time ‐ 10(errors) Proficiency Score: 251 (revised level based on mean performance of 8 experts ‐ Jan 2011 version) Proficiency Time: 49 seconds with no errors Trainee Scores: Date Rep. # 1 2 3 4 5 6 7 8 9 10 11 12 13 14 15 16 17 18 19 20 Time Pegs Dropped Score Date Rep. # 21 22 23 24 25 26 27 28 29 30 31 32 33 34 35 36 37 38 39 40 Time Pegs Dropped Score UT Southwestern Medical Center at Dallas, Southwestern Center for Minimally Invasive Surgery Robotic Basic Skills Curriculum Task 6: Stair Rubberband Transfer Description: The trainee must grasp the rubberband placed at position “A” with the left needle driver and transfer it to position “B”. The right needle driver is then used to grasp the rubberband and place it at the next target (position “C”). The task is completed when the trainee has placed the rubberband back at position “A” with the left needle driver. Clutching and camera movement are required to perform this task. Time starts: When the camera is first moved Time stops: When the rubberband has been placed back at position "A" with the left needle driver Instruments: Left hand: Needle driver Right hand: Needle driver Camera: Zero degree, centered, surgeon adjustments as needed Fourth arm: Not used Errors: Pegs dropped out of the field of view = 1 point. Avulsion of model = a score of zero Proficiency Testing Protocol: 1‐proctored repetition Proficiency Training Protocol: Achieve proficiency score on 2 consecutive repetitions (max 80 reps) Maximum time allowed: 300 seconds Scoring Formula: Score = 300 ‐ time ‐ 10(errors) Proficiency Score: 242 (revised level based on mean performance of 8 experts ‐ Jan 2011 version) Proficiency Time: 58 seconds with no errors Trainee Scores: Date Rep. # 1 2 3 4 5 6 7 8 9 10 11 12 13 14 15 16 17 18 19 20 Time Rubber Bands Dropped Avulsion Score Date Rep. # 21 22 23 24 25 26 27 28 29 30 31 32 33 34 35 36 37 38 39 40 Time Rubber Bands Dropped Avulsion Score UT Southwestern Medical Center at Dallas, Southwestern Center for Minimally Invasive Surgery Robotic Basic Skills Curriculum Task 7: Running and Cutting Rubberband Description: This task uses a 12cm long rubberband model that is marked with 10 target segments at 1cm intervals. The red marked segments indicate beginning and end points. The trainee must grasp the rubberband (on the first & third marked segments) using both needle drivers, activate the 4th arm (scissors), and cut the rubberband in between each marked interval. This process is then repeated until all 10 marked segments have been cut. Clutching and 4th arm activation is required to successfully perform this task. Time starts: When the rubberband is first grasped Time stops: When the tenth section of rubberband is released by the needle drivers Instruments: Left hand: Needle driver Right hand: Needle driver Camera: Zero degree, centered, surgeon adjustments as needed Fourth arm: Curved Scissors Clutching as needed Errors: Cutting outside of black marked segments = 1 point Proficiency Testing Protocol: 1‐proctored repetition Proficiency Training Protocol: Achieve proficiency score on 2 consecutive repetitions (max 80 reps) Maximum time allowed: 300 seconds Scoring Formula: Score = 300 ‐ time ‐ 10(errors) Proficiency Score: 202 (revised level based on mean performance of 8 experts ‐ Jan 2011 version) Proficiency Time: 98 seconds (1 min 38 sec) with no errors Trainee Scores: Date Rep. # 1 2 3 4 5 6 7 8 9 10 11 12 13 14 15 16 17 18 19 20 Time Black Lines Missed Score Date Rep. # 21 22 23 24 25 26 27 28 29 30 31 32 33 34 35 36 37 38 39 40 Time Black Lines Missed Score UT Southwestern Medical Center at Dallas, Southwestern Center for Minimally Invasive Surgery Robotic Basic Skills Curriculum Task 8: Pattern Cut Description: FLS testing gauze (with a simple circle) is placed on the plastic clip at one end. The fourth arm grasper is initially placed by the surgeon to hold counter traction on the gauze. The surgeon then activates the right hand scissors and cuts along and within the black line using the left hand grasper to aid with traction. The surgeon is encouraged to bring the camera close to the operating field and continuously adjust the view such that precision cutting (within the black line) may be achieved. Only the top layer of gauze must be cut. Start: When the gauze is grasped by the fourth arm grasper Stop: Completion of cutting the marked circle Instruments: Left hand: Maryland Bipolar Forceps Right hand: Curved Scissors Camera: Zero degree, centered on the 4x4 square gauze, adjustments are encouraged Fourth arm: Prograsp or Cadiere graspers (activated at the start of task) Clutching as needed Errors: Cuts outside of the line (either side) Proficiency Testing Protocol: 1 repetition with proctor Proficiency Training Protocol: Achieve proficiency score on 2 consecutive repetitions (max 80 reps) Maximum time allowed: 300 seconds Scoring Formula: Score = 300 ‐ time ‐ 50(errors) Proficiency Score: 147 (revised level based on mean performance of 8 experts ‐ Jan 2011 version) Proficiency Time: 153 seconds (2 min 33 sec) with no errors Trainee Scores: Date Rep. # 1 2 3 4 5 6 7 8 9 10 11 12 13 14 15 16 17 18 19 20 Time Cuts Outside of Line Score Date Rep. # 21 22 23 24 25 26 27 28 29 30 31 32 33 34 35 36 37 38 39 40 Time Cuts Outside of Line Score UT Southwestern Medical Center at Dallas, Southwestern Center for Minimally Invasive Surgery Robotic Basic Skills Curriculum Task 9: Running Suture Description: This task uses the FLS suturing model with 5 pairs of inked targets placed on either side of a 2cm slit. The trainee must perform a running suture (2‐0 silk, 15cm length) by approximating the 2cm slit. Using the FLS laparoscopic suturing protocol (i.e. alternating hands), the trainee will perform a surgeon’s knot followed by 2 square knots; (3 knots total). These knots must be tied on the first and last pairs of inked targets. The needle must be passed through the remaining targets in a continuous fashion. Suture tails must be cut to 1cm in length. Time starts: When the trainee picks up the needle with needle driver Time stops: When all suture tails have been cut to 1cm in length Instruments: Left Hand: Needle driver Right Hand: Needle driver Camera: Zero degree, centered, surgeon adjustments as needed Fourth Arm: Curved Scissors Clutching required for activation of fourth arm Errors: Accuracy: Sum of distances in (mm) needle passed outside of each colored target Gap (air knot): Distance in (mm) between targets on FLS suturing model (minimum = 2mm = no error) Breakage of suture: 10 points Bunny Ears: Incorrect knot = 1 point Frayed Suture: 1 point if outside of knot, 10 points if within knot Avulsion of model = a score of zero. Slippage of knot: 10 points for slip >3 mm Tails: Fails to cut tails to 1 cm = 1 point for each occurrence Proficiency Testing Protocol: 1‐proctored repetition Proficiency Training Protocol: Achieve proficiency score on 2 consecutive repetitions (max 80 reps) Maximum time allowed: 600 seconds Scoring Formula: Score = 600 ‐ time ‐ 10(errors) Proficiency Score: 340 (revised level based on mean performance of 8 experts ‐ Jan 2011 version) Proficiency Time: 260 seconds (4 min 20 sec) with no errors Trainee Scores: Date Rep. # 1 2 3 4 5 6 7 8 9 10 11 12 13 14 Time Accuracy Gap Error Breakage Bunny ears Frayed within Knot Frayed outside Knot Avulsion Knot Slippage Tail Length Score Date Rep. # 15 16 17 18 19 20 21 22 23 24 25 26 27 28 29 30 Time Accuracy Gap Error Breakage Bunny ears Frayed within Knot Frayed outside Knot Avulsion Knot Slippage Tail Length Score


