Three Phase Transformers
advertisement
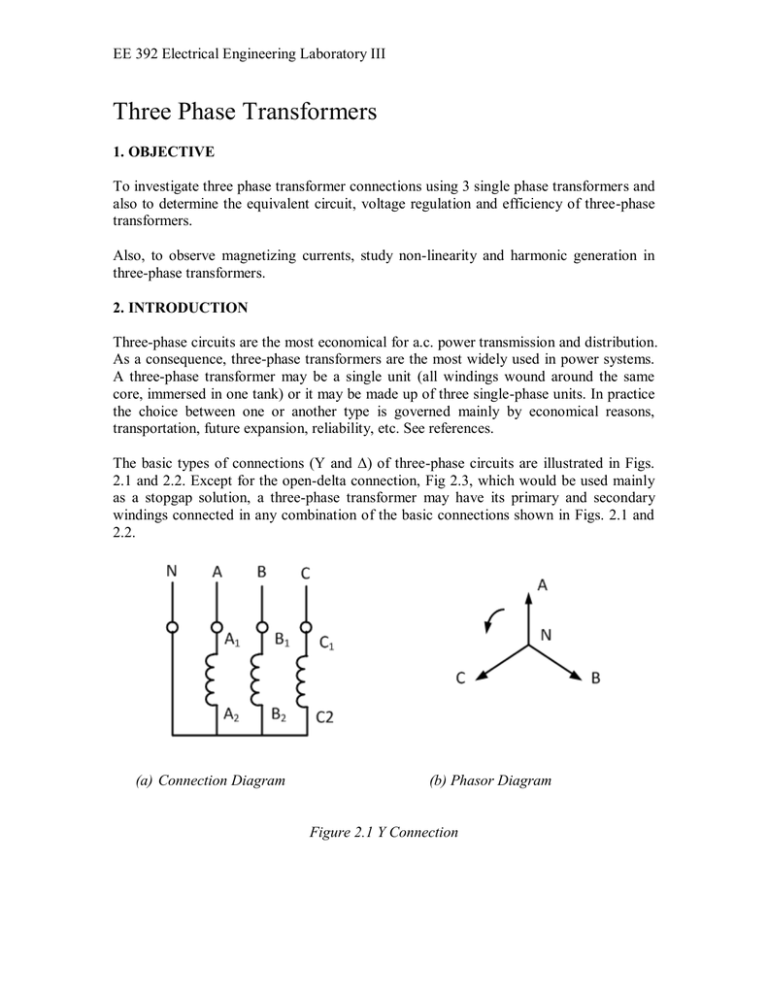
EE 392 Electrical Engineering Laboratory III Three Phase Transformers 1. OBJECTIVE To investigate three phase transformer connections using 3 single phase transformers and also to determine the equivalent circuit, voltage regulation and efficiency of three-phase transformers. Also, to observe magnetizing currents, study non-linearity and harmonic generation in three-phase transformers. 2. INTRODUCTION Three-phase circuits are the most economical for a.c. power transmission and distribution. As a consequence, three-phase transformers are the most widely used in power systems. A three-phase transformer may be a single unit (all windings wound around the same core, immersed in one tank) or it may be made up of three single-phase units. In practice the choice between one or another type is governed mainly by economical reasons, transportation, future expansion, reliability, etc. See references. The basic types of connections (Y and Δ) of three-phase circuits are illustrated in Figs. 2.1 and 2.2. Except for the open-delta connection, Fig 2.3, which would be used mainly as a stopgap solution, a three-phase transformer may have its primary and secondary windings connected in any combination of the basic connections shown in Figs. 2.1 and 2.2. (a) Connection Diagram (b) Phasor Diagram Figure 2.1 Y Connection EE 392 Electrical Engineering Laboratory III (a) Connection Diagram (b) Phasor Diagram Figure 2.2 Δ Connection (a) Connection Diagram (b) Phasor Diagram Figure 2.3 Open-Δ Connection The angular displacement of a transformer connection may be defined as the angle between the no-load line to line voltages of the corresponding primary and secondary terminals. There are two basic angular displacements: 0◦ and 30◦ shown in Figs. 2.4 and 2.5. Other angular displacements of 150◦, 180◦, 210◦, 330◦ (and -30◦, -150◦. etc.) can also be obtained by suitable connections of windings. An example of such a connection is shown in Fig. 2.6. The importance of angular displacement becomes clear when three-phase transformers are to be connected in parallel. Only transformers having the same displacement may be connected in parallel, otherwise short-circuit type currents will circulate in the secondaries damaging the transformer. Explain why? EE 392 Electrical Engineering Laboratory III (a) Connection Diagram (b) Phasor Diagram Figure 2.4 Y-Y Connection, 0ο Angular Displacement (a) Connection Diagram (b) Phasor Diagram Figure 2.5 Δ-Y Connection, 30ο Angular Displacement (a) Connection Diagram (b) Phasor Diagram Figure 2.6 An example of the interconnection of sectional windings Due to nonlinearity of the iron core, higher harmonics are present in the magnetizing current. Thus, they can be detected in the no-load current. The most significant of them is the 3rd harmonic. It can be shown that the 3rd harmonic in all the phases is not phase- EE 392 Electrical Engineering Laboratory III shifted (is in-phase). It can be represented as an independent, superposed current in each of the three transformers. Since the 3rd harmonic is in-phase and it is needed to generate the sinusoidal flux, some configurations that prevent its flow give non-sinusoidal flux and transformed voltage that in turn contains the 3rd harmonic. Such a configuration is for example Y/Y connection with the disconnected neutral, Fig. 2.7. Figure 2.7 Y-Y Connection with Disconnected Neutral Figure 2.7 shows the secondary phase voltages that contain 3rd harmonic because, the 3rd harmonic component of current can not flow in the primary windings (neutral disconnected). Therefore, the phase voltage in phase a is: Va t E1a sin t 0o E3asin 3t (2.1) whereas, the line-to-line voltage according to KVL is: Vab t E1b sin t 120o E 3bsin 3t – E1a sin t 0o E3a sin 3t E1 . sin t 150o (2.2) As it can be seen from the above, the phase voltages Va, Vb, Vc contain 3rd harmonuic and they are not of a good quality. On the other hand, the line-to –line voltages Vab, Vbc, Vca, do not contain that harmonic because it is cancelled due to the fact that it is not phaseshifted. Using the above reasoning, students should derive adequate conclusions for Δ/Y and Δ/ Δ connections and confirm them experimentally. More information regarding the advantages, disadvantages, uses, harmonic content, etc. of three-phase transformer connections may be found in the Bibliography. EE 392 Electrical Engineering Laboratory III 3. PROCEDURE Select three similar single-phase transformers. Record the name plate data of the transformers. 3.1. Transformer Equivalent Circuit 3.1.1 Perform an open-circuit test on one of the single-phase transformers In the open-circuit test, connect the primary winding to the full rated AC voltage. Leave the secondary winding open. Connect two voltmeters, an ammeter and a wattmeter as shown in Figure 3.1. Record the readings of the voltmeters, the ammeter and the wattmeter. Figure 3.1: Open-circuit test 3.1.2 Perform a short-circuit test on the same transformer used in 3.1.1: Short-circuit the secondary winding. Connect an autotransformer at the primary winding. Make sure that the autotransformer can handle the rated current of the primary winding of the transformer under test. Keep the autotransformer output at its lowest setting at the beginning. You need a fairly low voltage to set up rated current in the primary when the secondary is short-circuited. Adjust the input voltage to the primary winding by adjusting the autotransformer setting until the current in the primary winding is equal to its rated value. Record the voltmeter, ammeter and wattmeter readings. Figure 3.2: Short-circuit test EE 392 Electrical Engineering Laboratory III 3.1.3 Single-phase equivalent circuit of the three-phase transformer Utilizing the readings taken from the open-circuit and short-circuit tests, determine the single-phase equivalent circuit of the three-phase transformer. Figure 3.3: Equivalent circuit of a transformer 3.3 Load Test on Three-Phase Transformer Using the three similar single-phase transformers (see ones that you used in step 1), make a three-phase connection. Connect the primary windings in delta and the secondary windings in wye. Use the load box (EE 1301) at the output (balanced resistive load). Connect the secondary side of the three-phase transformer to the balanced resistive load. Connect the primary side to a balanced three-phase rated voltage supply. The circuit digram is shown in Fig. 3.4. Perform load test at three current levels, 10%, 40% and 100% of the rated current by varying the resistive load. Take appropriate voltage, current and power readings. Remember to record the no-load voltages on the secondary side for calculating the voltage regulations experimentally. From the experimental data, determine the voltage regulation and efficiency of the three-phase transformer at the three load levels. With the help of the equivalent circuit obtained in 3.2, calculate the voltage regulation, copper losses, and efficiency of the transformer at the three current levels; 10%, 40% and 100% of the rated value. Compare these results with the ones obtained from the experimental data. EE 392 Electrical Engineering Laboratory III Figure 3.4: Experimental configuration for doing load test on transformer 3.4 Transformer Current Waveforms Record the wave shape of the phase and line excitation current for the following transformer connections: 3.4.1 Δ-Y Connection a) Using the high voltage windings of the three transformers as primary, connect them in a delta configuration. b) Retain Y connection on the low voltage windings as the secondary. c) Display a line current and a circulating current in the delta connection for unloaded and fully loaded conditions. d) Determine the angular displacement between the primary and secondary voltages, draw the respective phasor diagram, and determine transformation ratio. 3.4.2 a) b) c) d) e) f) Δ- Δ Connection Retain high voltage side as primary connected in Δ. Connect low voltage secondary windings in Δ, but do not close the Δ. Measure the voltage appearing at the open terminals. Now, determine how T3 should be connected in order to close the Δ without danger of short-circuit. Arrange to observe primary circulating current and line current on no-load. Identify from the attached waveforms. Determine transformation ratio and angular displacement. EE 392 Electrical Engineering Laboratory III 3.4.3. Y-Y Connection a) Wire both primary and secondary in a Y configuration. Note: Connect the 208V, as the primary. b) Display the no-load secondary line-to-line and line-to-neutral voltages with the primary neutral disconnected. Note the harmonic content of the line-to-neutral voltage. Repeat with the primary neutral connected. Determine the phase relationship between them. Determine the transformation ratio. c) With the neutral still connected, display a line current and the primary neutral current. Disconnect the neutral. Display the two currents. For the connections 3.4.1 to 3.4.3, draw a theoretical circuit diagram, which shows all directions of all voltages and currents. Draw relevant phasor diagrams (for the basic harmonics) that display phase shifts of the currents and voltages. Remember that phasor diagrams without properly identified schematic diagrams are meaningless! In particular, show the displacements between primary and secondary phasors of the respective voltages and currents. BIBLIOGRAPHY 1. Bhag S. Guru, Huseyin R. Hiziroglu, "Electric Machinery & Transformers", Third Edition, Oxford, ISBN: 0-19-513890-2. 2. Stephen J. Chapman, “Electric Machinery Fundamentals”, McGraw-Hill. 3. Fitzerald, Kingsley, Umans, “Electric Machinery”, McGraw-Hill. 4. Mulukutla S. Sarma, “Electric Machines - Steady-State Theory and Dynamic Performance”, West Publishing. EE 392 Electrical Engineering Laboratory III LABORATORY SAFETY In this experiment, the supply voltage will be 120 volts (measured to ground) and 208 volts line to line. While these voltages are similar to residential electrical supply, there is more danger of electrical shock since these are experimental circuits. As in residential supply, the current is limited to 15 amperes by a circuit breaker; however, there is still danger of overcurrent, overheating, and sparks due to possible errors in your circuit. You should exercise EXTREME CARE during this experiment. Assemble or modify the circuit only when the breakers are off. Use short wires where possible and ensure that wires are not loosely connected. Have the circuit inspected by an instructor before turning on the power. The circuit should never be touched when it is live. Lethal body currents are possible. Don’t even consider using two hands to touch a live circuit. Ground Fault Breaker: Each of the power laboratories (2C70, 2C74 & 2C75) has a 3phase supply equipped with a ground fault interrupter that detects any current that flows to the outside from the 4-wire supply (red, black, blue and white-neutral terminals). The 3-phase supply to the entire room will be switched off if more than 10 mA flows from the 4-wire supply to a grounded item such as the table legs, the breaker panel, ground leads of an oscilloscope etc. The interrupter is to protect a student that, for example, accidentally contacts both the grounded table legs and some energized part of the circuit. Note that this interrupter DOES NOT protect a student that simultaneously touches two parts of a live circuit. Emergency Power Down: In each of the electrical laboratories there is RED emergency button. Pushing this button will shutdown all the electrical supply to all electrical laboratories on the second and third floor. This includes the 120/208 volt 3-phase ac, 120 volt single phase ac (with standard duplex outlets), and the 120/240 volt dc supply. The lighting remains connected. To return to normal operation, breakers in the locked power room must be reset by technicians. Electrical Supply: Separate breakers for each type of electrical supply are present on the room breaker panel; turn on the 50-Amp 3-phase breaker that corresponds to your station. The 100-Amp breaker at your workstation will function as an On-Off switch. You must now use a 15-Amp table breaker unit located in 2C70; use the ones that have three cables attached to them. To get 120 V ac, you would use only two of the three plugs on the table breaker. Let’s say that you plug the leftmost plug into any of the 3phase “hots” (red, blue or black), and the middle plug into the white neutral (ground) connection under the three “hots”. On the table breaker, the connectors on the left would be 120 V ac with respect to the middle connectors, which would be ground (actually this is neutral, not ground). For the 3 phase portion of this lab, simply plug each of the table breaker plugs into the red, blue and black sockets. There is now 208 V between each of the three sets of connections on the table breaker (i.e. 208V between the leftmost and the middle connectors, 208V between the middle and the right most connectors, 208V between the leftmost and rightmost connectors). =============
