Reflection and Refraction Lab Manual - Physics 212
advertisement
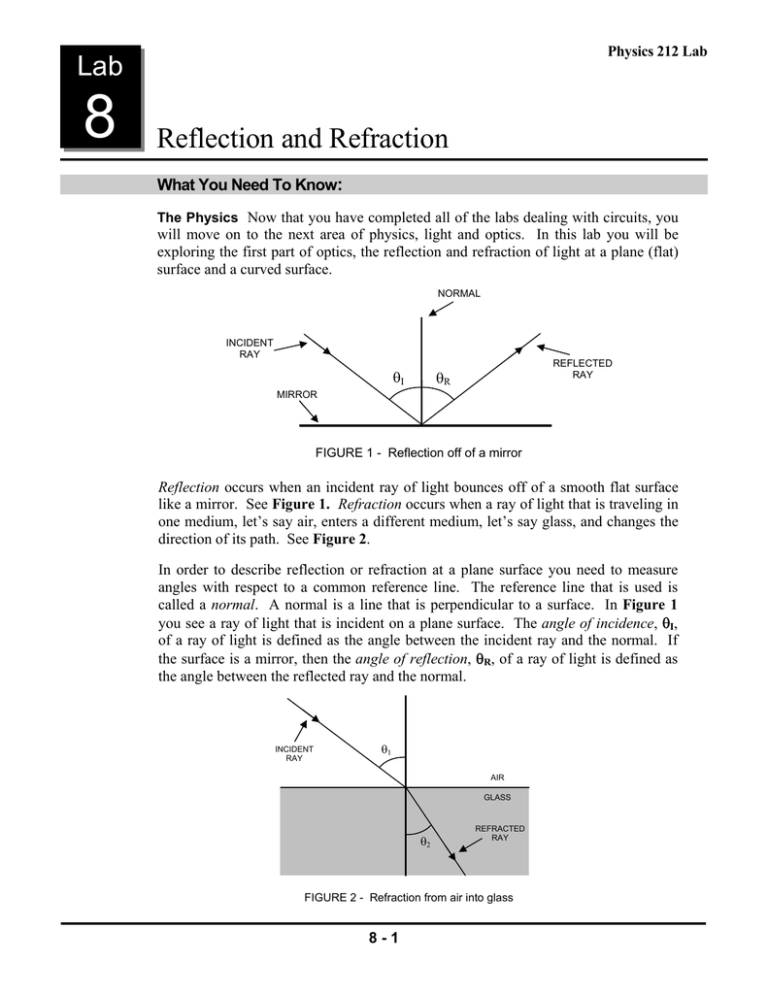
Physics 212 Lab Lab 8 Reflection and Refraction What You Need To Know: The Physics Now that you have completed all of the labs dealing with circuits, you will move on to the next area of physics, light and optics. In this lab you will be exploring the first part of optics, the reflection and refraction of light at a plane (flat) surface and a curved surface. NORMAL INCIDENT RAY I REFLECTED RAY R MIRROR FIGURE 1 - Reflection off of a mirror Reflection occurs when an incident ray of light bounces off of a smooth flat surface like a mirror. See Figure 1. Refraction occurs when a ray of light that is traveling in one medium, let’s say air, enters a different medium, let’s say glass, and changes the direction of its path. See Figure 2. In order to describe reflection or refraction at a plane surface you need to measure angles with respect to a common reference line. The reference line that is used is called a normal. A normal is a line that is perpendicular to a surface. In Figure 1 you see a ray of light that is incident on a plane surface. The angle of incidence, I, of a ray of light is defined as the angle between the incident ray and the normal. If the surface is a mirror, then the angle of reflection, R, of a ray of light is defined as the angle between the reflected ray and the normal. INCIDENT RAY 1 AIR GLASS 2 REFRACTED RAY FIGURE 2 - Refraction from air into glass 8-1 Reflection and Refraction Physics 212 Lab If the light is refracted as in Figure 2, then 2 is defined as the angle of refraction. (1 is still the angle of incidence.) The amount that the ray of light will refract is related to the index of refraction of the medium. The index of refraction, n (no units), is defined as the ratio of the speed of light in a vacuum and the speed of light in the medium. In this lab however, we will use a different equation, called Snell’s Law, to calculate the index of refraction. Snell’s Law is … n1 sin θ1 n2 sin θ 2 Now let’s examine reflection and refraction at a curved surface. There are two different kinds of curved surfaces that you will be dealing with for reflection; a concave mirror and a convex mirror. Both of these are considered to be spherical mirrors, which means that the mirrors are part of the arc of a large circle. This implies that the mirror has an associated radius of curvature, R. See Figure 3. The center of the mirror is called the vertex. A line drawn through the vertex and the center of curvature, C, is called the principal axis. Halfway between the vertex and the center of curvature is the focal point, F. The distance from the focal point to the vertex of the mirror is the focal length, f. The relationship between the radius of curvature and the focal length is, R = 2f. MIRROR R F C f PRINCIPAL AXIS n1 is the index of refraction of the incident medium 1 is the angle of incidence n2 is the index of refraction of the refracting medium 2 is the angle of refraction VERTEX FIGURE 3 - Spherical concave mirror For a concave mirror, all of the light rays that run parallel to the principal axis will reflect off of the mirror and converge at the focal point. See Figure 4. For a convex mirror, parallel light rays will reflect off of the mirror and diverge from the focal point. See Figure 5. You can use dashed lines that trace back along the reflected rays to show that the light rays diverge from the focal point. C F F FIGURE 4 – Concave mirror with parallel incoming rays C FIGURE 5 - Convex mirror with parallel incoming rays Both R and f have sign conventions that are given in the chart at the top of the next page. In general though, concave mirrors have a positive focal length and convex mirrors have a negative focal length. 8-2 Reflection and Refraction Physics 212 Lab Sign Conventions for Mirrors F Both R and f are + if the center of curvature for the R is in front of the mirror. Both R and f are – if the center of curvature for the R is in back of the mirror. F Curved surface refraction occurs when light travels through a lens. There are two different types of lenses: a converging lens and a diverging lens. A converging lens has a center that is thicker than its edges while a diverging lens has a center that is thinner than its edges. See Figures 6 & 7. Also notice that there are focal points on both sides of the lens. This does not imply that one focal length is positive and the other negative. The sign conventions are given in the chart below. FIGURE 6 Converging lens Sign Conventions for Lenses F F The focal length, f, is + for a converging lens The focal length, f, is – for a diverging lens The Equipment You will be using a Ray Box throughout this lab. The Ray Box will be used as a source of parallel light rays. You can set it for white light rays or for colored light rays. There is a mask on the side of the box that slides back and forth that will allow you to control the number of light rays that emerge from the box. For white light you can have between 1 and 5 light rays. For colored light you can have 1 to 3 light rays, each a different color. Sharing Duty For much of this lab you will share, with your lab partner, the duty of FIGURE 7 Diverging lens drawing Light Ray Diagrams (LRDs). This will save time and paper. For example, one person will draw the LRD for the concave mirror and the other person will draw the LRD for the convex mirror. You will SWITCH for the lenses so that each of you will make a LRD for a diverging light-ray case. NOTE: When tracing a light ray, just put a dot at the beginning of the ray and a dot at the end of the ray. Draw in all of your lines by connecting the dots AFTER you’ve passed the light box to your partner. ALSO, all data, calculations, and answers to questions should go on paper OTHER than your light ray diagram sheet. What You Need To Do: Part 1 – Reflection For A Plane Surface For this section, you will make a diagram of light reflecting off a plane surface. Use the three sided mirror in your optics box. A) Plug in your ray box and set it up so that a single white light ray is emerging from it. You can do this by sliding the plastic, slitted mask on the side of the ray box. If you put down a piece of clean white paper (that your TA will supply) you can see the light better. 8-3 Reflection and Refraction Physics 212 Lab B) Place the three sided mirror on the white paper so that the three sides are perpendicular to the tabletop. Arrange the light ray so that it is incident on the plane side. You will get better results if your angle of incidence is greater than ~ 45º. C) Hold down the mirror and trace a line for the mirror surface, then place dots at the beginning and end points for your light rays (as described in the intro). Pass the ray box to your partner to repeat this process, preferably at a different angle of incidence. D) Now, using your dots as guides, draw in the incident ray and the reflected ray. Also make sure that your light rays are at least 9 cm long (so that you can use the protractor in the next step). Your partner should do the same on his/her diagram. E) Using the protractor, make a normal line to the mirror surface at the point where the ray reflects. The diagram should look similar to Figure 1. F) Using the protractor, measure the angle of incidence and the angle of reflection. Based on both of your observations on reflection, what can you say about the relationship between the angle of incidence and the angle of reflection? Question 1 G) Turn over the ray box and slide the mask so that only red light is emerging. (You can use the diverging lens on its side to prop up the edge of the Ray Box to lengthen the light ray. See Figure 11 later in the lab.) Overlay the red light ray on top of the incident ray that you already drew. YOU DON’T HAVE TO TRACE IT. Observe how the ray reflects. Try blue. Try green. Question 2 Does the color of the light affect the relationship that you determined in Question 1? For this section, you will make a diagram of multiple light rays reflecting off a concave mirror and a convex mirror. Use the three sided mirror in your optics box. Part 2 – Reflection For A Curved Surface A) Set up the ray box so that 5 white light rays are emerging from it on top of the white paper. Place the concave side of the mirror in the path of the light rays. NOTE: Make sure that the center ray is reflecting directly back on itself. B) Hold down the mirror and trace a line for the mirror surface, then place dots at the beginning and end points for your light rays. Pass the ray box to your partner to repeat this process using the CONVEX mirror. Now, draw in your light rays. C) For the person who used the convex mirror, notice that the reflected rays do not converge. You will have to draw in dashed lines behind the mirror as in Figure 5. D) Each of you will now measure the focal length for the mirror that you drew. Record the value next to your drawing. Make sure to include the correct sign based on what was discussed in the intro. (For the convex mirror, all of the light rays might not converge at exactly the same point. When measuring the focal length, use as a reference point the central location of where all the rays cross.) 8-4 Reflection and Refraction Physics 212 Lab E) Calculate the radius of curvature for your mirror and place it next to the drawing. Question 3 Does the color of the light affect your focal length? Try it … Part 3 – Refraction For A Plane Surface For this section, you will EACH make a diagram of light refracting two times through a clear plastic rhombus that is in your optics box. A) Shine a single ray of white light into the rhombus as shown INCIDENT RAY in Figure 9. Make sure the frosted side of the rhombus (a few don’t have a frosted side) is face down so that you can see the light ray inside of the rhombus. NOTE: For better results, your angle of incidence should be more than ~ 45º. NORMAL RHOMBUS B) Hold down the rhombus and trace a line around it, then place OUTGOING RAY NORMAL dots at the beginning and end points for your light rays. Pass the ray box and rhombus to your partner to repeat this process, however, your partner should use a different angle of incidence (preferably larger). C) Using your dots, draw in the incident light ray and the FIGURE 9 – Rhombus with refracting light ray outgoing light ray. Make sure each line is at least 9 cm long. Also, draw a line inside of the rhombus connecting the incident ray and the outgoing ray. D) Using the protractor, draw two normal lines as shown in Figure 9. E) Measure the angle of incidence and the angle of refraction at the first surface (not the second surface, this is a common mistake). You will have to extend the light ray inside of the rhombus to measure the angle of refraction. F) Use Snell’s Law to calculate the index of refraction of the rhombus. The index of refraction of air is 1.0. G) Average your index of refraction with your lab partner’s. Compare the average value to the actual value of 1.5 by calculating a percent error. Question 4 Notice that the angle of incidence at the first surface is equal to the angle of refraction at the second surface. Prove algebraically (using Snell’s Law twice) why this is true. Question 5 Do different colors refract at different angles? Try it … Part 4 – Refraction For A Curved Surface In this section, you will make a diagram of multiple light rays refracting through a converging lens and a diverging lens. A) Set up the ray box so that 5 white light rays are emerging from it on top of the white paper. Place the converging lens in the path of the light rays. NOTE: Make sure that the center ray is incident perpendicular to the center of the lens. 8-5 Reflection and Refraction Physics 212 Lab B) Whichever lab partner drew the diagram for the convex mirror will do the converging lens diagram. Hold down the lens and trace a line for the lens surface on both sides. Place dots at the beginning and end points for your light rays on both sides of the lens. Pass the ray box to your partner to repeat this process using the DIVERGING lens. Now, draw in your light rays. NOTE: For the diverging lens, do not use the reflected rays off of the first surface. C) For the person who used the diverging lens, notice that the refracted rays do not converge. You will have to draw in dashed lines behind the lens. D) Each of you will now measure the focal length for the lens that you drew. Record the value next to your drawing. Make sure to include the correct sign based on what was discussed in the intro. Do you still get the same focal lengths if you turn the lenses around to face the other way? Did you expect this result? Explain why. Question 6 White light is actually a mixture of all colors. In this section you will use the rhombus to break white light up into colors. To demonstrate this, put the rhombus in the path of a single white light ray. See Figure 10. Make sure that the ray exiting the rhombus is very close to the surface of the rhombus. What do you see? (“By the way, which one’s Pink?”) Part 5 – Color From A Prism OUTGOING RAY INCIDENT RAY RHOMBUS FIGURE 10 – Rhombus with refracting light ray Question 7 Which color refracts the most? The least? Question 8 Re-examine your answer to Question #5. Re-answer the question now. What is different about this situation? Part 6 – Mixing Colors You just saw how light can be separated into colors. Now you will do the reverse. A) Use the diverging lens on its side to prop up the end of the ray box with the colored mask. See Figure 11. FIGURE 11 – The ray box propped up on the diverging lens B) Slide the mask on the ray box so that the three primary colors appear. Place the converging lens in the path of the colored light. Stand up a white sheet of paper outside of the focal point. Slowly move the paper towards the focal point. Question 9 What do you see when the paper reaches the focal point? 8-6 Reflection and Refraction Physics 212 Lab Question 10 Try combining different pairs of colors together. (The mirror, placed on its plane side, blocks one of the light rays nicely.) What do you see? Did your results turn out how you expected? What You Need To Turn In: Turn in all of your own drawings, you cannot share drawings. Make sure you have the correct drawings as well. Answer all of the questions in the sections where they are asked. © Spring 2013 by Michael J. Dubuque 8-7

