GeoServer Tutorial: Installation, Configuration, and Usage
advertisement
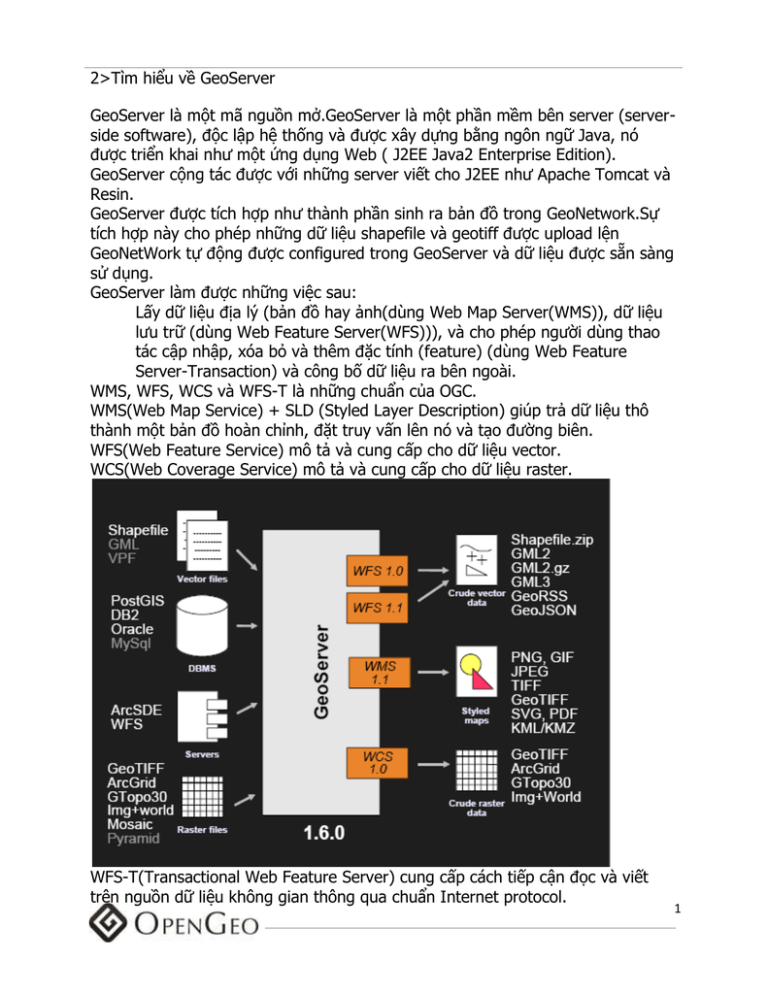
2>Tìm hiểu về GeoServer
GeoServer là một mã nguồn mở.GeoServer là một phần mềm bên server (serverside software), độc lập hệ thống và được xây dựng bằng ngôn ngữ Java, nó
được triển khai như một ứng dụng Web ( J2EE Java2 Enterprise Edition).
GeoServer cộng tác được với những server viết cho J2EE như Apache Tomcat và
Resin.
GeoServer được tích hợp như thành phần sinh ra bản đồ trong GeoNetwork.Sự
tích hợp này cho phép những dữ liệu shapefile và geotiff được upload lện
GeoNetWork tự động được configured trong GeoServer và dữ liệu được sẵn sàng
sử dụng.
GeoServer làm được những việc sau:
Lấy dữ liệu địa lý (bản đồ hay ảnh(dùng Web Map Server(WMS)), dữ liệu
lưu trữ (dùng Web Feature Server(WFS))), và cho phép người dùng thao
tác cập nhập, xóa bỏ và thêm đặc tính (feature) (dùng Web Feature
Server-Transaction) và công bố dữ liệu ra bên ngoài.
WMS, WFS, WCS và WFS-T là những chuẩn của OGC.
WMS(Web Map Service) + SLD (Styled Layer Description) giúp trả dữ liệu thô
thành một bản đồ hoàn chỉnh, đặt truy vấn lên nó và tạo đường biên.
WFS(Web Feature Service) mô tả và cung cấp cho dữ liệu vector.
WCS(Web Coverage Service) mô tả và cung cấp cho dữ liệu raster.
WFS-T(Transactional Web Feature Server) cung cấp cách tiếp cận đọc và viết
trên nguồn dữ liệu không gian thông qua chuẩn Internet protocol.
1
Dữ liệu Vector có thể lưu trữ trong Shapefile, PostGIS, Oracle locator/spatial,
DB2, ArcSDE,...Nó có đặc tính (FeatureType) cơ bản sau: đối tượng hình học,
thuộc tính mô tả và tọa độ và một vài thông tin khác như đường biên,
style,caching, metadata(WFS và WMS sử dụng nó) và một vài nhóm thuộc tính
chia sẻ cùng một cấu trúc chung(attributes, CRS).
Thư mục dữ liệu trong GeoServer bao gồm:
configuration của Geoserver
style
CRS
dữ liệu
2
Geoserver trả về dữ liệu xuất dưới định dạng GML từ dữ liệu nhập định dạng lai
XML:GML
Web Map Service(WMS):
Lược đồ khối WMS:
3
Cách sủ dụng để lấy thông tin (GetMap request):
Các định dạng mà WMS hỗ trợ(Xem các ví dụ map previews trong
GeoServer): ảnh(gif,png,jpeg, svg+xml), file vector(pdf),tích hợp được định
dạng ảnh của Google Earth(kml), tương tác được openlayers.
4
Định nghĩa lớp style (styled layer descriptor .sld):một dạng file xml
điều khiển việc định dạng bản đồ, thuộc tính và tỉ lệ bản đồ sẽ dựa trên style đó.
Giống như style của Google Map là hàng ngàn đoạn thẳng dài.
Web Feature Service(WFS):
Lược đồ khối WFS:
Cách sử dụng để lấy thông tin(Get Feature): Lấy dữ liệu trong GML hay định
dạng trong shapefile dạng nén.Câu truy vấn có thể viết dưới dạng XML.Get
Feature giúp xây dựng bô lọc(filter) để lấy những thuộc tính xác định và hỗ trợ
trong việc giao dịch(thêm,xóa,cập nhập thuộc tính).
Dữ liệu Raster:
Cách định dạng dữ liệu raster thành chuẩn OGC(WMS) để đưa dữ liệu
dễ sử dụng:
5
Vai trò của Web Coverage Service trong việc truy xuất dữ liệu
raster ra dạng WFS để dễ sử dụng:
Ví dụ về sử dụng dữ liệu raster
6
Phần sau sẽ nói chi tiết về cách sử dụng GeoServer bằng GUI (hình ảnh
trực quan)
Phần 1: Cài đặt GeoServer
Download phần mềm geoserver-1.6.3.exe). Bấm Next
trên màn hình cài đặt Welcome .
Bạn phải có cài JDK ở C:\Program Files\Java\jdk1.5.0_14 (jdk có version mới hơn
cũng được).
This location should match
the location of the JDK we
installed in the previous
section.
7
Đồng ý License Agreement và tiếp tục công việc cài đặt
với những giá trị mặc định:
Đây cũng là thư mục dữ liệu(
Data Directory) là nơi mà GeoServer
dùng để chứa dữ liệu như
shapefile,raster, và kết nối cơ sở dữ
liệu và những file configuration khác
dùng để điều khiển hành động của
GeoServer .
8
Chọn Install và kết thúc bằng Finish.
9
Phần 2: Chạy GeoServer
Chọn Start MenuProgramsGeoServerStart Geoserver
Đừng đóng màn hình này vì
nó giúp khởi động GeoServer.
Màn hình này cũng cho ta
thấy được hành động của
GeoServer và bắt được lỗi để
sửa.
Mở Web Browser(IE hay FireFox),đánh http://localhost:8080/geoserver/ để
thấy được GeoServer Welcome Page
10
Phần 3: Trình bày một số thao tác thực hiện trên GeoServer
Mục 1: Thêm dữ liệu Shapefile vào GeoServer
Copy những file nào
landmarks.shp
landmarks.shx
landmarks.dbf
landmarks.prj
vào:
C:\Program Files\GeoServer 1.6.3\data_dir\data\shapefiles
Phải bảo đảm bốn file quan
trong shapefile được copy.Đấy là
những file đuôi . shp, shx, dbf, và prj.
Mở Web Browser và đến trang web GeoServer Welcome
Page tại địa chỉ: http://localhost:8080/geoserver/.
Từ trang Welcome chọn Config đặt tại góc trênbên trái
Trong trang Login page, đánh username: “admin”, và password:
“geoserver”.
11
Chọn đường link Data .
Chọn đường link DataStores và chọn New.
Chọn Shapefile từ danh sách xổ xuống và đánh vào
texbox tên của tên shapefile, ở trong ví dụ này là
landmarks
Trong danh sách xổ xuống chứa
đựng những định dạng dữ liệu
không gian mà GeoServer hỗ
trợ.Khi tạo mới DataStore,một
trong những định dạng trên phải
được chọn. Những định dạng
12
default là Shapefile và
PostGIS.Những định dạng mới
khác thì cần phải có plug-in thêm.
Trên trang Feature Data Set Editor, đánh
“file:data/shapefiles/landmarks.shp” trong url và chọn
Submit.
On the Feature Type Editor page set the style by selecting point
from the Style dropdown list.
It is possible to attach any
number of styles to a feature type
or layer. Choosing one from the
Style dropdown sets the server
default, which will be chosen when
a client does not specify a style.
1. Set the Spatial Reference System for the layer by clicking the
Lookup SRS button.
13
2. Generate the bounds for the layer by clicking the
Generate button.
The Lookup SRS
utility provides a way
to determine the EPSG
code for a layer when
it is not specified by
the metadata of a
spatial data source.
Scroll to the bottom of the page and click Submit.
3. Finalize the changes by clicking Apply located on the top left
corner of the page.
14
MODULE 2: The Basics of GeoServer
The GeoServer user interface
follows a Submit-Apply workflow.
When a change is made it will NOT
take effect until it is Applied.
4. Persist the changes by clicking Save.
Mục 2: Sử dụng Map Preview
Open a web browser and navigate to the GeoServer Welcome
Page at http://localhost:8080/geoserver/.
From the Welcome page navigate to the Map Preview by clicking
the Demo link, followed by the Map Preview link.
15
From the Map Preview page, preview the landmarks layer by
clicking the topp:landmarks link.
The Map Preview
contains a list of all layers
currently published by
GeoServer. A layer can be
previewed in a variety of
formats like KML and
GeoRSS. The default is an
OpenLayers map.
16
Click on one of the points to get more information.
Mục 3 : Style
1. From the GeoServer Welcome page navigate to
Config
17
2. Click New.
3. Enter “landmarks” in the text field and click New.
4. Scroll to the bottom of the Style Editor page and
click Browse…
Navigate to the data directory on the USB drive, select
the landmarks.sld file, and click Upload…
In GeoServer, styles
are represented via SLD
(Styled Layer Descriptor)
documents. SLD is an
XML format for
specifying the
symbolization of a layer.
18
When an SLD document is
uploaded the contents are shown
in the text editor. The editor can
be used to edit the contents of the
SLD directly.
Add the new style by clicking Submit, followed by Apply, and finally
Save.
5. From the Config page navigate to
. Select
19
landmarks:landmarks from the dropdown and click Edit.
6. On the Feature Type Editor page set the Style by selecting
landmarks from the dropdown.
Setting the default
style allows that style to be
used implicitly when no
style is specified in a map
request.
20
MODULE 2: The Basics of GeoServer
Scroll to the bottom of the page, Submit, Apply, and Save.
Repeat steps 1 through 3 from the previous section to view the
landmarks layer in the Map Preview.
21
Mục 4: Style với file .sld
1. From the GeoServer Welcome page navigate to
Config
.
2. Select the landmarks style and click Edit.
3. In the Style Editor, change the symbol by changing “star” to
“circle” on line 17.
4. Decrease the size of the symbol by changing the value of Size
from “20” to “15” on line 26.
22
5.
Add a black Halo to the label by adding the following after the
LabelPlacement element on line 45:
<Halo>
<Radius>1</Radius>
<Fill>
<CssParameter
name=”fill”>#000000</CssParamete
r>
</Fill>
</Halo>
Change the color the label to white by adding the following after the
Halo element added in the previous step.
<Fill>
<CssParameter
name=”fill”>#FFFFFF</CssParamete
r>
</Fill>
23
6. Scroll to the bottom of the page, Submit, Apply, and Save.
Navigate to the Map Preview and view the landmarks
Remember that a change will
not
be
put in effect until you
layer.
Apply.
24
Mục
Mục
Mục
Mục
5:
6:
7:
8:
Thêm một cơ sở dữ liệu PostGIS vào GeoServer(co tai lieu)
Thêm một bảng trong PostGIS vào trong GeoServer(co tai lieu)
Thêm dữ liệu ở dạng shapefile vào trong PostGIS(co tai lieu)
Geoserver làm việc với OpenLayers
1. Tạo một bản đồ nền(basic map)
2. Làm việc với các lớp nền(base layers)
3. Làm việc với các lớp chồng(overlays)
Mục 9: Tạo nhóm lớp và xem trên GeoServer
Mục 10: Kết hợp phủ thêm GoogleMaps
Phần sau nói về lập trỉnh trên GeoServer
In this tutorial you will learn how to interact with the GeoServer catalog. The
target is to Create a simple service which queries the catalog for data stores and
feature types.
So first we create our service, lets call it CatalogLister which will perform the
following operations:
Listing all data stores in the catalog
Listing all feature types in the catalog
public class CatalogLister {
public void listDataStores( OutputStream output ) {
}
public void listFeatureTypes( OutputStream output ) {
}
}
The first thing that is needed is a reference to the catalog itself. So lets add a
constructor which takes the catalog as its only paramter.
GeoServerCatalog catalog;
public CatalogLister( GeoServerCatalog catalog ) {
this.catalog = catalog;
}
25
First up is listDataStores. A data store corresponds to a service in the catalog. In
catalog terminology, one must "resolve a service handle into a data store".
Implementing this operation, we step through each service and test for a resolve
to a data store. When we find a service that is indeed backed by a data store it is
printed out.
public void listDataStores( OutputStream output ) {
//output
PrintStream printer = new PrintStream( output );
//get all services from the catalog
List services = catalog.members( null );
for ( Iterator s = services.iterator(); s.hasNext(); ) {
Service service = (Service) s.next();
//first we must test to see wether this handle is backed by a datastore
if ( service.canResolve( DataStore.class ) ) {
//it is a data store, write it to output
printer.println( service.getIdentifier().toString() );
}
}
}
Next up is listFeatureTypes. A feature type corresponds to a geo resource in the
catalog. In the catalog hierarchy geo resources are children or services. So for
each service in teh catalog, we check each geo resource for a resolve to a
feature type. This time we will go a step further, and actually perform the
resolve to underlying feature type object.
public void listDataStores( OutputStream output ) {
//output
PrintStream printer = new PrintStream( output );
//get all services from the catalog
List services = catalog.members( null );
for ( Iterator s = services.iterator(); s.hasNext(); ) {
Service service = (Service) s.next();
//get all children
List geoResources = service.members( null );
for ( Iterator g = geoResources.iterator(); g.hasNext(); ) {
26
GeoResource geoResource = (GeoResourfce) g.next();
//do the test
if ( geoResource.canResolve( FeatureType.class ) ) {
//do the resolve
FeatureType featureType = (FeatureType) geoResource.resolve(
FeatureType.class, null );
printer.println( featureType.getTypeName() );
}
}
}
}
Đơn giản dùng Filter (PropertyIsLike) trong WFS để lọc ra dữ liệu cần tìm.
Spring + GeoServer
In GeoServer Spring is a container, whose job is to house and manage
components inside of the container. A component in Spring is referred to as a
bean. Consider the following two GeoServer components / beans called
GeoServer, and Data.
Spring is used as the glue which ties together GeoServer components managing
the dependencies between them.
GeoServer.java
/**
* Represents the running server as a whole.
27
*/
class GeoServer {
GeoServer() {
...
}
}
Data.java
/**
* The GeoServer catalog.
*/
class Data {
/** reference to server facade */
GeoServer server;
Data(GeoServer server) {
this.server = server;
}
}
In the above, Data is dependent on GeoServer. This dependency is declared
simply by adding a reference to a GeoServer to the constructor of Data. This
form of dependency declaration is known as Inversion of Control (IOC).
In order for this dependency on GeoServer to be satisfied at runtime, we must
describe the dependency to Spring. This is done with a Spring Context.
applicationContext.xml
<beans>
<!-- declare the GeoServer component -->
<bean id="geoServer" class="org.vfny.geoserver.global.GeoServer"/>
<!-- declare the Data component with a dependency on geoServer -->
<bean id="data" class="org.vfny.geoserver.global.Data">
<constructor-arg ref="geoServer"/>
</bean>
28
</beans>
The above context does the following:
1. Creates an instance of GeoServer
2. Creates an instance of Data
3. Injects the instance of Data, with the instance of GeoServer
Taking the example one step further, consider a third component, called WFS,
which is dependent on both the Data and GeoServer components:
WFS.java
/**
* Web Feature Service.
*/
class WFS {
GeoServer geoServer;
Data data;
WFS(GeoServer geoServer, Data data) {
this.geoServer = geoServer;
this.data = data;
}
}
applicationContext.xml
<bean id="wfs">
<constructor-arg ref="geoServer"/>
<constructor-arg ref="data"/>
</bean>
Spring will manage the above component declarations such that all dependencies
are satisfied.
29
The following depicts GeoServer realized as a set of beans wired together with
Spring.
Plug-in System
Beyond being a container to house GeoServer components, Spring is used as the
primary plug-in mechanism. In GeoServer plug-ins are based off of the idea of
extension points and extensions.
30
Extension Points
An Extension Point is an interface or abstract class that is intended to be
implemented by plug-ins. Conceptually, an extension point is a place in
GeoServer that is designed to be extended by plugins. Physically, an extension
point is a java interface or an abstract class.
An example of an extension point in GeoServer is _GetMapProducer whose
purpose it to output a map in a WMS GetMap request.
GetMapProducer.java
interface GetMapProducer {
void produceMap(WMSMapContext map) throws WmsException;
void writeTo(OutputStream out) throws ServiceException, IOException;
String getContentType() throws java.lang.IllegalStateException;
void abort();
}
An implementation of this interface is intended to produce a map in a specifc
format.
31
Extensions
An Extension is an implementation of an extension point. It is an instance of the
interface or abstract class declared by the extension point. An extension is made
up of two parts:
1. A concrete class implementing an extension point interface
2. A spring bean declaration
Continuing with the GetMapProducer example consider the following class:
PNGMapProducer.java
class PNGMapProducer implements GetMapProducer {
...
}
As the name suggests the point of this class is to produce map in a png image
format.
As stated above, the second part of an extension is a spring bean declaration.
The bean declaration tells the spring container about our extension so that it can
be used by other code.
applicationContext.xml
<bean id="pngMapProducer" class="PNGMapProducer"/>
GeoServer wiki is hosted by OpenGeo | Contact administrators
services.xml:used to define the common GeoServer configuration options
in addition to WFS and WMS services
catalog.xml: used to configure the data subsystem
info.xml (& associated schema.xml): used to define which FeatureTypes
are available through the data subsystem
32
Các bạn ơi gợi ý cho mình đôi chút về chức năng search như trong trang
http://www2.hcm.ciren.gov.vn/jvnwebgis. Bác chandoidibui,step2 làm ra cái này
phải không? Có thể gợi ý cho e phải làm ntn, sử dụng những cái gì được không?
E đang tìm hiểu phần này nhưng chưa biết nên làm thế nào, làm sao để request
cái cần search tới geoserver, chẳng hạn như tên 1 con đường nào đó, và hiển thị
kết quả trên client.
Cái này e thấy rất hay mong các bác gợi ý giúp e với.
(Gợi ý: viết servlet riêng chạy chung với Geoserver).
Prerequisites:
1. GeoServer installed and running (visible from
http://localhost:8080/geoserver) .
2. GeoServer configured with the topp:states dataset.
Step 1: Export OpenLayers Preview
1. Navigate to the Demo > Map Preview page
(http://localhost:8080/geoserver/mapPreview.do).
2. View the OpenLayers preview for the states dataset.
33
3. In Firefox, select File > Save Page As... (Ctrl+S)
4. Save the file as MyMap.html in your C:\Program Files\GeoServer 1.6beta3\data_dir\www directory. Ensure you save as Web Page, HTML
only
5. Confirm that you can view the page from
http://localhost:8080/geoserver/www/MyMap.html
Step 2: Customize MyMap.html
1. Open C:\Program Files\GeoServer 1.6-beta3\data_dir\www\MyMap.html in
Notepad++ that deals well with line endings (Start > Run > wordpad).
2. Edit the <title> tag, and change from "OpenLayers Map Preview" to
"MyMap"
3. Save your changes, refresh
http://localhost:8080/geoserver/www/MyMap.html and confirm that your
custom title shows up in the browsers title bar.
34
4. Now, replace the content of the MyMap.html file with the source of this file
http://dev.openlayers.org/sandbox/tschaub/foss4g/examples/googlesm.html and we'll start building up a map from "scratch."
5. Download
http://dev.openlayers.org/sandbox/tschaub/foss4g/build/OpenLayers.js
and place it in your C:\Program Files\GeoServer 1.6-beta3\data_dir\www
directory.
6. Begin editing MyMap.html again and replace the OpenLayers script tag
with the path to this OpenLayers.js file
<script src="http://localhost:8080/geoserver/www/OpenLayers.js"
type="text/javascript"></script>
7. Add the following line above your init() function
OpenLayers.ImgPath = "../openlayers/img/";
8. Add the following link tag above the script tag that points to
OpenLayers.js.
<link rel="stylesheet" href="../openlayers/theme/default/style.css"
type="text/css" />
9. Now, open http://localhost:8080/geoserver/www/MyMap.html and confirm
that you're looking at imagery from google centered on North America.
Step 3. Add a WMS layer from GeoServer
1. Edit MyMap.html and define a WMS layer that points to your topp:states
dataset. The WMS constructor in OpenLayers takes four arguments: layer
name, layer url, parameters, and options (see documentation here
http://dev.openlayers.org/apidocs/files/OpenLayers/Layer/WMS-js.html).
We want the layer named "topp:states" and we want transparency. Your
layer definition should look like
// add a WMS layer in Spherical Mercator
var wms = new OpenLayers.Layer.WMS(
"State Boundaries",
"http://localhost:8080/geoserver/wms",
{layers: "topp:states", transparent: "true"}
);
35
Add the above just below the definition of the "google spherical mercator"
layer.
2. Add the layer to the map (layers can be added one at a time with
map.addLayer, or all at once with addLayers)
map.addLayers([gsat, wms]);
3. Refresh your map to see the states dataset over Google's tiles.
Step 4. Add an editable vector layer
1. Edit MyMap.html and define a Vector layer for editing. The constructor for
the Vector layer takes two arguments: name and options. We want to
name it something like "Editable Vectors." Your layer definition should
look something like
var vector = new OpenLayers.Layer.Vector("Editable Vectors");
Add the above just below the definition of the "states" layer.
2. Add the vector layer to the map.
map.addLayers([gsat, wms, vector]);
3. Add an editing toolbar to your map. The constructor for the editing
toolbar takes two arguments: layer and options. We want to point it to
the vector layer created above. Since we aren't doing anything special
with the toolbar, we can add it to the map at the same time it is created.
map.addControl(new OpenLayers.Control.EditingToolbar(vector));
Add the above just below the "LayerSwitcher" control
("map.addControl(new OpenLayers.Control.LayerSwitcher()))"
4. Refresh the map to see an editing toolbar that lets you draw points, lines,
and polygons.
Extra Credit
36
The current build of OpenLayers doesn't properly support WFS over a Sperical
Mercator layer (as above). Despite that, you can build a map similar to the one
described above in EPSG:4326 (the default projection assumed in OpenLayers).
1. Build a map similar to the one above, but in EPSG:4326. Use one of the
other WMS data sources as the base layer.
2. Add a WFS layer to the map. Try using the topp:poi dataset. Note that
adding a maxFeatures parameter is a good idea - limit the number of
features returned to 25 or so at first. The class docs linked above should
help with the syntax for constructing a WFS layer.
3. Add ModifyFeature control to the map (again, see the class
documentation). Point it to your WFS layer. Activate the control after
adding it to the map.
4. You should be able to modify the geometries of the requested WFS
features.
37
