edb guide to system features, section a2
advertisement
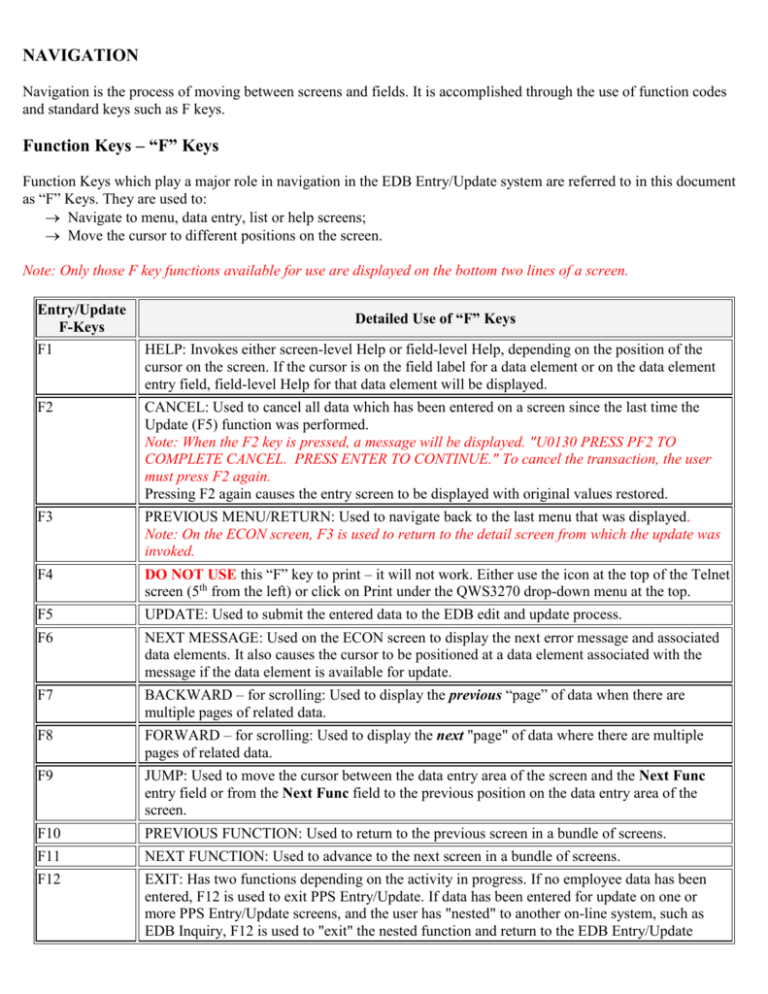
NAVIGATION Navigation is the process of moving between screens and fields. It is accomplished through the use of function codes and standard keys such as F keys. Function Keys – “F” Keys Function Keys which play a major role in navigation in the EDB Entry/Update system are referred to in this document as “F” Keys. They are used to: Navigate to menu, data entry, list or help screens; Move the cursor to different positions on the screen. Note: Only those F key functions available for use are displayed on the bottom two lines of a screen. Entry/Update F-Keys F1 Detailed Use of “F” Keys HELP: Invokes either screen-level Help or field-level Help, depending on the position of the cursor on the screen. If the cursor is on the field label for a data element or on the data element entry field, field-level Help for that data element will be displayed. F2 CANCEL: Used to cancel all data which has been entered on a screen since the last time the Update (F5) function was performed. Note: When the F2 key is pressed, a message will be displayed. "U0130 PRESS PF2 TO COMPLETE CANCEL. PRESS ENTER TO CONTINUE." To cancel the transaction, the user must press F2 again. Pressing F2 again causes the entry screen to be displayed with original values restored. F3 PREVIOUS MENU/RETURN: Used to navigate back to the last menu that was displayed. Note: On the ECON screen, F3 is used to return to the detail screen from which the update was invoked. F4 DO NOT USE this “F” key to print – it will not work. Either use the icon at the top of the Telnet screen (5th from the left) or click on Print under the QWS3270 drop-down menu at the top. F5 UPDATE: Used to submit the entered data to the EDB edit and update process. F6 NEXT MESSAGE: Used on the ECON screen to display the next error message and associated data elements. It also causes the cursor to be positioned at a data element associated with the message if the data element is available for update. F7 BACKWARD – for scrolling: Used to display the previous “page” of data when there are multiple pages of related data. F8 FORWARD – for scrolling: Used to display the next "page" of data where there are multiple pages of related data. F9 JUMP: Used to move the cursor between the data entry area of the screen and the Next Func entry field or from the Next Func field to the previous position on the data entry area of the screen. F10 PREVIOUS FUNCTION: Used to return to the previous screen in a bundle of screens. F11 NEXT FUNCTION: Used to advance to the next screen in a bundle of screens. F12 EXIT: Has two functions depending on the activity in progress. If no employee data has been entered, F12 is used to exit PPS Entry/Update. If data has been entered for update on one or more PPS Entry/Update screens, and the user has "nested" to another on-line system, such as EDB Inquiry, F12 is used to "exit" the nested function and return to the EDB Entry/Update screen. Note: If data has been entered on an Entry/Update screen, an attempt to use F12 before completing or canceling the update process will result in an error message. Cursor Movement The cursor is usually positioned at the first enterable data field on a screen when the screen is first displayed. The cursor moves between entry fields first from left to right, then from top to bottom. There are several methods of moving the cursor from one field to another. Keys Detailed Use of Keys Tab Tab key alone moves the cursor to the next data entry field on the screen. Shift-Tab (Back tab) Used to move the cursor to the previous entry field on the screen. Hint: You must press down and hold the shift key and press tab key at the same time. F9 (Jump key) Moves the cursor from the current position to the Next Func field or from the Next Func field to the previous cursor position on the screen. Enter When no errors were detected in the entered data, the "ENTER" key will move the cursor to the first enterable data field on the screen. If one or more errors were detected in the entered data, the "ENTER" key will move the cursor to the first field that has an invalid value. Arrow keys Use of these keys for navigation is not recommended. Automatic movement (Auto skip) When the user types characters in an entry field and fills the field with data, the cursor will move to the next entry field. If the user does not fill the field, the cursor will need to be moved to the next field with the Tab key. Screen Selection Individual Screens The user may select an individual screen by entering the 4 character function code for the screen in the Next Func field and entering the appropriate employee record key such as the employee’s ID number. For example: To access the EAPP Screen for an employee whose ID number is 200000078: Place the cursor in the Next Func field Enter Function Code EAPP Enter Employee ID 200000078 Press Enter Bundles (See Bundles & Individual Action Code Table) NEED LINK HERE A bundle is a group of screens or fields that are linked together and/or highlighted in order to lead the user through an action such as a hire. The user may select a bundle by entering the 4 character function code for the desired bundle in the Next Func field of any screen. For example: To select the Staff New Hire bundle: Place the cursor in the Next Func field Enter Function Code HIRE Press Enter Navigation Within a Bundle Once a bundle has been selected, the user navigates as follows: F10 Prev Func - Select the F10 PrevFunc key to move to a previous screen within the bundle; F11 Next Func - Select the F11 NextFunc key to move to the next screen within a bundle. Note: If the transaction is canceled, the user must initiate the ENTIRE bundle again; there is no mechanism to store "work-in-progress". Navigating Between Subsystems - Nesting "Nesting" is a term used to describe the process of temporarily leaving the current entry/update function to access another online inquiry function such as PPS Inquiry while retaining the data entered. For example: A user entering leave of absence data for an employee record on the ELVE screen wants to check the employee's appointment data before completing the update. The user enters IAPP in the NextFunc field and presses Enter to view appointment data for the employee in EDB Inquiry. The user can then view appointment and distribution data for the employee on the IAPP screen. Notice the message "Upd in Prog", Update in Progress, is displayed in the lower right of the screen. This serves as a reminder to the user that an update is in progress. To return to the PPS On-line Entry/Update system the user presses F12 Exit on the IAPP screen and is returned to the ELVE screen. From PPS Entry/Update it is possible to nest to other Personnel/Payroll inquiry screens such as IERN (Payroll Audit Record Inquiry), IHDB (History Data Base Inquiry), or IHIS (Personnel History Reports Inquiry) as well as IDDB (EDB Inquiry) for the same or different employees. Navigational Messages Navigational messages in PPS Entry/Update are provided to alert the user to the status of a requested action or to an error related to the action. A list of navigational messages that apply to EDB Entry/Update will be coming soon. Navigational Message - "DATA ENTERED IS NOT UNIQUE" There is one "Navigational" message that will actually cause another screen (the ID Browse Select Screen) to be displayed. The message is "U0010 Data Entered is not unique - select correct match". This message is issued when the preparer is on the EEID screen in a NEW HIRE bundle and there is a record in the IID (PPS ID Data Base) that contains the same or similar Social Security number, Name, or Birthdate as the record that the preparer is updating. Note: The IID contains ID records for UCD employees past (1999 forward,) and present. The "correct match" could be one of the records listed on the ID Browse Select Screen or a new ID number. Assigning an ID Number Example When processing a new/rehire using the appropriate bundle, the preparer completes the employee identification data on the EEID screen of the bundle and presses the Enter key. If the system finds one or more matches to the entered data in the IID system, the ID Browse Screen will display with the navigational message "U0010 Data Entered is not unique - select correct match". The ID number, SSN number, Name and/or Date of Birth for all records in the IID that match the entered data for the new hire will be displayed. There will also be an option "NONE OF THE ABOVE - ASSIGN NEW ID" on the bottom portion of the screen. If none of the records displayed as possible matches are for the employee being hired, the preparer should select the "NONE OF THE ABOVE - ASSIGN NEW ID" option by using the TAB key to position the cursor next to the "NONE OF THE ABOVE" line. Next, the preparer should enter an S in the SEL column and press the Enter key. The message "U0001 Input Accepted" should then be displayed on the screen. By selecting this option, the preparer is requesting the system to issue a new employee ID number to the person being hired. The preparer would press then F3 key to return to the EEID screen. The EEID screen should be displayed again with the new employee number assigned. The preparer may then continue to enter the rest of the required data in the hire bundle. If the message is “P0620 New Employee ID Number invalid or already on EDB”, the transaction should be cancelled and the preparer should check the EDB. The employee record will probably be on the EDB and the actions will need to be processed as a rehire or additional employment or some action other than a new hire. If the department “hiring” this employee is not the home department, access to the record will need to be requested from the home department. Employee/Payroll Record Selection An employee record can be selected by entering a Function Code and one of the following employee record keys: Employee ID: By keying in the 9-digit ID Number Employee Name: By keying in LAST NAME,FIRST NAME; do not key in a space between the comma and the first name Social Security #: By keying in the Social Security Number without hyphens. For example, to select an employee whose SSN is 123-45-6789 key in 123456789 For example: To select an employee record and entry screen, the user needs to enter the Function Code and the employee record key. To display the appointment/distribution screen the user would enter EAPP, the 9-digit employee ID number, and then press the Enter key. To display the same screen for a different employee, tab past the Next Func field and enter the employee record key for the next employee. For example: Tab to the ID field and enter the employee number of a different employee and then press Enter. Note: When using employee name as the record key, a partial name may be entered. If the system finds a single match to the entered data, the requested screen will be displayed. If the system does not find an exact match or finds more than one match, the WHO screen will be displayed. The WHO screen will list the employees who have a name that is close to the name that was entered and the cursor will be at the top of the list. Once the WHO screen is displayed, IF THE FUNCTION CODE THAT WAS ENTERED IS STILL DISPLAYED NEXT TO "Next Func:", the employee record may be selected by either moving the cursor down the list until the cursor is next to the correct employee and pressing the Enter key or by moving the cursor to the ID number field, entering the ID number and pressing Enter. To access a different function for a different employee, enter the new Function Code and a new employee record key. For example: The user would enter IGEN, a different 9-digit employee ID number and then press the Enter key. Scrolling Scrolling is the method used to display additional data associated with a single screen function. When there is more data than can fit on a single screen, F7 Backward and F8 Forward may be used to scroll among pages of the screen to display the full range of data. F7 would be pressed to display the previous page of available data F8 would be pressed to display the next page of available data For example: “Pg 1 of 2” is displayed on the 4th line (right side) of the EAPP screen which indicates that there is additional appointment/distribution data. To access the additional data, the user would press F8 to scroll forward.
