Maintenance Protocol
advertisement

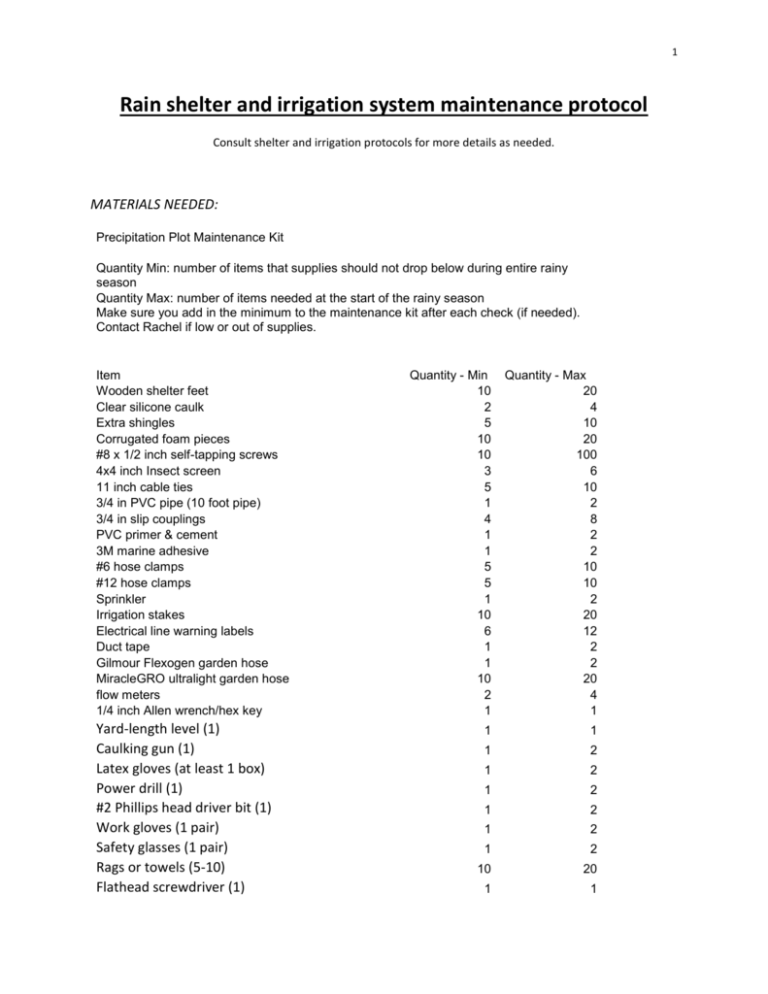
1 Rain shelter and irrigation system maintenance protocol Consult shelter and irrigation protocols for more details as needed. MATERIALS NEEDED: Precipitation Plot Maintenance Kit Quantity Min: number of items that supplies should not drop below during entire rainy season Quantity Max: number of items needed at the start of the rainy season Make sure you add in the minimum to the maintenance kit after each check (if needed). Contact Rachel if low or out of supplies. Item Wooden shelter feet Clear silicone caulk Extra shingles Corrugated foam pieces #8 x 1/2 inch self-tapping screws 4x4 inch Insect screen 11 inch cable ties 3/4 in PVC pipe (10 foot pipe) 3/4 in slip couplings PVC primer & cement 3M marine adhesive #6 hose clamps #12 hose clamps Sprinkler Irrigation stakes Electrical line warning labels Duct tape Gilmour Flexogen garden hose MiracleGRO ultralight garden hose flow meters 1/4 inch Allen wrench/hex key Yard-length level (1) Caulking gun (1) Latex gloves (at least 1 box) Power drill (1) #2 Phillips head driver bit (1) Work gloves (1 pair) Safety glasses (1 pair) Rags or towels (5-10) Flathead screwdriver (1) Quantity - Min 10 2 5 10 10 3 5 1 4 1 1 5 5 1 10 6 1 1 10 2 1 Quantity - Max 20 4 10 20 100 6 10 2 8 2 2 10 10 2 20 12 2 2 20 4 1 1 1 1 2 1 2 1 2 1 2 1 2 1 2 10 20 1 1 2 Flags PVC cutter (1) Aquarium net (1) Hand trowel (1) Socket wrench (1) 9/16in socket fitting (1) 5/16in socket fitting (1) Adjustable crescent wrench (1) Mallet (1) Clipboard Datasheets Protocols 1 40 gallon Tupperware for transporting water in truck 2 5 gallon water jugs for transporting water to sites Funnel for transferring water to jugs Thread tape for sprinkler repair Bolts for solar panel Wire and wire connectors – Red Wire and wire connectors – Black Wire cutter 5 10 1 1 1 2 1 2 1 2 1 2 1 2 1 2 1 2 1 1 2 6 1 1 1 1 2 2 1 1 1 1 4 8 1 2 1 2 1 1 Maintaining slope: Make sure that the shelter frame and the attached gutters are still sloping in the proper direction, from the high end down towards the gutter end drops. This should rarely be an issue since wooden “feet” have been installed under each EMT “leg” to prevent the structure from sinking, but in some cases one of these feet may become displaced or an EMT kee-klamp fixture may have come loose. The structure should have a continuous and fairly consistent slope down the length of each EMT “arm” and this slope should be evident just by looking at the structure. However, if you are unsure if the structure is still properly sloped you can check this by laying the yard-length level flat on the gutter segment or EMT arm under question. The bubble in the level should always rise towards the end of the gutter segment or EMT arm that is supposed to be the high end. Every shelter leg should have a wooden foot under it without exception. If one of these feet is missing, it will need to be replaced whether or not the leg has sunk into the ground. In most cases the foot should still be somewhere in the immediate vicinity, however, if you cannot find it you will need to replace it with one from the maintenance 3 kit. Simply lift up the EMT leg that is missing the wooden foot, slide the wooden foot onto the rebar underneath it, then slide the EMT leg back down the rebar so that it rests on the foot. If the leg sank into the ground as a result of the missing foot the structure at this location should now be restored to its proper slope. The shelter frame is composed of EMT pipes held together with EMT kee-klamp fittings that are tightened with a 1/4in allen wrench. If one of these fittings has become too loose it may slide down the frame resulting in a loss of proper slope. This problem can be fixed by returning the EMT kee-klamp fitting to its original position and retightening it with the 1/4in allen wrench. Slide the EMT kee-klamp fitting back up the leg and use your best judgment to determine where it should be positioned, then check this positioning using the yard-length level while keeping in mind that the slope on any given length of arms or gutters should be rather consistent from the high end to the low end. If an EMT arm or support beam has become detached from an EMT kee-klamp fitting it can be reattached using the 1/4in allen wrench as well. Simply plug the pipe back into the fitting and retighten it with the allen wrench. Maintaining Shingles: Check the shingles at the shelter site to make sure none have broken or acquired major cracks. Most cracks can be repaired with clear silicone caulk, however those that are broken beyond repair will need to be replaced. Repair minor cracks by applying a small amount of clear silicone caulk to your gloved index finger and spread the caulk evenly on the shingle so that the crack is sealed in a manner that will not impede water flow. Replace broken shingles with the extras in the maintenance kit by installing them using corrugated foam pieces and self-tapping screws. Wear work gloves and safety glasses if using a power drill for this task and take care not to screw the shingles in too tight or they will crack. Once any damaged shingles have been repaired or replaced check to see if any of them need to be cleaned. A light film of dirt on the shingles is normal and is not a problem if it is not causing a significant shadow to be cast on the ground below. However, if any of the shingles have too much dirt or debris built up it will adversely affect the transmission of light and they will need to be cleaned by wiping them with a damp cloth. Maintaining Gutters: 4 Walk up and down each length of gutter to make sure none of the caulk has broken at the slip connectors or end caps, which will cause the gutters to leak. You may be able to determine if leaking has already occurred in a particular area by monitoring the vegetation under each gutter for any obvious areas of overgrowth. If you find a broken seal remove the preexisting caulk at this location by scraping it with a flathead screwdriver and peeling it off, then reapply new caulk to reseal the gutter at this location and spread it smooth with a gloved finger so that it will not impede water flow. Check the gutter strainers to make sure they are in place at each gutter end drop and securely sealed with insect screen. If you discover that the insect screen has become detached from one of the gutter strainers, wrap that gutter strainer with new insect screen and secure it with an 11in cable tie. Remove what you can with your hands that has built up in the gutters and gutter end drops before putting the gutter strainers back in the gutter end drops. Maintaining pre-tank water lines: Make sure that the PVC line connecting the gutter end drops to the water tank is still intact and that none of the PVC fittings have become disconnected. If you find the line disconnected at any location glue the line back together using a liberal application of PVC primer and solvent cement. Checking flow meters: Lift the square of hardware cloth covering the flow meter housing by removing the four metal stakes holding it into place. Lift the hardware cloth covering the hose on one side of the flow meter housing and slide the hose meter housing to the side exposing the flow meter. Press the right button on the flow meter once to turn on the display and record the reading from the flow meter on the data sheet. This reading indicates how much water has been pumped to the irrigation plot since the last maintenance check. Press and hold the left button on the flow meter to reset the counter. If the flow meters are cracked or no longer working they will need to be replaced or removed from the system (see irrigation protocol). 5 Water flow meter installation Checking the water system: Once you have reset the flow meter you can star to check the watering system. Begin by walking along the enter water line from the gutters to the sprinkler and checking for any areas that show obvious signs of leaks including a large amount of vegetation growth. Mark these spots with flags and monitor them after you pour the water in. After this preliminary check, use one of the 5 gallon jugs to pour water into each of the gutters, near the end with the gutter strainer. Begin by pouring a small amount of water to make sure the gutter isn’t clogged. If you find a segment of the water line is clogged with too much dirt and impeding water flow, cut out this segment of the water line using a PVC cutter and glue in a new segment of PVC pipe using 3/4in PVC slip couplings and PVC primer and solvent cement. Once you’re certain there’s not a clog in the gutter system you can pour more water into each gutter. In general, about seven gallons should be sufficient to test the whole system but in some instances you may need 10 gallons. As you are pouring the water in, look for leaks along the gutters and pvc line. As you get to the last two gutters, you should hear the pump start and then see the sprinkler start to work. Continue pouring until you have added at least 7 gallons. It takes at least 7 gallons to make the sprinkler work correctly. After pouring the water, walk the entire length of the system to look for leaks. Be sure to also monitor the sprinkler during this time. The sprinkler should begin to spin 360 degrees and distribute water evenly on the irrigation plot. This is an important step for at least the first few checks of the season to make sure the sprinklers are maintaining proper calibration. If the sprinkler is not 6 spinning 360 degrees make sure that the pattern adjuster is flipped all the way up, that the sprinkler riser is positioned vertically, and that the lower pattern adjustment wing is clicked in to the left when viewing from the sprinkler from above. If the sprinkler is spraying water too short or too far adjust the stream deflector, and if it is not spreading water evenly adjust the diffuser screw. If the sprinkler tip appears to be clogged the nozzle can be removed with an adjustable crescent wrench, cleaned and then reinstalled. See the attached instructions for clarification on these steps. If this does not solve the problem the sprinkler can be replaced with one from the maintenance kit. Record the amount of water used during this process in the data sheet and reset the counter on the water flow meter when you are finished. Maintaining water tanks: Wipe the solar panel attached to the water tank lid with a damp cloth to clean off dust and debris. Open the water tank. **Before doing this, check the underside for black widows as they like to build webs in the lip of the tank.** Slide open the lid of the water tank by removing the nuts fastening it to the tank and temporarily disconnecting one segment of the electrical housing so that you can pull some slack from the solar panel cord at this location. Check to make sure that the insect screens covering the water tank outlet and overflow holes are still attached. If the screen at the outlet filter has come detached reattach it using 3M marine sealant. If one of the screens covering the overflow holes has become detached reattach it using silicone caulk. Wear gloves for this process and use your finger to spread the marine adhesive or caulk around all edges of the screen. Use the aquarium net to scoop out any debris or excess mud built up in the bottom of the water tank. Checking irrigation boxes: Use a hand trowel to access the irrigation box which is located between the water tank and the ventilation snorkel. Expose the lid of the irrigation box and then dig a trench around it at all sides so that dirt will not fall inside once the lid is removed. Note that you do not need to dig up the entire irrigation box, but only need to dig deep enough to remove the lid. Use a flathead screwdriver to pry off the green plastic caps covering the bolts to the irrigation box lid, detach the electrical line warning label at one end, and then remove the lid using a socket wrench equipped with a 9/16in socket fitting. 7 Make sure that there is no water or other signs of leaking in the irrigation box. If it seems like leaking may have occurred at any location make sure that both of the hose clamps are secure by tightening them with a socket wrench equipped with a 5/16in socket fitting. If the threaded hose barb fittings seem loose they can be tightened using an adjustable crescent wrench. Make sure that the battery connections are tight. The solar charge regulator should have an indicator light showing that the battery is either charging or fully charged. Do not touch the two battery terminals at the same time. Use caution to avoid laying a wrench or other metal object across the two terminals, which can cause sparks or even a fire and could potentially ruin the battery. Wear gloves and to put a cloth over one of the terminals so that you don’t accidentally touch them at the same time. Recording rain gauge data Record the water level in the rain gauge and then empty it. Reassembling the system: When you are finished with the maintenance and checking of the rain shelter and irrigation system slide the water flow meter housing back to its original position and resecure the hardware cloth you have removed using the irrigation stakes and a mallet. Put the lid back on the water tank and reattach the nuts locking it into place. Reach into the irrigation box and pull back the slack from the solar panel wire. Reconnect the PVC electrical housing where you detached it to remove the water tank lid. Put the lid back on the irrigation box using the bolts you have removed and a socket wrench equipped with a 9/16in socket fitting. The bolts should be snug, but take care not to over tighten them or you will damage the rubber washers under the bolt head. Then put the green plastic bolt covers back onto the irrigation box lid. Put the electrical line warning label back on the irrigation box lid using duct tape and rebury the irrigation box. Never leave the site without replacing the lids to the water tank or irrigation box, as this may result in inadvertently trapping wildlife. 8 9


