Managing Course Content
advertisement
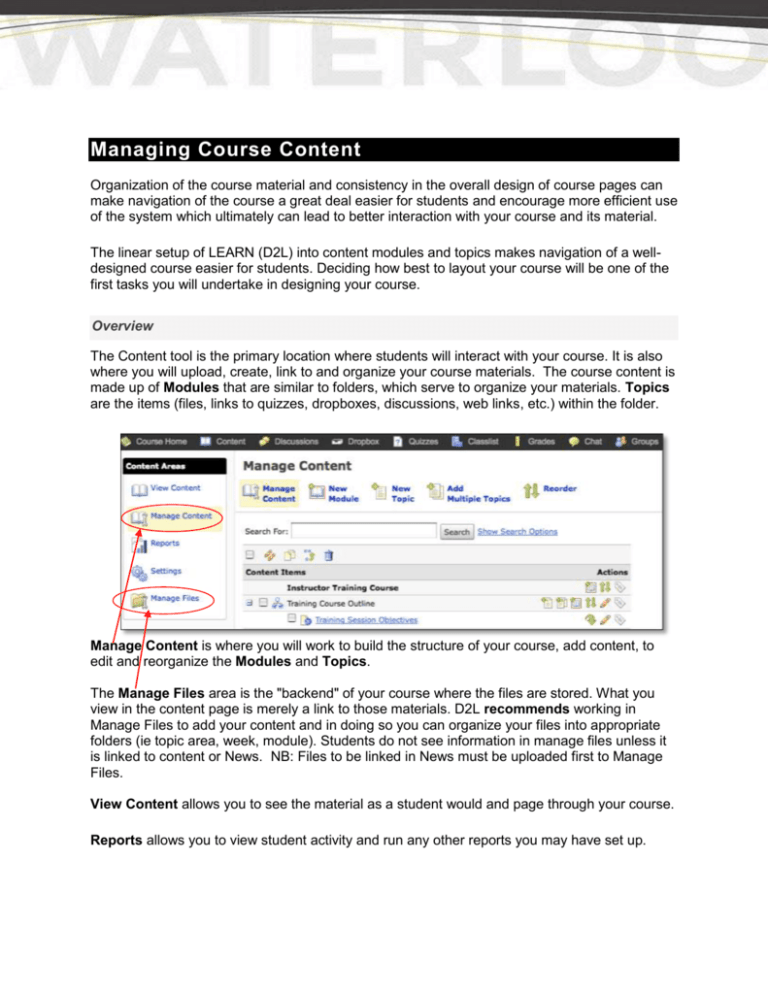
Managing Course Content Organization of the course material and consistency in the overall design of course pages can make navigation of the course a great deal easier for students and encourage more efficient use of the system which ultimately can lead to better interaction with your course and its material. The linear setup of LEARN (D2L) into content modules and topics makes navigation of a welldesigned course easier for students. Deciding how best to layout your course will be one of the first tasks you will undertake in designing your course. Overview The Content tool is the primary location where students will interact with your course. It is also where you will upload, create, link to and organize your course materials. The course content is made up of Modules that are similar to folders, which serve to organize your materials. Topics are the items (files, links to quizzes, dropboxes, discussions, web links, etc.) within the folder. Manage Content is where you will work to build the structure of your course, add content, to edit and reorganize the Modules and Topics. The Manage Files area is the "backend" of your course where the files are stored. What you view in the content page is merely a link to those materials. D2L recommends working in Manage Files to add your content and in doing so you can organize your files into appropriate folders (ie topic area, week, module). Students do not see information in manage files unless it is linked to content or News. NB: Files to be linked in News must be uploaded first to Manage Files. View Content allows you to see the material as a student would and page through your course. Reports allows you to view student activity and run any other reports you may have set up. Settings allow you to control how the content is displayed. For example you can display modules vertically or horizontally and change the module and topic display characteristics. Working in Manage Content Manage Content is where you build the course structure that the students will interact with. Your content will be displayed to the students in Modules and Topics. Creating a Module To create a Module select New Module, if it is a sub-module select a parent module. You must give the module a title and, if you choose, a short title. The short title appears in the table of contents sidebar in view content mode (and in the student's view). Notice that you can hide enumeration (you may also change and rename the enumeration style under Settings). To hide the new module from student view, to have it available on a specific date or to add specific release conditions to the module select Restrictions. Note: If you move to a new tab the system will save the settings from the previous tab. Creating a Topic To create a Topic within the module, select New Topic at the top of the page or the New Topic icon associated with the Module. You may create your topic directly as a new page; link to a course file (already stored in Manage Files) upload a file (the physical file will reside in Manage Files); or create a link to a course item such as a dropbox or quiz or to an external URL. Create New File opens an HTML editor page to which you can directly create content. You must assign the file to a Module and name your file. You may decide to hide enumeration. You may also Choose destination which will assign the file to a specific folder within manage files. If you do not choose a folder or create a new folder, the file will reside in the default folder. Restrictions may be placed on a Topic just as for a Module. Additionally, Discussions may be associated directly with a Topic. Your discussion forums must be created prior but then can be linked to the item. When a student views the content page (Topic), the discussion icon appears at the top of the page for the students to access and if a help discussion was created it will appear as a question mark icon . The discussion topics will open in a new window so the student will not need to navigate back to the Topic page. Note: If you create this type of discussion it would be prudent to clearly demonstrate the access to your students as the icons are small and easy to miss. Course File enables you to link to a file already stored in the Manage Content area. To do so: Select Course file under New Topic. Select a Module Create a Title for the file (and a short title if desired). Browse the Manage Files area for the file. Select the file you wish to add. Save In Manage Files, a document that is linked to a file in Content will have a link icon it. Changes that are made in the file will be updated in both locations. next to Upload New File enables you to upload a file from your computer. Select Choose File and browse your computer. You may wish to choose where in Manage Files the file should reside, if so, select Choose Destination, otherwise, the default path will be followed. Quicklink enables you to create a topic that is a link either to an external URL or to a course item (such as a quiz, dropbox or file that you have already created or uploaded). To display an external URL type or copy the address into the box and choose whether or not you wish to have the content viewed in a new window or not. To link to an item in your course, select the quicklink icon and choose the category (e.g., Quizzes) and then the specific item (e.g., Quiz 1). Note: Since dropboxes, quizzes and discussions are accessed at the Navbar it would be prudent to direct your students to them from the appropriate module as well. Adding Multiple Topics In Manage Content you may also choose to add multiple topics as once. These items must already reside within Manage Files. Selecting this option brings you into the Manage Files area where you can select the files you wish to have displayed as Topics. You may create a new title and short title. The short title appears in the Content Map widget that is visible to students to help them navigate through the system. If you choose not to set a short title, the topic title will be used. Working in Manage Files In order to keep your course organized, you can create folders within the manage files area to store your course content. All files put into a Module will reside in Manage files either in a folder you specify or in the default root folder. To create a folder select New Folder, give the folder a name and save. You may create a new HTML page or upload a file into a folder within Manage Files. The uploaded file may either be a single file or a zip archive containing a number of files. To create a zip file on your computer select the files you wish to zip, right click (PC) or control click (Mac) and select “send to compressed folder” (PC) or “create archive” (Mac). To unzip your uploaded zip file mouse-over the file name and select the small arrowhead. Select the Unzip option. Items from the Learning Object Repository (LOR) may be retrieved into the manage files area for use in your course as well. There are a number of other actions you can perform with files brought to manage files. You may move your files into new folders by choosing Cut, selecting the desired folder, and selecting Paste. To copy a file (a template file for example), select Copy and then Paste and Rename the copy of the file. You may directly add a file to a Module in content by selecting Add Content Topic. You will be prompted to name the topic and to assign it to a Module. These actions described above may also be accessed via the icons top of the Manage Files page. on the View Content View Content is similar to the student view of your course, although to accurately view the course as a student would change your role on the course homepage. View content does allow you to move through the course and view your layout. Clicking on View Content brings you to the Table of Contents page. From this view, the entire table of contents, display any bookmarked items or view the last topic visited. You can expand or collapse your modules by selecting the + or – boxes to the right of the module title. From this view, you can see if a Topic or Module is hidden from students or is associated with a time/date restriction. Topics that have not been viewed yet appear bold. From this view, it is also possible to print or download the course content by selecting Print/Download and selecting the Modules or Topics you wish to print or download. Selecting the box along the top panel allows you to select all. In the Content View, you can move between topics by clicking the forward or back arrows on the top right of the page or by clicking on a topic in the content map. NB: If you click on a module title in the content map you are taken to the first topic in the module. Within a topic you can use the Content icons to: Show/hide the content map Open the topic in a new tab or window Access a help discussion (if you have set it up) Access the topic discussion (if you have set it up) Add or remove bookmarks Give/receive topic feedback Print the topic Edit the topic


