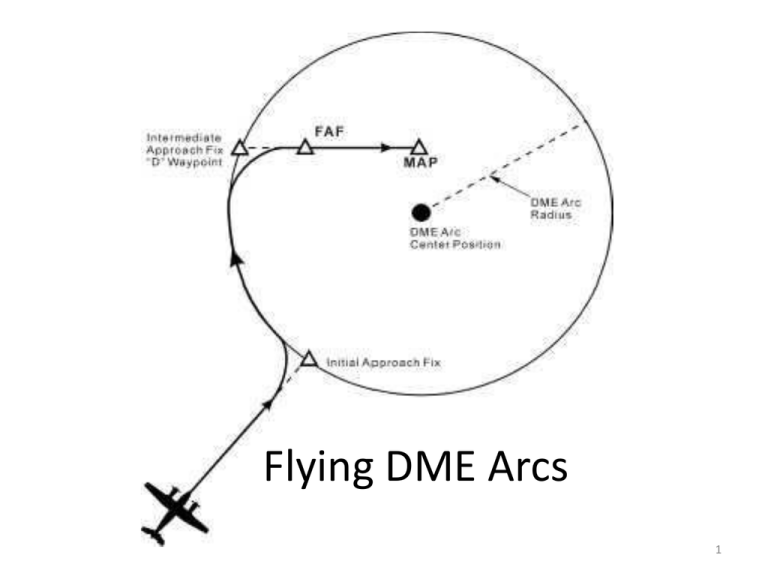
Flying DME Arcs
advertisement

Flying DME Arcs 1 Purpose • The DME Arc is a procedure used to transition an aircraft from the enroute environment to an instrument approach • Arc entry may be located before the IF, or after, but the arc is always part of the approach 2 DME Arc Basics • A DME arc is an imaginary circle, the radius of which is defined by a DME distance from the VOR – A DME arc simply involves flying a circular course around a VOR/DME or VORTAC station at a specified distance • There is no specific DME distance at which arcs are established – they are created based upon local need • Arcs associated with a procedure are not always based on the facility which is the navaid for the approach – e.g. a VOR DME arc leading to an ILS approach 3 DME Arc Basics • The protected area around an arc is 4 miles either side of the DME distance - but pilots are expected to remain within one mile of the specified arc distance • The DME arc will have at least one minimum altitude, but may also contain altitude step-down fixes at specified radials along the arc • Pilots often use the term right arc for an arc that keeps the station on the right wingtip of the aircraft, or left arc where the station stays on the left. ATC will usually refer to the general direction from the station where you will fly the arc, such as "arc Southeast." • With calm winds, the DME station should remain directly off the aircraft’s wingtip 4 Flying the DME Arc • Tune the DME to the correct station or set the GPS to the correct station – GPS can substitute for DME – see AIM 1-1-19, Table 11-6 • Identify the DME station’s Morse code id - These identifiers are broadcast only two times a minute – VOR receivers that automatically tune the DME should be verified as it's easy to tune the wrong station inadvertently • Tune the VOR station for the procedure 5 Flying the DME Arc • There are three phases of flying an arc: – Joining the Arc – Maintaining the arc – Exiting from the Arc • First, get established on the inbound radial leading to the arc – Suggest reducing your speed to help prevent blowing through DME arc – Joining the arc from the inside of the DME circle uses the same techniques – just be careful to turn in the correct direction 6 Joining the DME Arc • To intercept the DME Arc turn approximately 90° left or right from the inbound course, as applicable, to join the arc – A 90° heading change in a standard rate turn will take 30 seconds. Consequently, you must lead the turn onto the arc to account for the distance covered during the turn • Rule of thumb - Use 0.5% of your groundspeed as the lead distance. If ground speed is 120 knots, then your turn onto the arc should begin about 0.6 miles before the arc • As you approach the arc the course to fly will be in front of you Your CDI indicates your inbound course to the arc under the lubber line. The 90-degree tangent to the west / east is 90 degrees to the left / right of the lubber line. That will be your new heading as you roll out from your turn 7 Joining / Maintaining the DME Arc • Maintain your orientation as you track the arc – e.g. the nose of the plane should be approximately 90° from the arc radial you are crossing +/- wind correction – Wind drift correction is constantly changing around the arc. Wind orientation is therefore important • Use your heading bug to track your heading and adjust the bug each time you change heading to remain on the arc • Depart the arc on the appropriate radial / Navaid 8 Maintaining the DME Arc • The goal is to fly a constant radius around the VOR • You can do that by flying a continuous shallow bank turn all the way around the DME station. However, holding a small bank angle while trying to maintain the correct DME distance takes a lot of attention, attention that’s needed for other things • The preferred procedure is to fly small straight-line segments around the arc of about 10 to 20 degrees each – For the first segment though, establish a 10 degree straight segment to determine if you are properly established on the arc quickly – e.g., if you joined the arc on the 010 radial, fly a straight line on your heading of 100 until you cross the 020 radial. – To fly the segment turn the HSI needle/OBS card until the check radial (020) is set. As you fly along the arc, the HSI/CDI needle will start to center as you close in and cross the 020 radial 9 Maintaining the DME Arc • After the first segment - turn the HSI /CDI heading 20 degrees further along the arc - e.g., to a heading of 040 and change your heading by 20° to 120° • Then continue on until the needle centers and then turn to a heading of 140° and turning the needle to 060° (then turn to a course of 160° twist the OBS to 80°, etc.) • This process continually turns you along the arc in twenty degree segments • Rule of Thumb - "turn twenty, twist twenty" all the way around – Some prefer to follow a "turn ten, twist ten" procedure instead to maintain a greater degree of accuracy. The twenty degree rule should keep you within a half mile of either side of the DME track – To prevent full-scale deflections, you can use the FAA suggested methodology – re-center and turn the OBS knob whenever the CDI gets 2-4 degrees from center. It’s more work, but more precise 10 Maintaining the DME Arc • While you fly the arc, keep an eye on the DME to determine your distance and speed relative to the VOR/DME station – Try setting the DME unit to ground speed/time-tostation mode, try to maintain a ground speed (relative to the station) that is below 20 knots or so. That's taxiing speed and you won't get too far off the arc at that speed 11 Maintaining the DME Arc • The FAA Instrument Flying Handbook suggests flying slightly inside the DME arc, so as to always fly toward it – If you get outside the arc, it’s turning away from you, necessitating a greater correction change of course • On arc => turn 10° • Inside => maintain heading • Outside arc => turn 2 x 10° = 20° • Once cleared for the approach and on a published segment you are expected to manage altitude on your own. It’s up to you to descend. The controller may prompt you, but don’t count on it. 12 Getting Off the Arc • To exit the arc on the desired radial or course, you will need to lead the turn, as you did to join the arc. Many approaches with DME arcs depict a lead radial to alert you that your exit is approaching. Typically the turn to exit the arc will require a turn of approximately 90 degrees – Be careful as pilots tend to settle into the turn / twist rhythm and can lose their situational awareness of where they are along the arc • There are four basic DME arc departure variations – – – – • Fly TO the station, join the arc, exit the arc flying TO the station Fly TO the station, join the arc, exit the arc flying FROM the station Fly away FROM the station, join the arc, exit the arc flying FROM the station Fly away FROM the station, join the arc, exit the arc flying TO the station Be sure your VOR or HSI is set to read correctly – Rule of Thumb - “What’s next?” If need the inbound course is a TO course, use TO and vice versa with from courses – With this rule when you complete the arc, the VOR is already set with a TO indication, which is what you need, making the transition smoother. The heading should also be a heads-up that the inbound turn is coming soon. If joining a localizer, when you turn inbound the OBS will already be set for your localizer heading 13 RMI DME ARC • If no wind, you can fly a precise arc by maintaining relative bearing of 90° or 270° • In actual practice, you will still fly a series of short legs – With RMI bearing pointer on wingtip reference (90° or 270° position), maintain heading and allow bearing pointer to move 5° to 10° behind wingtip – Turn toward station until pointer points 5° to 10° ahead of wingtip – Continue these last two steps to maintain arc • Cross wind correction – If cross wind drifts aircraft away, turn in until bearing pointer points ahead of wingtip – If cross wind drifts aircraft closer to the DME station, turn out until bearing pointer points behind wingtip – Change relative bearing 10° to 20° for each 0.5 NM deviation from arc 14 GPS DME Arc • Set to terminal mode (1 nm) • Verify that RAIM is functioning and has proper integrity • Enter the DME facility (Can’t use substitutes near-by if the facility isn’t in your database) • Maintain distance from the station based upon GPS distance – You will be slightly closer as the distance is ground distance not slant distance. In most cases the difference is de minimis • If the arc is included as part of the database procedure – follow the magenta brick road 15 Charting Lead radial DME Arc distance and source facility IAFs on the arc and inbound radials and GPS waypoint identifiers Inbound course / Exit radial 16 Questions 17 Disclaimer • Instrument flight can be dangerous. Do not rely solely on this presentation – PROFESSIONAL INSTRUCTION IS REQUIRED • The foregoing material should not be relied upon for flight. • ALTHOUGH THE ABOVE INFORMATION IS FROM SOURCES BELIEVED TO BE RELIABLE SUCH INFORMATION HAS NOT BEEN VERIFIED, AND NO EXPRESS REPRESENTATION IS MADE NOR IS ANY TO BE IMPLIED AS TO THE ACCURACY THEREOF, AND IT IS SUBMITTED SUBJECT TO ERRORS, OMISSIONS, CHANGE. 18


