3_parallax_LCD_with_arduino
advertisement

living with the lab
using a parallax serial LCD with an Arduino
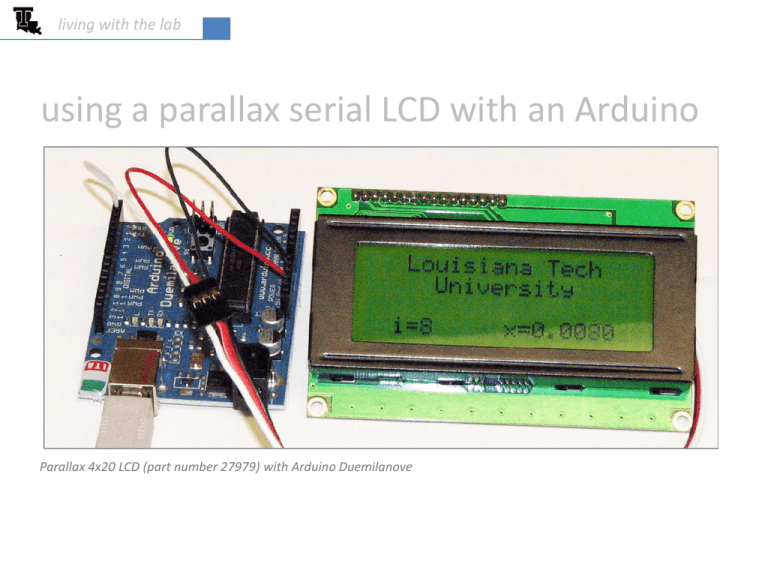
Parallax 4x20 LCD (part number 27979) with Arduino Duemilanove
living with the lab
LCD wiring
RX = wire to receive serial data from Arduino
5V = power wire
GND = ground wire
a servo extension is handy for wiring
the LCD to the Arduino
2
living with the lab
Arduino wiring
TX = wire to transmit serial data from digital I/O pin to LCD
ground
5V power
3
living with the lab
LCD and Arduino together
4
living with the lab
Programming
Text: “Louisiana Tech University” is displayed, with character locations chosen to center the text on
the first two lines of the LCD
Integers: The text “i=“ is printed followed by an integer that varies from 1 to 10
Floating Point Numbers: The text “x=“ is printed followed by a number with four numerals printed
to the right of the decimal; the value here ranges from 0.0010 to 0.0100
5
living with the lab
row 0, position 3
Cursor Position & Printing to the 4x20 LCD
Serial.write(131);
// move cursor to row 0 position 3
Serial.write("Louisiana Tech"); // print “Louisiana Tech” at (0,3)
0
1
2
3
4
5
6
7
8
9
10
11
12
13
14
15
16
17
18
19
0
128
129
130
131
132
133
134
135
136
137
138
139
140
141
142
143
144
145
146
147
1
148
149
150
151
152
153
154
155
156
157
158
159
160
161
162
163
164
165
166
167
2
168
169
170
171
172
173
174
175
176
177
178
179
180
181
182
183
184
185
186
187
3
188
189
190
191
192
193
194
195
196
197
198
199
200
201
202
203
204
205
206
207
6
living with the lab
Setting the Communication Rate
The dip switches on the back of the LCD are set to SW1=off and SW2=on. This causes the
LCD to look for data arriving at a rate of 9600 bits per second. The sketch must include . . .
Serial.begin(9600);
. . . so that the Arduino will know to send data to the LCD at a rate of 9600 bits per second.
7
living with the lab
A Complete Sketch
This sketch does not require a special library (only the Serial commands commonly used in sketches)
/*****************************************************************************/
/* David Hall
September 2012 */
/* Example program using a Parallax 4x20 LCD to output text and numbers.
*/
/* The following screen is printed:
*/
/*
*/
/*
--------------------*/
/*
|
Louisiana Tech |
*/
/*
|
University
|
*/
/*
|
|
*/
/*
|
i=8
x=0.0080 |
where 1<=i<=10 and 0.0000<=x<=0.0100
*/
/*
--------------------*/
/*
*/
/* The program prints out both integers and floating point numbers. The
*/
/* floating point number is printed to four decimal places.
*/
/*
*/
/* A partial listing of commands recognized by the LCD is provided below.
*/
/* See the data sheet for the LCD on the Parallax web site for more details. */
/* Serial.write(8) - move cursor one space left
*/
/* Serial.write(9) - move cursor one space right
*/
/* Serial.write(10) - move cursor down one line
*/
/* Serial.write(12) - clear screen and move cursor to top left
*/
/* Serial.write(13) - carriage return (will wrap if on last line)
*/
/* Serial.write(17) - turn backlight on
*/
/* Serial.write(18) - turn backlight off
*/
/* Serial.write(21) - turn display off
*/
/* Serial.write(22) - turn display on, cursor off, no blink
*/
/* Serial.write(23) - turn display on, cursor off, character blink
*/
/* Serial.write(24) - turn display on, cursor on, no blink (default)
*/
/* Serial.write(25) - turn display on, cursor on, character blink
*/
/* Serial.write(128) moves the cursor to row 0 and position 0
*/
/* row and position commands are shown below for all 80 character positions */
/*
ROW 0:
128=(0,0) 129=(0,1) 130=(0,2) 131=(0,3) 132=(0,4)
*/
/*
133=(0,5) 134=(0,6) 135=(0,7) 136=(0,8) 137=(0,9)
*/
/*
138=(0,10) 139=(0,11) 140=(0,12) 141=(0,13) 142=(0,14)
*/
/*
143=(0,15) 144=(0,16) 145=(0,17) 146=(0,18) 147=(0,19)
*/
/*
ROW 1:
148=(1,0) 149=(1,1) 150=(1,2) 151=(1,3) 152=(1,4)
*/
/*
153=(1,5) 154=(1,6) 155=(1,7) 156=(1,8) 157=(1,9)
*/
/*
158=(1,10) 159=(1,11) 160=(1,12) 161=(1,13) 162=(1,14)
*/
/*
163=(1,15) 164=(1,16) 165=(1,17) 166=(1,18) 167=(1,19)
*/
/*
ROW 2:
168=(2,0) 169=(2,1) 170=(2,2) 171=(2,3) 172=(2,4)
*/
/*
173=(2,5) 174=(2,6) 175=(2,7) 176=(2,8) 177=(2,9)
*/
/*
178=(2,10) 179=(2,11) 180=(2,12) 181=(2,13) 182=(2,14)
*/
/*
183=(2,15) 184=(2,16) 185=(2,17) 186=(2,18) 187=(2,19)
*/
/*
ROW 3:
188=(3,0) 189=(3,1) 190=(3,2) 191=(3,3) 192=(3,4)
*/
/*
193=(3,5) 194=(3,6) 195=(3,7) 196=(3,8) 197=(3,9)
*/
/*
198=(3,10) 199=(3,11) 200=(3,12) 201=(3,13) 202=(3,14)
*/
/*
203=(3,15) 204=(3,16) 205=(3,17) 206=(3,18) 207=(3,19)
*/
/*
*/
/* To print variables to the LCD, you need to use the Serial.print()
*/
/* command instead of the Serial.write() command. For example, the command
*/
/* Serial.print(x,4) will send variable "x" to the LCD with four digits
*/
/* beyond the decimal point.
*/
/*****************************************************************************/
See the Parallax website (www.parallax.com) for more details.
Custom characters and other features are available for this LCD.
When developing your sketch, print things to the LCD screen only once
if they do not change. For example, the text in this sketch is printed
once in setup(), while the variables are printed repeatedly in loop().
void setup() {
Serial.begin(9600);
pinMode(1,OUTPUT);
Serial.write(12);
Serial.write(131);
Serial.write("Louisiana Tech");
Serial.write(153);
Serial.write("University");
Serial.write(190);
Serial.write("i=
x=");
Serial.write(22);
}
void loop() {
float x=0.0;
for (int i=1;i<=10;i++)
{
x=x+0.0010;
Serial.write(192);
Serial.print(i);
Serial.write(" ");
Serial.write(200);
Serial.print(x,4);
delay(1000);
}
}
//
//
//
//
//
//
//
//
//
//
//
//
//
//
//
//
//
use a baud rate of 9600 bps
set pin1 as an output (pin1=TX)
clear screen & move to top left position
move cursor to row 0, position 3
print a text string starting at (0,3)
move cursor to row 1, position 5
print a text string starting at (1,5)
move cursor to row 3, position 2
print text string at (3,2)
turn cursor off to keep screen clean
add 0.001 to variable x
move cursor to row 3, position 4
print i at the current cursor position
print blanks to cover previous printing
move cursor to row 3, position 12
print x to 4 decimal places
delay 1 second between printing numbers
8
living with the lab
After downloading your sketch, you may need to
press the Arduino reset button to remove
“gibberish” that may be printed on the LCD.
reset button
9
living with the lab
A Complete Sketch (for old IDE)
If you haven’t downloaded the Arduino Integrated Development Environment (IDE) in a while, then try
program below.
/*****************************************************************************/
/* David Hall
November 2010 */
/* Example program using a Parallax 4x20 LCD to output text and numbers.
*/
/* The following screen is printed:
*/
/*
*/
/*
--------------------*/
/*
|
Louisiana Tech |
*/
/*
|
University
|
*/
/*
|
|
*/
/*
|
i=8
x=0.0080 |
where 1<=i<=10 and 0.0000<=x<=0.0100
*/
/*
--------------------*/
/*
*/
/* The program prints out both integers and floating point numbers. The
*/
/* floating point number is printed to four decimal places.
*/
/*
*/
/* A partial listing of commands recognized by the LCD is provided below.
*/
/* See the data sheet for the LCD on the Parallax web site for more details. */
/* Serial.print(8,BYTE) - move cursor one space left
*/
/* Serial.print(9,BYTE) - move cursor one space right
*/
/* Serial.print(10,BYTE) - move cursor down one line
*/
/* Serial.print(12,BYTE) - clear screen and move cursor to top left
*/
/* Serial.print(13,BYTE) - carriage return (will wrap if on last line)
*/
/* Serial.print(17,BYTE) - turn backlight on
*/
/* Serial.print(18,BYTE) - turn backlight off
*/
/* Serial.print(21,BYTE) - turn display off
*/
/* Serial.print(22,BYTE) - turn display on, cursor off, no blink
*/
/* Serial.print(23,BYTE) - turn display on, cursor off, character blink
*/
/* Serial.print(24,BYTE) - turn display on, cursor on, no blink (default)
*/
/* Serial.print(25,BYTE) - turn display on, cursor on, character blink
*/
/* Serial.print(128,BYTE) moves the cursor to row 0 and position 0
*/
/* row and position commands are shown below for all 80 character positions */
/*
ROW 0:
128=(0,0) 129=(0,1) 130=(0,2) 131=(0,3) 132=(0,4)
*/
/*
133=(0,5) 134=(0,6) 135=(0,7) 136=(0,8) 137=(0,9)
*/
/*
138=(0,10) 139=(0,11) 140=(0,12) 141=(0,13) 142=(0,14)
*/
/*
143=(0,15) 144=(0,16) 145=(0,17) 146=(0,18) 147=(0,19)
*/
/*
ROW 1:
148=(1,0) 149=(1,1) 150=(1,2) 151=(1,3) 152=(1,4)
*/
/*
153=(1,5) 154=(1,6) 155=(1,7) 156=(1,8) 157=(1,9)
*/
/*
158=(1,10) 159=(1,11) 160=(1,12) 161=(1,13) 162=(1,14)
*/
/*
163=(1,15) 164=(1,16) 165=(1,17) 166=(1,18) 167=(1,19)
*/
/*
ROW 2:
168=(2,0) 169=(2,1) 170=(2,2) 171=(2,3) 172=(2,4)
*/
/*
173=(2,5) 174=(2,6) 175=(2,7) 176=(2,8) 177=(2,9)
*/
/*
178=(2,10) 179=(2,11) 180=(2,12) 181=(2,13) 182=(2,14)
*/
/*
183=(2,15) 184=(2,16) 185=(2,17) 186=(2,18) 187=(2,19)
*/
/*
ROW 3:
188=(3,0) 189=(3,1) 190=(3,2) 191=(3,3) 192=(3,4)
*/
/*
193=(3,5) 194=(3,6) 195=(3,7) 196=(3,8) 197=(3,9)
*/
/*
198=(3,10) 199=(3,11) 200=(3,12) 201=(3,13) 202=(3,14)
*/
/*
203=(3,15) 204=(3,16) 205=(3,17) 206=(3,18) 207=(3,19)
*/
/*****************************************************************************/
See the Parallax website (www.parallax.com) for more details.
Custom characters and other features are available for this LCD.
When developing your sketch, print things to the LCD screen only once
if they do not change. For example, the text in this sketch is printed
once in setup(), while the variables are printed repeatedly in loop().
void setup() {
Serial.begin(9600);
pinMode(1,OUTPUT);
Serial.print(12, BYTE);
Serial.print(131,BYTE);
Serial.print("Louisiana Tech");
Serial.print(153,BYTE);
Serial.print("University");
Serial.print(190,BYTE);
Serial.print("i=
x=");
Serial.print(22,BYTE);
}
void loop() {
float x=0.0;
for (int i=1;i<=10;i++)
{
x=x+0.0010;
Serial.print(192,BYTE);
Serial.print(i);
Serial.print(" ");
Serial.print(200,BYTE);
Serial.print(x,4);
delay(1000);
}
}
//
//
//
//
//
//
//
//
//
//
//
//
//
//
//
//
//
use a baud rate of 9600 bps
set pin1 as an output (pin1=TX)
clear screen & move to top left position
move cursor to row 0, position 3
print a text string starting at (0,3)
move cursor to row 1, position 5
print a text string starting at (1,5)
move cursor to row 3, position 2
print text string at (3,2)
turn cursor off to keep screen clean
add 0.001 to variable x
move cursor to row 3, position 4
print i at the current cursor position
print blanks to cover previous printing
move cursor to row 3, position 12
print x to 4 decimal places
delay 1 second between printing numbers
10


