Pulley System Set-up Directions
advertisement
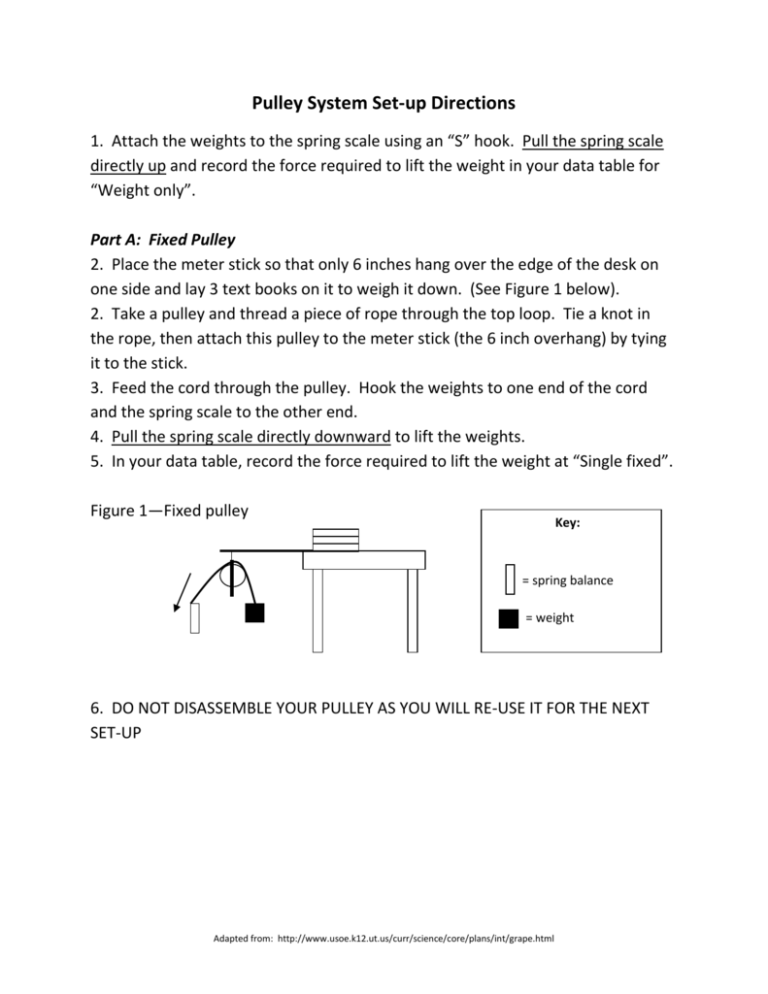
Pulley System Set-up Directions 1. Attach the weights to the spring scale using an “S” hook. Pull the spring scale directly up and record the force required to lift the weight in your data table for “Weight only”. Part A: Fixed Pulley 2. Place the meter stick so that only 6 inches hang over the edge of the desk on one side and lay 3 text books on it to weigh it down. (See Figure 1 below). 2. Take a pulley and thread a piece of rope through the top loop. Tie a knot in the rope, then attach this pulley to the meter stick (the 6 inch overhang) by tying it to the stick. 3. Feed the cord through the pulley. Hook the weights to one end of the cord and the spring scale to the other end. 4. Pull the spring scale directly downward to lift the weights. 5. In your data table, record the force required to lift the weight at “Single fixed”. Figure 1—Fixed pulley Key: = spring balance = weight 6. DO NOT DISASSEMBLE YOUR PULLEY AS YOU WILL RE-USE IT FOR THE NEXT SET-UP Adapted from: http://www.usoe.k12.ut.us/curr/science/core/plans/int/grape.html Part B: Combining a Fixed and a Moveable Pulley 1. Set up the pulleys as shown in Fig. 2 (see below). Use the fixed pulley you made from the last set-up. Using a second piece of string, tie the weight to the bottom loop of another pulley (not the fixed one). This will be your moveable pulley. Tie a third piece of string to the bottom loop of the fixed pulley. Thread this string through your moveable pulley. Thread it through your fixed pulley. Attach the spring scale to this piece of rope. Figure 2—Fixed and Movable pulley 2. Pull the spring scale directly downward. 3. In your data table, record the force required to lift the weight at “Fixed and Movable”. Adapted from: http://www.usoe.k12.ut.us/curr/science/core/plans/int/grape.html Investigating Pulleys Question: How do pulleys make our lives easier? Background Information: A fixed pulley is attached and hangs from a solid object. A moveable pulley is able to move. A single fixed pulley changes the direction the force is applied to move an object. It feels easier because gravity is now helping. It takes a moveable pulley to reduce the force needed to lift the object. The mechanical advantage of a pulley system basically means—how much easier the machine makes it for you to do your job (in this case lifting a weight). You can measure this by using a spring scale. Part I—Investigating pulley set-ups Follow the directions on the Pulley System Set-up Directions sheet to correctly set-up your pulley systems. Data Table: Pulley System Force required to lift weight (N) Weight only Single fixed Fixed and Movable Adapted from: http://www.usoe.k12.ut.us/curr/science/core/plans/int/grape.html Analysis: 1. Was there a difference in the mechanical advantage for the single fixed pulley and the fixed and movable pulley? (Mechanical advantage is the ability of a machine to make a task easier for you to do). Explain your answer: 2. Why would anyone use a single fixed pulley if it does not give you a mechanical advantage? 3. A machine never gives you something for nothing. Although the force required by you is decreased, something else is increased. What must be increased? Conclusion: Why do humans use pulleys? What are three things we haven’t discussed that use pulleys? Adapted from: http://www.usoe.k12.ut.us/curr/science/core/plans/int/grape.html Part II—Going further: Designing your own pulley Now that you understand how fixed and moveable pulleys work—use the pulleys provided to design a system to lift the heavy weight provided. 1. Draw a diagram below of the pulley system you will create. 2. Did your pulley system make it easier (give you a greater mechanical advantage) to lift the weight than just lifting it up by yourself? Explain your answer. Adapted from: http://www.usoe.k12.ut.us/curr/science/core/plans/int/grape.html
