How to Create a Discussion Board
advertisement
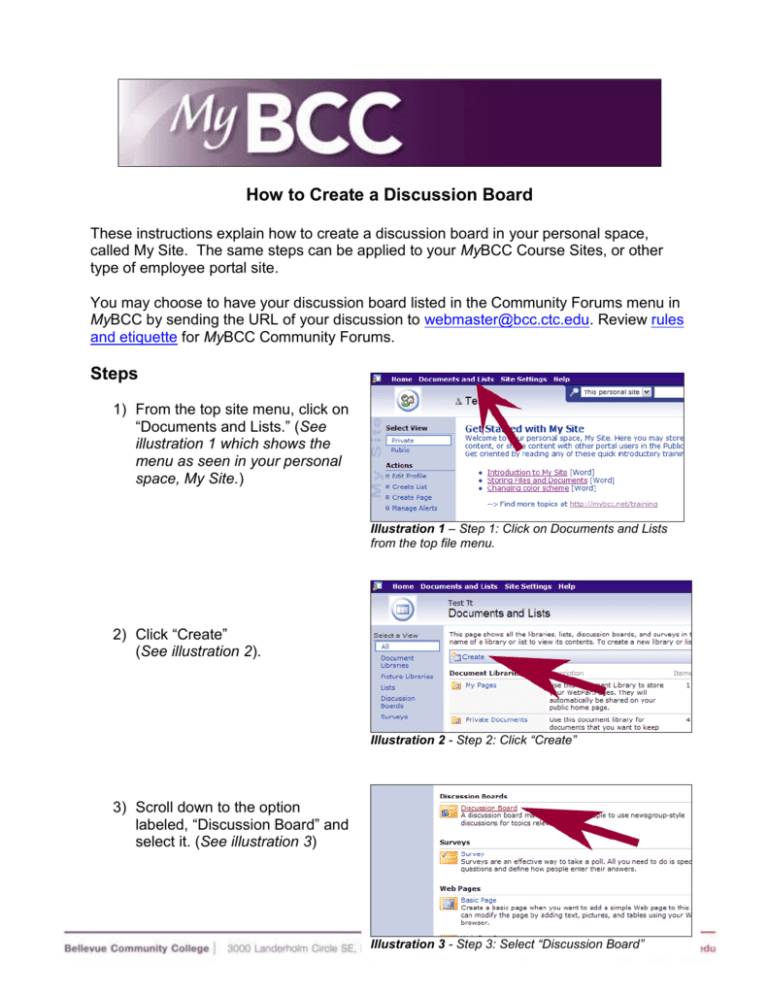
How to Create a Discussion Board These instructions explain how to create a discussion board in your personal space, called My Site. The same steps can be applied to your MyBCC Course Sites, or other type of employee portal site. You may choose to have your discussion board listed in the Community Forums menu in MyBCC by sending the URL of your discussion to webmaster@bcc.ctc.edu. Review rules and etiquette for MyBCC Community Forums. Steps 1) From the top site menu, click on “Documents and Lists.” (See illustration 1 which shows the menu as seen in your personal space, My Site.) Illustration 1 – Step 1: Click on Documents and Lists from the top file menu. 2) Click “Create” (See illustration 2). Illustration 2 - Step 2: Click “Create” 3) Scroll down to the option labeled, “Discussion Board” and select it. (See illustration 3) Illustration 3 - Step 3: Select “Discussion Board” 4) Give your discussion list a short, concise name and description. (See example in illustration 4.) 5) Under the Navigation options, determine if you want to display this discussion on the Quick Launch bar (the side navigation menu on your site’s home page.) The default setting is set to yes. If you wish to turn this off, click “No.” (See illustration 4.) Illustration 4 – Step 4-6: Naming your discussion 6) Finish creating your discussion board by selecting “Create” Give users access to contribute to discussion board 7) Select “Modify settings & columns” under the Actions heading area on the left menu of your discussion board. (See illustration 5.) Note: As the administrator of your site, you automatically inherit contributor rights to all libraries, discussion boards, or lists. Also, any user you’ve given Web Designer and Contributor access to at your Site level privileges will also possess these rights. Steps 8-13 are only required if your site members possess Reader group privileges throughout the rest of your site. Illustration 5 - Step 7: Modify Columns & Settings 8) Under General Settings, select “Change permissions for this discussion board.” (See illustration 6). Tip: From this same menu page, you may also change the title and description of your discussion, add columns, change views or delete your discussion board. 9) There are two methods for setting up permissions. Illustration 6 - Step 8: Change permissions a. Modify (redefine) Reader group privileges. (To use this option, you must already have users established at your site’s “top level” that have Reader privileges. This method is preferred for MyBCC Course Sites or your personal space, My Site.) b. Add Users or Groups with Contributor privileges. Choose either Step 9A or 9B 9A) Modifying Reader group Privileges (preferred for MyBCC Course Sites) 1) Select the box to the left of the “Reader level” (See illustration 7) under the heading, “Site Groups.” 2) Click on “Edit Permissions of Selected Users.” 3) Change Reader permissions to “View, insert, edit, delete items.” 4) Press “OK.” 5) Skip steps 10-13 and continue on to Step 14. 9B) Add Users or Groups with Contributor privileges 1) Click “Add Users” 2) Type the group or individual username in the “Users” field. For all students, use: academic\mybccstudents For all BCC employees, use: bcc_srv1\allbccofficial For students in your class site, use: academic\2010A564 (Find your class’ group number by looking at the first part of your URL – this is an 8 character number that begins with your class item #.) For adding individual users,use: Employee users: username@bcc.ctc.edu or bcc_srv1\username Student users: username@student.bcc.ctc.e du or academic\username Illustration 7 - Step 9B: Add Users or Groups Illustration 8 - Step 9B: Add Users or Groups Note: If adding more than one group or individual at a time, separate each with a semicolon (no spaces). Also be careful not to add extra spaces at the end of the line. Only BCC network accounts may be used. Some users may select users using the “Address Book” button (similar to choosing user names when composing an e-mail.) This feature is only available if you are logged in to the BCC Network, you are using a machine with Outlook installed, and you are using a PC and Internet Explorer. 3) Choose permissions – for basic rights, you’ll want to choose the second bullet “View, insert, edit, delete items.” (See illustration 8.) 4) Click “Next” to continue. 5) Confirm that the system has identified the correct users or groups you intended to invite. Check the e-mail, user name and display name in the Confirm Users area. If these do not look right to you, click the “Back button” on the browser and change the information. When giving rights to individual users, you have the option to send the user an email notification with Illustration 9 - Step 9B: Add users or groups. the URL of the discussion board. Deselect this if you do not wish to notify this user at this time. You can e-mail them later with the URL when you are ready to invite them to the site. to let them know that you have granted them access. (See illustration 9) 6) Press “Finish” at the bottom of this page. Illustration 10 - Step 13: Confirm you have added users. 10) Verify the group name or user name is now listed in your Discussion Board permissions list. (See illustration 10). 11) Click on “Home” or “Documents & Lists” (from your site menu across top of the page.) 12) Locate the link to the Discussion Board and click on it. Tips: a. From home page, locate link displayed on the Quick Launch Bar. Illustration 11 - Step 11: Click b. From Documents & Lists, locate link on your discussion board from under Discussion Boards menu. the Quick Launch bar. c. From home page (in “My Site”), locate link on left menu under “My Lists.” (See illustration 11.) 13) Highlight and copy the URL of the discussion board from your Internet Browser’s address line. Paste this URL into an e-mail directed to webmaster@bcc.ctc.edu if you wish to have your discussion listed in Community Forums at https://go.mybcc.net/forums/. Visit http://mybcc.net/training for other training topics and handouts.
