Selecting cutting data ......................................... D22
advertisement
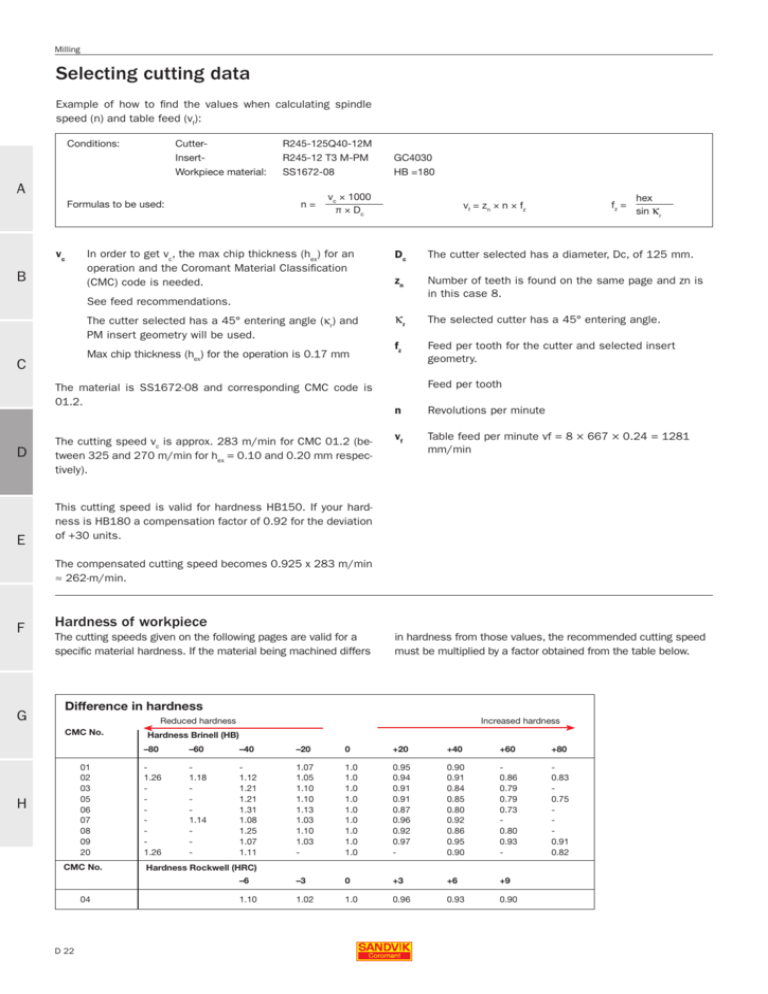
Milling Selecting cutting data Example of how to find the values when calculating spindle speed (n) and table feed (vf): Conditions: CutterInsertWorkpiece material: R245-125Q40-12M R245-12 T3 M-PM SS1672-08 A Formulas to be used: vc B n= GC4030 HB =180 vc × 1000 π × Dc In order to get vc, the max chip thickness (hex) for an operation and the Coromant Material Classification (CMC) code is needed. Max chip thickness (hex) for the operation is 0.17 mm C The material is SS1672-08 and corresponding CMC code is 01.2. D E The cutting speed vc is approx. 283 m/min for CMC 01.2 (between 325 and 270 m/min for hex = 0.10 and 0.20 mm respectively). hex sin κr Dc The cutter selected has a diameter, Dc, of 125 mm. zn Number of teeth is found on the same page and zn is in this case 8. κr The selected cutter has a 45° entering angle. fz Feed per tooth for the cutter and selected insert geometry. See feed recommendations. The cutter selected has a 45° entering angle (κr) and PM insert geometry will be used. fz = vf = zn × n × fz Feed per tooth n Revolutions per minute vf Table feed per minute vf = 8 × 667 × 0.24 = 1281 mm/min This cutting speed is valid for hardness HB150. If your hardness is HB180 a compensation factor of 0.92 for the deviation of +30 units. The compensated cutting speed becomes 0.925 x 283 m/min ≈ 262-m/min. F G Hardness of workpiece The cutting speeds given on the following pages are valid for a specific material hardness. If the material being machined differs in hardness from those values, the recommended cutting speed must be multiplied by a factor obtained from the table below. Difference in hardness Reduced hardness CMC No. 01 02 03 05 06 07 08 09 20 H CMC No. 04 D 22 Increased hardness Hardness Brinell (HB) –80 –60 –40 –20 0 +20 +40 +60 +80 1.26 1.26 1.18 1.14 - 1.12 1.21 1.21 1.31 1.08 1.25 1.07 1.11 1.07 1.05 1.10 1.10 1.13 1.03 1.10 1.03 - 1.0 1.0 1.0 1.0 1.0 1.0 1.0 1.0 1.0 0.95 0.94 0.91 0.91 0.87 0.96 0.92 0.97 - 0.90 0.91 0.84 0.85 0.80 0.92 0.86 0.95 0.90 0.86 0.79 0.79 0.73 0.80 0.93 - 0.83 0.75 0.91 0.82 –6 –3 0 +3 +6 +9 1.10 1.02 1.0 0.96 0.93 0.90 Hardness Rockwell (HRC) Milling Terminology and units for milling Dc lm De ap = Cutting diameter = Machined length = Effective cutting diameter = Cutting depth mm mm mm mm ae vc Q Tc zn = Working engagement = Cutting speed = Metal removal rate = Period of engagement = Total number of edges in the tool mm m/min cm3/min min piece fz fn vf hex hm = Feed per tooth = Feed per revolution = Table feed (feed speed) = Max chip thickness = Average chip thickness mm mm mm/min mm mm zc = Effective number of teeth kc1 = Specific cutting force (for hex =1 mm) n = Spindle speed Pc = Cutting power net η = Efficiency piece N/mm2 rev/min kW A κr = Major cutting edge angle degrees vc0 = Constant for cutting speed cvc = Correction factor for cutting speed mc = Rise in specific cutting force (kc) as a function of chip thickness iC = inscribed circle B C General milling formulas Cutting speed (m/min) fn Spindle speed (rev/min) n = vc × 1000 π ×Dc Table feed (feed speed) (mm/min) vf = fz × n ×zn Feed per tooth (mm) Feed per revolution (mm/rev) fz vc = π × Dc × n 1000 fz = D zn=8 vf n ×zn E fn = vf n fz ap ×ae ×vf 1000 Removal rate (cm3) Q= Specific cutting force (N/mm2) kc = kc1 × hm-mc Average chip thickness (mm) (Side and facemilling) when ae/Dc ≤ 0.1 hm ≈ fz Average chip thickness (mm) when ae/Dc ≥ 0.1 sin κ ×180 × a ×f hm = π ×r D × arcsine az c ( De ) c Κr = 90° hex Dc F hm ae Machining time (min) Tc = Net power (kW) Pc = √aD e G c lm vf H ap ×ae ×vf ×kc 60 ×106 × η D 23 Milling Formulas for specific milling cutters Facemilling cutters, side and facemilling cutters and endmills These tools are characterized by having straight cutting edges. A ap Max cutting diameter at a specific depth (mm) De = Dc + Feed per tooth (mm/tooth), cutter centered fz = Feed per tooth (mm/tooth), side milling fz = 2 × ap tan κr Dc De B C hex sin κr De × hex sin κr × √De2 – (De –2 × ae)2 Cutters with round inserts ap D Max cutting diameter at a specific depth (mm) De = Dc +√iC2 – (iC − 2ap)2 Feed per tooth (mm/ tooth), cutter centered fz = Feed per tooth (mm/tooth), side milling fz = Max cutting diameter at a specific depth (mm) De = √D32 – (D3 – 2 × ap)2 Feed per tooth (mm/tooth), side milling fz = Feed per tooth (mm/tooth), cutter centered fz = Dc De E iC × hex De – Dc De × iC × hex (De – Dc) × √De2 – (De – 2 × ae)2 F Ballnose endmills ap G De D3 × hex √D – (De – 2 × ae)2 2 e H D 24 D3 × hex De Milling Calculation of power consumption The example is valid for 0° top rake angle. The power consumption changes 1% per degree of change in top rake. A positive top rake angle decreases the power consumption and a negative top rake increases the power consumption. A positive cutter with +15° top rake angle requires 15% less power than a cutter with 0° top rake angle. Plunge milling A x vf x K 60 x 106 x η A ≈ ae x D3 (slot) A ≈ ae x S (stepover S) Pc = A Example B 45° facemilling of steel, CMC 01.3 Cutter diameter, Dc=125 mm Depth of cut, ap=5 mm Width of cut, ae=100 mm Feed per insert, fz=0.2 mm Table feed, vf=1000 mm For different insert geometries the power consumption must be adjusted. For each degree more positive top rake angle the power consumption will decrease with 1%. For a CoroMill 245 facemill with M-geometry. The M-geometry has +21° top rake angle. C Milling in general Pc = ap ×ae ×vf ×K 100 000 Pc(γ) = Pc ×Mγ For an engagement of 80% the K value is 5.4. For a top rake angle of +21° the Mγ value is 0.79. 5 ×100 ×1000 ×5.4 Pc = 100 000 Pc(γ) = 27.0 ×0.79 = 21.3 kW = 27.0 kW D E Optimized power consumption calculation Use multiplying factor from top rake angle to adjust Pc values. True rake angle, γ –7° –6° –5° –4 –3° –2° –1° 0° 1° 2° 3° 4° 5° 6° 7° 8° 9° 10° 11° Multiplying factor, Mγ 1.07 1.06 1.05 1.04 1.03 1.02 1.01 1 0.99 0.98 0.97 0.96 0.95 0.94 0.93 0.92 0.91 0.90 0.89 True rake angle, γ 12° 13° 14° 15° 16° 17° 18° 19° 20° 21° 22° 23° 24° 25° 26° 27° 28° 29° 30° Multiplying factor, Mγ 0.88 0.87 0.86 0.85 0.84 0.83 0.82 0.81 0.80 0.79 0.78 0.77 0.76 0.75 0.74 0.73 0.72 0.71 0.70 When machine power is a problem F • Go from close to coarse pitch, i.e. less number of teeth. • A positive cutter is more power efficient than a negative. G • Reduce the cutting speed before the table feed. Warning: Be aware of the power curve for machining centres. The machine may lose efficiency if the rpm is too low. H • Use a smaller cutter and take several passes. • Reduce the depth of cut. D 25 Milling Constant K for use in power requirement calculation1) ISO P A B M C CMC Description No. 01.1 01.2 01.3 01.4 01.5 Steel ae/Dc=0.8 ae/Dc=0.4 ae/Dc=0.2 fz=0.1 fz=0.2 fz=0.4 fz=0.1 fz=0.2 fz=0.4 fz=0.1 fz=0.2 fz=0.4 Unalloyed C = 0.10–0.25% C = 0.25–0.55% C = 0.55–0.80% 5.7 6.1 6.5 6.9 7.6 4.8 5.1 5.4 5.8 6.4 4.0 4.3 4.6 4.8 5.4 6.2 6.6 7.1 7.5 8.3 5.2 5.6 5.9 6.3 7.0 4.4 4.7 5.0 5.3 5.9 6.8 7.2 7.7 8.2 9.1 5.7 6.1 6.5 6.9 7.6 4.8 5.1 5.4 5.8 6.4 02.1 02.2 Low-alloyed (alloying elements ≤5%) Non-hardened Hardened and tempered 6.5 7.6 5.4 6.4 4.6 5.4 7.1 8.3 5.9 7.0 5.0 5.9 7.7 9.1 6.5 7.6 5.4 6.4 03.11 03.13 03.21 03.22 High-alloyed (alloying elements ≤5%) Annealed Hardened tool steel 7.4 8.2 11.0 11.8 6.2 6.9 9.3 9.9 5.3 5.8 7.8 8.4 8.1 8.9 12.0 12.9 6.8 7.5 10.1 10.8 5.7 6.3 8.5 9.1 8.8 9.7 13.1 14.0 7.4 8.2 11.0 11.8 6.2 6.9 9.3 9.9 06.1 06.2 06.3 Castings Unalloyed Low-alloy, alloying elements ≤5% High-alloy, alloying elements >5% 5.3 6.1 7.4 4.5 5.1 6.2 3.8 4.3 5.3 5.8 6.6 8.1 4.9 5.6 6.8 4.1 4.7 5.7 6.3 7.2 8.8 5.3 6.1 7.4 4.5 5.1 6.2 6.2 9.7 8.0 5.4 8.4 6.9 4.7 7.2 5.9 6.7 10.4 8.6 5.8 9.0 7.4 5.0 7.8 6.4 7.2 11.2 9.2 6.2 9.7 8.0 5.4 8.4 6.9 05.11 05.12 05.13 Stainless steel Ferritic/Martensitic Non-hardened PH-hardened Hardened 05.21 05.22 Austenitic Non-hardened PH-hardened 6.9 9.7 6.0 8.4 5.2 7.2 7.4 10.4 6.4 9.0 5.6 7.8 8.0 11.2 6.9 9.7 6.0 8.4 05.51 05.52 Austenitic-Ferritic (Duplex) Non-weldable ≥0.05%C Weldable <0.05%C 6.9 8.3 6.0 7.2 5.2 6.2 7.4 8.9 6.4 7.7 5.6 6.7 8.0 9.6 6.9 8.3 6.0 7.2 Stainless steel – cast D S E 15.11 15.12 15.13 Ferritic/Martensitic Non-hardened PH-hardened Hardened 6.5 9.5 8.0 5.4 8.0 6.7 4.6 6.7 5.7 7.1 10.4 8.7 5.9 8.7 7.3 5.0 7.3 6.2 7.7 11.3 9.5 6.5 9.5 8.0 5.4 8.0 6.7 15.21 15.22 Austenitic Non-hardened PH-hardened 6.9 9.5 5.8 8.0 4.8 6.7 7.5 10.4 6.3 8.7 5.3 7.3 8.2 11.3 6.9 9.5 5.8 8.0 15.51 15.52 Austenitic-Ferritic (Duplex) Non-weldable ≥0.05%C Weldable <0.05%C 6.9 8.4 5.8 7.0 4.8 7.5 9.1 6.3 7.7 5.3 8.2 10.0 6.9 8.4 5.8 Heat resistant super alloys 20.11 20.12 Iron base Annealed or solution treated Aged or solution treated and aged 9.1 9.5 7.7 8.0 10.0 10.4 8.4 8.7 10.9 11.3 9.1 9.5 20.21 20.22 20.24 NIckel base Annealed or solution treated Aged or solution treated and aged Cast or cast and aged 10.1 11.0 11.4 8.5 9.3 9.6 11.0 12.0 12.5 9.3 10.1 10.5 12.0 13.1 13.6 10.1 11.0 11.4 20.31 20.32 20.33 Cobalt base Annealed or solution treated Solution treated and aged Cast or cast and aged 10.3 11.4 11.8 8.6 9.6 9.9 11.2 12.5 12.9 9.4 10.5 10.8 12.2 13.6 14.0 10.3 11.4 11.8 Commercial pure (99.5% Ti) α, near α and α+β alloys, annealed α+β alloys in aged cond. β alloys, annealed or aged 4.7 5.1 5.1 4.0 4.3 4.3 5.1 5.5 5.5 4.4 4.7 4.7 5.5 6.0 6.0 4.7 5.1 5.1 16.0 13.5 17.4 14.7 19.0 16.0 Titanium alloys 23.1 23.21 23.22 F H K G N 04.1 Extra hard steel Hard steel Hardened and tempered 10.1 Chilled cast iron Cast or cast and aged 9.0 7.4 9.9 8.2 10.9 9.0 07.1 07.2 Malleable cast iron Ferritic (short chipping) Pearlitic (long chipping) 3.3 3.7 2.7 3.0 2.2 2.5 3.6 4.1 3.0 3.3 2.4 2.8 4.0 4.5 3.3 3.7 2.7 3.0 08.1 08.2 Grey cast iron Low tensile strength High tensile strength 3.7 4.5 3.0 3.7 2.5 3.1 4.1 5.0 3.3 4.1 2.8 3.4 4.5 5.5 3.7 4.5 3.0 3.7 09.1 09.2 Nodular SG iron Ferritic Pearlitic 3.7 5.5 3.0 4.6 2.5 4.1 6.1 3.3 5.0 2.8 4.5 6.7 3.7 5.5 3.0 30.11 Aluminium alloys Wrought or wrought and coldworked, non-aging 1.5 1.3 1.7 1.4 1.8 1.5 30.12 Wrought or wrought and aged 2.5 2.1 2.7 2.3 2.9 2.5 Aluminium alloys Cast, non-aging Cast or cast and aged 2.3 2.7 1.9 2.2 2.5 2.9 2.1 2.4 2.7 3.2 2.3 2.7 1.3 1.1 1.5 1.2 1.6 1.3 30.41 30.42 Aluminium alloys Cast, 13–15% Si Cast, 16–22% Si 2.7 2.7 2.2 2.2 2.9 2.9 2.4 2.4 3.2 3.2 2.7 2.7 33.1 33.2 33.3 Copper and copper alloys Free cutting alloys, ≥1% Pb Brass, leaded bronzes, ≤ 1% Pb Bronze and non-leaded copper incl. electrolytic copper 2.1 2.1 5.1 1.8 1.8 4.3 2.3 2.3 5.6 1.9 1.9 4.7 2.5 2.5 6.1 2.1 2.1 5.1 30.21 30.22 H 30.3 Calculated with an efficiency ηmt = 0.8 1) D 26 Milling Cutting data calculations for milling operations Facemilling Example R245-125Q40-12M R245-12 T3 M-PM SS 1672-08 HB =150 85 mm 4 mm 45° Cutter: Insert: Workpiece material: ae: ap: 4 κr zn = 8 GC4030 CMC 01.2 A 85 Calculate spindle speed (n) n= vc × 1000 π × Dc n= 283 × 1000 π × 125 ≈ 721 rpm B To get vc, first find hex value for -PM geometry. The cutting speed vc for hex= 0.17 mm is 283-m/min (between 325 and 270-m/min). C Calculate table feed (vf) vf = zn × n × fz fz = vf = 8 × 721 × 0.24 ≈ 1384 hex fz = sin κr 0.17 ≈ 0.24 sin 45° mm/min D mm/tooth Facemilling with round inserts Example E Cutter: Insert: Workpiece material: ae: ap: 4 R200-109Q32-16M RCKT 16 06 M0-PM SS 1672-08 HB =150 85 mm 4 mm zn = 6 GC4030 CMC 01.2 F 85 Calculate spindle speed (n) vc × 1000 n= π × De = De = Dc + √iC2 – (iC - 2ap)2 To get vc, first find hex value for -PM geometry. The cutting speed vc for hex= 0.17 mm is 283-m/min (between 325 and 270-m/min). 283 × 1000 ≈ 732 rpm π × 123 De = 109 + √162– (16 - 2 × 4)2 ≈ 123 mm Calculate table feed (vf) vf = n × fz × zn fz = hex sin κr G H 45° = 732 × 0.34 × 6 ≈ 1493 mm/min 30° Max ap fz = 0.17 = 0.34 mm/tooth sin 30° 100% of max ap ⇒ Κr = 45° 75% of max ap ⇒ Κr = 38° 50% of max ap ⇒ Κr = 30° 25% of max ap ⇒ Κr = 21° D 27 Milling Slotting/facemilling with 90° entering angle Cutter: Insert: Workpiece material: ae: ap: Example 5 R390-063Q22-17M zn = 5 R390-063Q22-17M zn = 5 R390-17 04 08M-PM GC1025 04=150 08M-PM CMCGC1025 SS R390-17 1672-08 HB 01.2 50 mm 5 mm A 50 Calculate spindle speed (n) vc × 1000 n= π × Dc B = 250 × 1000 π × 63 ≈ 1263 To get vc, first find hex value for -PM geometry. The cutting speed vc for hex 0.15 is 250-m/ min (between 280 and 230-m/min). rpm Calculate table feed (vf) vf = n × fz × zn C D = 1263 × 0.15 × 5 = 947 mm/min Shoulder milling with 90° entering angle Example Cutter: Insert: Workpiece material: ae: ap: 5 E R390-063Q22-17M R390-17 04 08M-PM SS 1672-08 HB =150 5 mm 5 mm zn = 5 GC1025 CMC 01.2 5 Calculate spindle speed (n) F vc × 1000 π × Dc n= G = 318 × 1000 π × 63 To get vc, first find hex value for -PM geometry. The cutting speed vc for hex 0.15 is 318-m/ min (between 325 and 310-m/min). ≈ 1607 rpm Calculate table feed (vf) For sidemilling the feed can be increased with a compensation factor. vf = k1 × zn × n × fz vf = 1.82 × 5 × 1607 × 0.15 ≈ 2193 mm/min Find the compensation factor, k1, in the table below by calculating Dc/ae H Dc → k1 = 1.82 ae = 12.6 2 3 4 5 6 8 10 1.0 1.1 1.2 1.3 1.4 1.5 1.6 D 28 12 15 1.8 2.0 20 2.2 25 2.5 30 40 50 100 Dc ae 2.8 3.2 3.6 5.0 Factor k1 Milling Side and facemilling Example Cutter: Insert: Workpiece material: ae: ap: 23 (ae) R245-125Q40-12M R245-12 T3 M-PM SS 1672-08 HB =150 2 mm 4 mm zn = 8 GC4030 CMC 01.2 A 14 (ap) Calculate spindle speed (n) vc × 1000 n= π × Dc n= This gives: 283 × 1000 π × 125 ≈ 720 rpm To get vc, first find hex value for -PM geometry. The cutting speed vc for hex 0.17 is 283-m/min (between 325 and 270-m/min). B Calculate table feed (vf) This gives: vf = n × zc × fz vf = 720 × 5 × 0.22 ≈ 792 zc = Number of effective edges = zn/2 For N331.32-125S40FM zn = 10 C mm/min → zc = 5 fz = factor k1 × hex The factor k1 can be found in table below. 1 2 1.0 1.0 3 4 5 6 8 10 1.1 1.2 1.3 1.4 1.5 1.6 12 15 1.8 2.0 20 2.2 Dc 125 = 5.43 = ae 23 → k1 = 1.3 fz = 1.3 × 0.17 ≈ 0.22 mm/tooth 25 2.5 30 40 50 100 Dc ae 2.8 3.2 3.6 5.0 Factor k1 D E F G H D 29 Milling Profile milling Example R216-20A25-055 R2160-20 T3 M-M SS 1672-08 HB =150 2 mm 4 mm Cutter: Insert: Workpiece material: ae: ap: 4 zn = 2 GC4040 CMC 01.2 2 A Calculate spindle speed (n) n= vc × 1000 π × De n= 308 × 1000 π × 16 To get vc, first find hex value for -M geometry. The cutting speed vc for hex 0.15 is 308-m/min (between 310 and 295-m/min). ≈ 6130 rpm B Find effective diameter, De C D 25 Calculate table feed (vf) vf = zn × n × fz vf = 2 × 6130 × 0.1 ≈ 1226 E Axial depth of cut (mm) ap Select axial depth of cut in this diagram. Go horizontally across the diagram to the curve representing the tool diameter. Move down vertically to the axis and read the effective diameter. mm/min fz according to table below. In stable conditions the feed can be increased. When working with long tools and difficult conditions the feed can be lowered. 24 22 20 18 16 14 12 10 8 6 4 2 0 17 16 15 14 13 12 11 10 9 8 7 6 5 4 3 2 1 0 D3 = 10 – 32 mm D3 = 40 – 50 mm D3 32 mm D3 25 mm D3 50 mm D3 20 mm D3 40 mm D3 16 mm D3 12 mm D3 10 mm De 2 4 6 8 10 12 14 16 18 20-22-24-26-28-30-32 4 8 12 16 20 24 28-32-36-40-44-48 50 Effective tool dia.(mm) Recommended feed, fz mm 12 16 20 25 30 32 40 50 0.05 0.08 0.10 0.12 0.15 0.15 0.20 0.25 0.05 – 0.10 0.08 – 0.15 0.10 – 0.20 0.12 – 0.25 0.15 – 0.35 0.15 – 0.35 0.20 – 0.40 0.25 – 0.40 Diameter, D3 Start value Range F Recommended radial steps and depth of cut for ball nose endmills Large cuts It is not recommended to exceed the values below for radial step and axial depth of cut. G H Cutter Max. recommended dia. Cutter dia. D3 D3 12 16 20 25 30 32 40 50 12 16 20 25 30 32 40 50 D 30 Radial step Depth of cut 5 6 6 8 10 10 12 12 15 12 16 12 20 15 20 Small cuts With the same axial depth of cut as for large cuts, surface can be improved by decreasing the radial step. Radial step 1.0 1.0 2.0 3.0 3.0 3.0 4.0 4.0 0.02 0.02 0.05 0.09 0.08 0.07 0.10 0.08 Radial step 1.5 2.0 3.0 4.0 4.0 4.0 6.0 6.0 0.05 0.06 0.11 0.16 0.13 0.13 0.23 0.18 Radial step 2.0 3.0 4.0 5.0 5.0 5.0 8.0 8.0 0.08 0.14 0.20 0.25 0.21 0.20 0.40 0.32 Milling Method for internal circular interpolation A Calculated version De Tool centre feed, mm/min vf = n × zc × fz fz ≈ De × hex sin × Κr √De2 – (De – 2 ae)2 Feed per insert, mm ae ≈ Dm2 – Dw2 4 × (Dm – De) Radial depth of cut, mm B C Simplified version vf = n × zc × fz Straight line feed, mm/min vf1 = vf × K D Tool centre feed, mm/min 1 K= √ DD + D m c The values can be taken from the table below E m Cutter diameter Hole diameter = Dm Dc mm Factor K 10 0.58 16 20 25 32 40 50 63 80 100 125 160 200 15 20 25 30 40 50 60 75 100 125 150 200 250 300 0.71 0.77 0.82 0.87 0.89 0.91 0.93 0.95 0.96 0.97 0.97 0.98 0.98 0.45 0.60 0.68 0.77 0.82 0.86 0.89 0.92 0.93 0.95 0.96 0.97 0.97 0.45 0.58 0.71 0.77 0.82 0.86 0.89 0.92 0.93 0.95 0.96 0.97 0.41 0.61 0.71 0.76 0.82 0.87 0.89 0.91 0.94 0.95 0.96 0.45 0.60 0.68 0.76 0.82 0.86 0.89 0.92 0.93 0.95 0.45 0.58 0.68 0.77 0.82 0.86 0.89 0.92 0.93 0.41 0.58 0.71 0.77 0.82 0.87 0.89 0.91 0.40 0.61 0.70 0.76 0.83 0.86 0.89 0.45 0.60 0.68 0.77 0.82 0.86 0.45 0.58 0.71 0.77 0.82 0.41 0.61 0.71 0.76 0.45 0.60 0.68 0.45 0.58 F G H D 31 Milling Method for external circular interpolation A Calculated version De Tool centre feed, mm/min vf = n × zc × fz B fz ≈ De × hex sin × Κr √De2 – (De – 2 ae)2 Feed per insert, mm ae ≈ Dw2 – Dm2 4 × (Dm – De) Radial depth of cut, mm C Simplified version vf = n × zc × fz vf1 D Straight line feed, mm/min vf1 = vf × K K= E F G H Tool centre feed, mm/min √ DD + D m c The values can be taken from the table below m Cutter diameter Hole diameter = Dm Dc mm Factor K 15 20 25 30 40 50 60 75 100 125 150 200 250 300 10 1.29 1.22 1.18 1.15 1.12 1.10 1.08 1.06 1.05 1.04 1.03 1.02 1.02 1.02 16 1.44 1.34 1.28 1.24 1.18 1.15 1.13 1.10 1.08 1.06 1.05 1.04 1.03 1.03 20 1.53 1.41 1.34 1.29 1.22 1.18 1.15 1.13 1.10 1.08 1.06 1.05 1.04 1.03 25 1.63 1.50 1.41 1.35 1.27 1.22 1.19 1.15 1.12 1.10 1.08 1.06 1.05 1.04 32 1.77 1.61 1.51 1.44 1.34 1.28 1.24 1.19 1.15 1.12 1.10 1.08 1.06 1.05 40 1.91 1.73 1.61 1.53 1.41 1.34 1.29 1.24 1.18 1.15 1.13 1.10 1.08 1.06 50 2.08 1.87 1.73 1.63 1.50 1.41 1.35 1.29 1.22 1.18 1.15 1.12 1.10 1.08 63 2.28 2.04 1.88 1.76 1.60 1.50 1.43 1.36 1.28 1.23 1.19 1.15 1.12 1.10 80 2.52 2.24 2.05 1.91 1.73 1.61 1.53 1.44 1.34 1.28 1.24 1.18 1.15 1.13 100 2.77 2.45 2.24 2.08 1.87 1.73 1.63 1.53 1.41 1.34 1.29 1.22 1.18 1.15 125 3.06 2.69 2.45 2.27 2.03 1.87 1.76 1.63 1.50 1.41 1.35 1.27 1.22 1.19 160 3.42 3.00 2.72 2.52 2.24 2.05 1.91 1.77 1.61 1.51 1.44 1.34 1.28 1.24 200 3.79 3.32 3.00 2.77 2.45 2.24 2.08 1.91 1.73 1.61 1.53 1.41 1.34 1.29 D 32 Milling Mounting dimensions for milling cutters Style A Dia. 50 – 63 Dia. 80 Dia. 100 Mounting diameter (dmm) A Centre bolts 1)For all Modulmill cutters and for R/L262.2AL the dimensions are 22.0 and 10.4 mm respectively. B Style B Mounting diameter (dmm) Dia. 125 C Centre bolts + washer D Style C Mounting diameter (dmm) Dia. 160 Dia. 200 – 250 E F Design with single pcd ( 4 – bolts) G Mounting diameter (dmm) Dia. 315 – 500 H Design with double pcd ( 8 – bolts) D 33 Milling Insert mounting with Torx Plus A Torque wrench for Torx Plus screws B The torque wrench for Torx Plus screws offers a possibility to always ensure correct torque value, in the machine shop as well as in the tool-room environments. Correct torque values are imperative especially when clamping ceramic and CBN inserts. Always use protective goggles when using ceramic inserts. C D E Cross section Sandvik Coromant has introduced the Torx Plus system on all insert screws to ensure an improved and secure clamping. The new Torx Plus screws will keep their previous codes, while the keys will change the code. All keys for insert clamping are concerned: screwdrivers, T-style keys, L-style keys, flag-style keys and combination keys (Torx Plus/hex). Torx Plus Torx Note! Torx Plus is a registered trademark of Camcar-Textron (USA). Wrench benefits: • ergonomic handle consisting of two materials, one of which has a rubber base for best grip • a "click" function when tightening the screws - is impossible to over tighten. • a fixed stop in counter clockwise direction, making it easier to loosening screws • design of blade tip has been optimised for best screw fitting • blade material consists of a higher class of material grade Note! The new Torx Plus keys and screw-drivers do NOT fit into the standard Torx screws. However, the standard Torx keys and screw-drivers will fit the new Torx Plus screws. F Milling cutter mountings Coromant Capto: provides the best stability and thus basis for high productivity, reliablity and quality. Cutters are available as over-size in relation the the coupling for extended tooling. Best choice, especially for long edge milling. Cylindrical shanks: Recommended for use with precision chucks like CoroGrip for best stability and precision. Extra long tools available. Weldon: established tool mounting but not recommended as first choice if productivity and precision are issues. Arbor: established tool mounting and the only solution for large-diameter cutters. Gives good stability for high productivity. Threaded: modular system with exchangeable cutting heads. Silent tool solution and carbide shank adapters for extended tooling. G H D 34 Milling Tool wear Flank and notch wear a. Rapid flank wear causing poor surface finish or out of tolerance. a b Frittering Thermal cracks Built-up edge (B.U.E.) b/c. Notch wear causing poor surface finish and risk of edge breakage. c Small cutting edge fractures (frittering) causing poor surface finish and excessive flank wear. Small cracks perpendicular to the cutting edge causing frittering and poor surface finish. Built-up edge causing poor surface finish and cutting edge frittering when the B.U.E. is torn away. Cause: Remedy: a. Cutting speed too high or insufficient wear resistance. Reduce cutting speed. Select a more wear resistant grade. a. Too low feed. Increase feed. b/c. Work hardening materials. Reduce cutting speed. Select tougher grade. b/c. Skin and scale. Increase cutting speed. Grade too brittle. Select tougher grade. Insert geometry too weak. Select an insert with a stronger geometry . Built-up edge. Increase cutting speed or select a positive geometry. Reduce feed at beginning of cut. A B C D Thermal cracks due to temperature variations caused by: - Intermittent machining. Select a tougher grade with better resistance to thermal shocks. - Varying coolant supply. Coolant should be applied copiously or not at all. Workpiece material is welded to the insert due to: E F Low cutting speed. Increase cutting speed. Low feed. Increase feed. Negative cutting geometry. Select a positive geometry. G Poor surface finish Vibrations Too high feed. Reduce feed. Wrong insert position. Change position. Deflection. Check overhang. Bad stability. Better stability. Wrong cutting data. Reduce cutting speed. Increase feed. Change cutting depth. Bad stability. Reduce overhang. Better stability. H D 35 Milling If problems should occur Some typical problems in milling and possible solutions Excessive vibration A B C D E F G H 1. Weak fixture Possible solutions: Assess the direction of cutting forces and provide adequate support or improve the fixture. Reduce cutting forces by decreasing cutting depths. Select a coarse and differentially pitched cutter with a more positive cutting action. Select an L-geometry with small corner radius and small parallel land. Seplect a fine-grain, uncoated insert or thinner coating 2. Weak workpiece Consider a square shoulder cutter (90-degree entering angle) with positive geometry. Select an insert with L-geoemetry Decrease axial cutting force – lower depth of cut, smaller corner radius and parallel land. Select a coarse-pitch cutter with differential pitch. 3. Long tool overhang Minimize the overhang. Use coarse-pitch cutters with differential pitch. Balance radial and axial cutting forces – 45 degree entering angle, large corner radius or round insert cutter. Increase the feed per tooth Use a light-cutting insert geoemtry – L/M 4. Milling square shoulder with weak spindle Select smallest possible cutter diameter. Select positive cutter and insert. Try up-milling. Check spindle deflection to see if acceptable for machine. 5. Irregular table feed Try up-milling Tighten machine feed mechanism. Unsatisfactory surface finish 1. Excessive feed per revolution Set cutter axially or classify inserts. Check height with indicator. Check the spindle run-out and the cutter mounting surfaces. Decrease the feed per rev to max. 70% of the width of the parallel land. Use wiper inserts if possible. (Finishing operations) 2. Vibration See section on vibration. 3. Built-up edge formation on insert Increase cutting speed to elevate machining temperature. Turn off coolant. Use sharp cutting edge inserts, with smooth rake side. Use positve insert geometry. Try a cermet grade with higher cutting data. D 36 Milling 4. Back-cutting Check spindle tilt (Tilt spindle approx 0.10mm/1000 mm) Axial run-out of spindle should not exceed 7 microns during finishing. Reduce the radial cutting forces (decrease the depth of cut) Select a smaller cutter diameter. Check the parallelism on the parallel lands and on wiper insert used. (Should not be standing on ”heel or toe”) Make sure the cutter is not wobbling – adjust the mounting surfaces. 5. Workpiece frittering Decrease feed per tooth. Select a close or extra-close pitch cutter. Re-position the cutter to give a thinner chip at cutter exit. Select a more suitable entering angle (45-degrees) and lighter cutting geometry. Choose a sharp insert. Monitor flank wear to avoid excessive wear. A B C Insert fracture in general milling 1. Excessive chip thickness at cutter exit Minimize the chip thickness at exit by changing the cutter position in relation to workpiece. Use down-milling Decrease the feed per tooth. Select a smaller cutter diameter. Use a stronger insert geometry (H). D E Insert fracture in square shoulder milling 1. Swarf follows cutter in up-milling, getting stuck between shoulder and edge. Change to down-milling. Use compressed air. Use a sharper insert to facilitate re-cutting of chips. Monitor flank wear to avoid excessive wear. 2. Down-milling with several passes. Consider performing the operation in one pass. 3. Chip jamming between shoulder and edge. Try up-milling Select a tougher insert grade. Select a horisontal milling machine. F G H D 37 Milling Selection and application process ① A ② B P M K N C S Define the operation Identify the type of operation: Facemilling Shoulder milling Profile milling Slot milling Then select the most suitable tool considering productivity, reliability and quality. Define the material Define workpiece material according to ISO: Steel (P) Stainless steel (M) Cast iron (K) Aluminium (N) Heat resistant and titanium alloy (S) Hardened material (H) H ③ Select cutter concept ④ Select the milling cutter ⑤ Select the insert ⑥ Define the start values D E F G H D 38 Assess which concept is the most productive for the application: CoroMill 245, CoroMill 210, CoroMill 390, CoroMill 290. Choose cutter pitch and mounting. Use a close pitch cutter as first choice. Use a coarse pitch cutter for long overhang and unstable conditions. Use an extra close pitch cutter for short chipping materials and super alloys. Choose a mounting type. Choose the insert geometry for your operation: Geometry L = Light For light cuts when low forces / power are required Geometry M = Medium First choice for mixed production Geometry H = Heavy For rough operations, forging, cast skin and vibrations Select insert grade for optimum productivity. Cutting speeds and feeds for different materials are given on the insert dispensers and in the tables. The values should be optimized according to machine and conditions! Milling A B C D E F G H D 39 Milling Operations – tool recommendations General facemilling A Material/ Application Steel Stainless steel Cast-iron Aluminium Super alloys Hardened steel P M K N S H Finishing Semi-finishing Roughing Heavy roughing CoroMill 245 CoroMill 245 CoroMill 245 T-MAX 45 CoroMill 245 CoroMill 245 CoroMill 245 - AUTO-AF* CoroMill 245 AUTO R CoroMill 245 (18) CoroMill Century CoroMill Century CoroMill 245 - CoroMill 245 CoroMill 300 CoroMill 300 T-Max 45 CoroMill 245 CoroMill 245 CoroMill 300 CoroMill 200 * CoroMill Century B P M K Thin walls Close to fixture C N CoroMill Century CoroMill 390 CoroMill Century CoroMill 390 S N Long overhang CoroMill 210 (R)/CoroMill 245 (F) Back facing CoroMill 331 High feed milling CoroMill 210/CoroMill 300 P M K D H CoroMill 390 P M K ➟ S P M K S N S H H E General shoulder milling F Material/ Application Steel Stainless steel Cast-iron Aluminium Super alloys Hardened steel P M K N S H Finishing Semi-finishing Roughing CoroMill 390 CoroMill 390 CoroMill 390 CoroMill 390 CoroMill 390 CoroMill 390 AUTO-AF CoroMill 290 CoroMill 290 CoroMill Century CoroMill 790 CoroMill 790 CoroMill Plura CoroMill 390 CoroMill 390 CoroMill Plura CoroMill 290 CoroMill 290 G P M K Repeated shoulder milling Deep shoulder milling H Edging/ Contouring D 40 S N H CoroMill 390 CoroMill 790 (Small ae (ae/Dc<…) Large ae (ae/Dc>…..) CoroMill 390 LE-11 CoroMill 390 LE- 18 CoroMill 390/CoroMill Plura CoroMill Plura For diameters smaller than 20 mm, CoroMill Plura solid carbide endmills are first choice generally for all materials. This catalogue has been split into smaller parts to enhance downloading speeds. If you want to view the next page please click HERE! (To go back to the last viewed page, use the integrated green arrows at the bottom of the Acrobat® user interface)
