Lab 1.5.1: Cabling a Network and Basic Router Configuration
(Instructor Version)
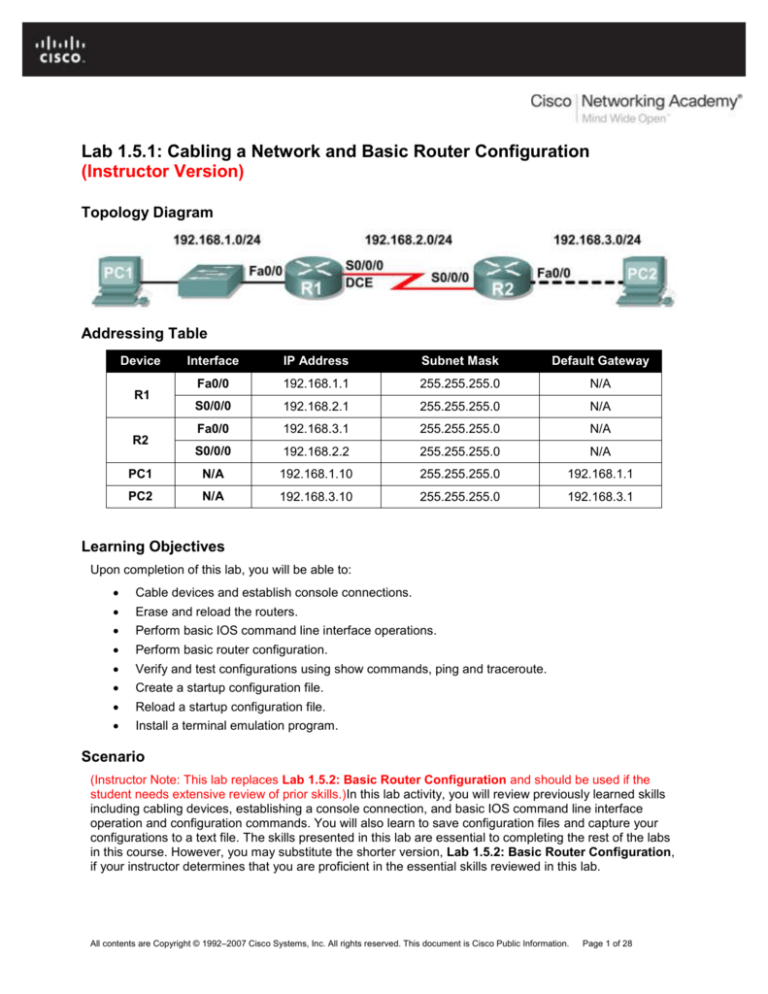
Topology Diagram
Addressing Table
Device
Interface
IP Address
Subnet Mask
Default Gateway
Fa0/0
192.168.1.1
255.255.255.0
N/A
S0/0/0
192.168.2.1
255.255.255.0
N/A
Fa0/0
192.168.3.1
255.255.255.0
N/A
S0/0/0
192.168.2.2
255.255.255.0
N/A
PC1
N/A
192.168.1.10
255.255.255.0
192.168.1.1
PC2
N/A
192.168.3.10
255.255.255.0
192.168.3.1
R1
R2
Learning Objectives
Upon completion of this lab, you will be able to:
Cable devices and establish console connections.
Erase and reload the routers.
Perform basic IOS command line interface operations.
Perform basic router configuration.
Verify and test configurations using show commands, ping and traceroute.
Create a startup configuration file.
Reload a startup configuration file.
Install a terminal emulation program.
Scenario
(Instructor Note: This lab replaces Lab 1.5.2: Basic Router Configuration and should be used if the
student needs extensive review of prior skills.)In this lab activity, you will review previously learned skills
including cabling devices, establishing a console connection, and basic IOS command line interface
operation and configuration commands. You will also learn to save configuration files and capture your
configurations to a text file. The skills presented in this lab are essential to completing the rest of the labs
in this course. However, you may substitute the shorter version, Lab 1.5.2: Basic Router Configuration,
if your instructor determines that you are proficient in the essential skills reviewed in this lab.
All contents are Copyright © 1992–2007 Cisco Systems, Inc. All rights reserved. This document is Cisco Public Information.
Page 1 of 28
CCNA Exploration
Routing Protocols and Concepts:
Introduction to Routing and Packet Forwarding
Lab 1.5.1: Cabling a Network and Basic Router Configuration
Task 1: Cable the Ethernet Links of the Network.
Cable the Ethernet links for a network that is similar to the one in the Topology Diagram. The output used
in this lab is from Cisco 1841 routers. But you can use any current router in your lab as long as it has the
required interfaces as shown in the topology. A simple way to identify the available interfaces on a router
is by entering the show ip interface brief command.
Which of the devices in the Topology Diagram require an Ethernet cable between them?
_____________________ PC1 to S1, S1 to R1, and R2 to PC2________________________________
Step 1: Connect the R1 Router to the S1 Switch.
Use a straight-through Ethernet cable to connect the FastEthernet 0/0 interface of the R1 router to the
FastEthernet 0/1 interface on the S1 switch.
What color is the link status light next to the FastEthernet 0/0 interface on R1? _____green__________
What color is the link status light next to the FastEthernet 0/1 interface on S1? _____green__________
Step 2: Connect PC1 to the S1 Switch.
Use a straight-through Ethernet cable to connect the network interface card (NIC) of PC1 to the
FastEthernet 0/2 Interface of the S1 switch.
What color is the link status light next to the NIC interface on PC1? _____green__________
What color is the link status light next to the FastEthernet 0/2 interface on S1? _____green__________
If the link status lights are not green, wait a few moments for the link between the two devices to become
established. If the lights do not turn green after a few moments, check that you are using a straightthrough Ethernet cable and that the power is on for the S1 switch and PC1.
Step 3: Connect PC2 to the R2 Router.
Use a crossover Ethernet cable to connect the FastEthernet 0/0 interface of the R2 router to the NIC of
PC2. Because there is no switch between PC2 and the R2 router, a crossover cable is required for a
direct link between the PC and the router.
What color is the link status light next to the NIC interface on PC2? _____green__________
What color is the link status light next to the FastEthernet 0/0 interface on R2? _____green__________
Task 2: Cable the Serial Link between the R1 and R2 Routers.
In a real-world WAN connection, the customer premises equipment (CPE), which is often a router, is the
data terminal equipment (DTE). This equipment is connected to the service provider through a data
circuit-terminating equipment (DCE) device, which is commonly a modem or channel service unit (CSU)/
data service unit (DSU). This device is used to convert the data from the DTE into a form acceptable to
the WAN service provider.
Unlike the cables in the academy lab setup, the serial cables in the real world are not connected back to
back. In a real-world situation, one router might be in New York, while another router might be in Sydney,
Australia. An administrator located in Sydney would have to connect to the router in New York through
the WAN cloud in order to troubleshoot the New York router.
In the academy labs, devices that make up the WAN cloud are simulated by the connection between the
back-to-back DTE-DCE cables. The connection from one router serial interface to another router serial
interface simulates the whole circuit cloud.
All contents are Copyright © 1992–2007 Cisco Systems, Inc. All rights reserved. This document is Cisco Public Information.
Page 2 of 28
CCNA Exploration
Routing Protocols and Concepts:
Introduction to Routing and Packet Forwarding
Lab 1.5.1: Cabling a Network and Basic Router Configuration
Step 1: Create a null serial cable to connect the R1 router to the R2 router.
In the academy labs, the WAN connection between routers uses one DCE cable and one DTE cable. The
DCE-DTE connection between routers is referred to as a null serial cable. The labs will use one V.35
DCE cable and one V.35 DTE cable to simulate the WAN connection. The V.35 DCE connector is usually
a female V.35 (34-pin) connector. The DTE cable has a male V.35 connector. The cables are also labeled
as DCE or DTE on the router end of the cable.
The DTE and DCE V.35 cables must be joined together. Holding one of the V.35 ends in each hand,
examine the pins and sockets as well as the threaded connectors. Note that there is only one proper way
for the cables to fit together. Align the pins on the male cable with the sockets on the female cable and
gently couple them. Very little effort should be required to accomplish this. When they are joined, turn the
thumbscrews clockwise and secure the connectors.
Step 2: Connect the DCE end of the null serial cable to the Serial 0/0/0 interface of the R1 router,
and the DTE end of the null serial cable to the Serial 0/0/0 interface of the R2 router.
Review the information provided below before making these connections.
Before making the connection to one of the routers, examine the connector on the router and the cable.
Note that the connectors are tapered to help prevent improper connection. Holding the connector in one
hand, orient the cable and router connecters so that the tapers match. Now push the cable connector
partially into the router connector. It probably will not go in all the way because the threaded connectors
need to be tightened in order for the cable to be inserted completely. While holding the cable in one hand
and gently pushing the cable toward the router, turn one of the thumb screws clockwise, 3 or 4 rounds, to
start the screws. Now turn the other thumbscrew clockwise, 3 or 4 rounds, to get it started. At this point
the cable should be attached sufficiently to free both hands to advance each thumbscrew at the same
rate until the cable is fully inserted. Do not over-tighten these connectors.
Task 3: Establish a Console connection to the R1 Router.
The console port is a management port used to provide out-of-band access to a router. It is used to set
up the initial configuration of a router and to monitor it.
A rollover cable and an RJ-45 to DB-9 adapter are used to connect a PC to the console port. As you
know from your previous studies, terminal emulation software is used to configure the router over the
console connection. The Cisco Networking Academy Program recommends using Tera Term. However,
you can also use HyperTerminal, which is part of the Windows operating system.
At the end of this lab, the following three appendices are available for your reference concerning these
two terminal emulation programs:
Appendix 1: Installing and Configuring Tera Term for use on Windows XP
Appendix 2: Configuring Tera Term as the Default Telnet Client in Windows XP
Appendix 3: Accessing and Configuring HyperTerminal
Step 1: Examine the router and locate the RJ-45 connector labeled Console.
Step 2: Examine PC1 and locate a 9-pin male connector serial port.
It may—or may not—be labeled as COM1 or COM2.
Step 3: Locate the console cable.
Some console cables have an RJ-45 to DB-9 adapter built into one end. Others do not. Locate either a
console cable with a built-in adapter or a console cable with a separate RJ-45 to DB-9 adapter attached
to one end.
All contents are Copyright © 1992–2007 Cisco Systems, Inc. All rights reserved. This document is Cisco Public Information.
Page 3 of 28
CCNA Exploration
Routing Protocols and Concepts:
Introduction to Routing and Packet Forwarding
Lab 1.5.1: Cabling a Network and Basic Router Configuration
Step 4: Connect the console cable to the router and PC.
First, connect the console cable to the router console port, an RJ-45 connector. Next, connect the DB-9
end of the console cable to the serial port of PC1.
Step 5: Test router connection.
1. Open your terminal emulation software (HyperTerminal, Tera Term, or other software specified by
your instructor).
2. Configure the software parameters specific to your applications (see appendices for help).
3. Once the terminal window is open, press the Enter key. There should be a response from the
router. If there is, then the connection has been successfully completed. If there is no connection,
troubleshoot as necessary. For example, verify that the router has power. Check the connection
to the serial port on the PC and the console port on the router.
Task 4: Erase and Reload the Routers.
Step 1: Using the HyperTerminal session established in Task 3, enter privileged EXEC mode on
R1.
Router>enable
Router#
Step 2: Erase the configuration.
To clear the configuration, issue the erase startup-config command. Confirm the objective when
prompted, and answer no if asked to save changes. The result should look something like this:
Router#erase startup-config
Erasing the nvram filesystem will remove all files! Continue? [confirm]
[OK]
Erase of nvram: complete
Router#
Step 3: Reload the configuration.
When the prompt returns, issue the reload command. Confirm the objective when prompted. After the
router finishes the boot process, choose not to use the AutoInstall facility, as shown:
Would
Would
Press
Press
you like to enter the initial configuration dialog? [yes/no]: no
you like to terminate autoinstall? [yes]:
Enter to accept default.
RETURN to get started!
Step 4: Establish a HyperTerminal Session to R2.
Repeat Steps 1 through 3 to remove any startup configuration file that may be present.
Task 5: Understand Command Line Basics.
Step 1: Establish a HyperTerminal session to router R1.
Step 2: Enter privileged EXEC mode.
Router>enable
Router#
All contents are Copyright © 1992–2007 Cisco Systems, Inc. All rights reserved. This document is Cisco Public Information.
Page 4 of 28
CCNA Exploration
Routing Protocols and Concepts:
Introduction to Routing and Packet Forwarding
Lab 1.5.1: Cabling a Network and Basic Router Configuration
Step 3: Enter an incorrect command and observe the router response.
Router#comfigure terminal
^
% Invalid input detected at '^' marker.
Router#
Command line errors occur primarily from typing mistakes. If a command keyword is incorrectly typed, the
user interface uses the caret symbol (^) to identify and isolate the error. The ^ appears at or near the point
in the command string where an incorrect command, keyword, or argument was entered.
Step 4: Correct the previous command.
If a command is entered incorrectly, and the Enter key is pressed, the Up Arrow key on the keyboard
can be pressed to repeat the last command. Use the Right Arrow and Left Arrow keys to move the
cursor to the location where the mistake was made. Then make the correction. If something needs to be
deleted, use the Backspace key. Use the directional keys and the Backspace key to correct the
command to configure terminal, and then press Enter.
Router#configure terminal
Enter configuration commands, one per line.
Router(config)#
End with CNTL/Z.
Step 5: Return to privileged EXEC mode with the exit command.
Router(config)#exit
%SYS-5-CONFIG_I: Configured from console by console
Router#
Step 6: Examine the commands that are available for privileged EXEC mode.
A question mark, ?, can be entered at the prompt to display a list of available commands.
Router#?
Exec commands:
<1-99>
Session number to resume
clear
Reset functions
clock
Manage the system clock
configure
Enter configuration mode
connect
Open a terminal connection
copy
Copy from one file to another
debug
Debugging functions (see also 'undebug')
delete
Delete a file
dir
List files on a filesystem
disable
Turn off privileged commands
disconnect Disconnect an existing network connection
enable
Turn on privileged commands
erase
Erase a filesystem
exit
Exit from the EXEC
logout
Exit from the EXEC
no
Disable debugging informations
ping
Send echo messages
reload
Halt and perform a cold restart
resume
Resume an active network connection
setup
Run the SETUP command facility
show
Show running system information
--More-All contents are Copyright © 1992–2007 Cisco Systems, Inc. All rights reserved. This document is Cisco Public Information.
Page 5 of 28
CCNA Exploration
Routing Protocols and Concepts:
Introduction to Routing and Packet Forwarding
Lab 1.5.1: Cabling a Network and Basic Router Configuration
Notice the --More-- at the bottom of the command output. The --More-- prompt indicates that there
are multiple screens of output. When a --More-- prompt appears, press the Spacebar to view the next
available screen. To display only the next line, press the Enter key. Press any other key to return to the
prompt.
Step 7: View output.
View the rest of the command output by pressing the Spacebar. The remainder of the output will appear
where the --More-- prompt appeared previously.
telnet
traceroute
undebug
vlan
write
Open a telnet connection
Trace route to destination
Disable debugging functions (see also 'debug')
Configure VLAN parameters
Write running configuration to memory, network, or terminal
Step 8: Exit privileged EXEC mode with the exit command.
Router#exit
The following output should be displayed:
Router con0 is now available
Press RETURN to get started.
Step 9: Press the Enter key to enter user EXEC mode.
The Router> prompt should be visible.
Step 10: Type an abbreviated IOS command.
IOS commands can be abbreviated, as long as enough characters are typed for the IOS to recognize the
unique command.
Enter only the character e at the command prompt and observe the results.
Router>e
% Ambiguous command: "e"
Router>
Enter en at the command prompt and observe the results.
Router>en
Router#
The abbreviated command en contains enough characters for the IOS to distinguish the enable
command from the exit command.
Step 11: Press the Tab key after an abbreviated command to use auto-complete.
Typing an abbreviated command, such as conf, followed by the Tab key completes a partial command
name. This functionality of the IOS is called auto-complete. Type the abbreviated command conf, press
the Tab key, and observe the results.
Router#conf
Router#configure
All contents are Copyright © 1992–2007 Cisco Systems, Inc. All rights reserved. This document is Cisco Public Information.
Page 6 of 28
CCNA Exploration
Routing Protocols and Concepts:
Introduction to Routing and Packet Forwarding
Lab 1.5.1: Cabling a Network and Basic Router Configuration
This auto-complete feature can be used as long as enough characters are typed for the IOS to recognize
the unique command.
Step 12: Enter IOS commands in the correct mode.
IOS commands must be entered in the correct mode. For example, configuration changes cannot be
made while in privileged EXEC mode. Attempt to enter the command hostname R1 at the privileged
EXEC prompt and observe the results.
Router#hostname R1
^
% Invalid input detected at '^' marker.
Router#
Task 6: Perform Basic Configuration of Router R1.
Step 1: Establish a HyperTerminal session to router R1.
Step 2: Enter privileged EXEC mode.
Router>enable
Router#
Step 3: Enter global configuration mode.
Router#configure terminal
Enter configuration commands, one per line.
Router(config)#
End with CNTL/Z.
Step 4: Configure the router name as R1.
Enter the command hostname R1 at the prompt.
Router(config)#hostname R1
R1(config)#
Step 5: Disable DNS lookup with the no ip domain-lookup command.
R1(config)#no ip domain-lookup
R1(config)#
Why would you want to disable DNS lookup in a lab environment?
___________________________________________________________________________________
___________________________________________________________________________________
So that the router does not attempt to look up a DNS entry for a name that is really only a typing error.
What would happen if you disabled DNS lookup in a production environment?
___________________________________________________________________________________
___________________________________________________________________________________
A router would not be able to resolve names, causing potential problems when the router needs an IP
address to address a packet.
All contents are Copyright © 1992–2007 Cisco Systems, Inc. All rights reserved. This document is Cisco Public Information.
Page 7 of 28
CCNA Exploration
Routing Protocols and Concepts:
Introduction to Routing and Packet Forwarding
Lab 1.5.1: Cabling a Network and Basic Router Configuration
Step 6: Configure an EXEC mode password.
Configure an EXEC mode password using the enable secret password command. Use class for
the password.
R1(config)#enable secret class
R1(config)#
The enable secret command is used to provide an additional layer of security over the enable
password command. The enable secret command provides better security by storing the enable
secret password using a non-reversible cryptographic function. The added layer of security encryption
provides is useful in environments where the password crosses the network or is stored on a TFTP
server. When both the enable password and enable secret passwords are configured, the router
expects the password as defined in the enable secret command. In this case, the router ignores the
password defined in the enable password command.
Step 7: Remove the enable password.
Because the enable secret is configured, the enable password is no longer necessary. IOS
commands can be removed from the configuration using the no form of the command.
R1(config)#no enable password
R1(config)#
Step 8: Configure a message-of-the-day banner using the banner motd command.
R1(config)#banner motd &
Enter TEXT message. End with the character '&'.
********************************
!!!AUTHORIZED ACCESS ONLY!!!
********************************
&
R1(config)#
When does this banner display?
___________________________________________________________________________________
___________________________________________________________________________________
When a user logs in to the router either through Telnet or the console connection.
Why should every router have a message-of-the-day banner?
___________________________________________________________________________________
___________________________________________________________________________________
To provide a warning to intentional or unintentional unauthorized access.
Step 9: Configure the console password on the router.
Use cisco as the password. When you are finished, exit from line configuration mode.
R1(config)#line console 0
R1(config-line)#password cisco
R1(config-line)#login
R1(config-line)#exit
R1(config)#
All contents are Copyright © 1992–2007 Cisco Systems, Inc. All rights reserved. This document is Cisco Public Information.
Page 8 of 28
CCNA Exploration
Routing Protocols and Concepts:
Introduction to Routing and Packet Forwarding
Lab 1.5.1: Cabling a Network and Basic Router Configuration
Step 10: Configure the password for the virtual terminal lines.
Use cisco as the password. When you are finished, exit from line configuration mode.
R1(config)#line vty 0 4
R1(config-line)#password cisco
R1(config-line)#login
R1(config-line)#exit
R1(config)#
Step 11: Configure the FastEthernet 0/0 interface with the IP address 192.168.1.1/24.
R1(config)#interface fastethernet 0/0
R1(config-if)#ip address 192.168.1.1 255.255.255.0
R1(config-if)#no shutdown
%LINK-5-CHANGED: Interface FastEthernet0/0, changed state to up
%LINEPROTO-5-UPDOWN: Line protocol on Interface FastEthernet0/0, changed
state to up
R1(config-if)#
Step 12: Use the description command to provide a description for this interface.
R1(config-if)#description R1 LAN
R1(config-if)#
Step 13: Configure the Serial0/0/0 interface with the IP address 192.168.2.1/24.
Set the clock rate to 64000.
Note: Because the routers in the labs will not be connected to a live leased line, one of the routers will
need to provide the clocking for the circuit. This is normally provided to each of the routers by the service
provider. To provide this clocking signal in the lab, one of the routers will need to act as the DCE on the
connection. This function is achieved by applying the clock rate 64000 command on the serial 0/0/0
interface, where the DCE end of the null modem cable has been connected. The purpose of the clock
rate command is discussed further in Chapter 2, “Static Routes.”
R1(config-if)#interface serial 0/0/0
R1(config-if)#ip address 192.168.2.1 255.255.255.0
R1(config-if)#clock rate 64000
R1(config-if)#no shutdown
R1(config-if)#
Note: The interface will not be activated until the serial interface on R2 is configured and activated.
Step 14: Use the description command to provide a description for this interface.
R1(config-if)#description Link to R2
R1(config-if)#
Step 15: Use the end command to return to privileged EXEC mode.
R1(config-if)#end
R1#
Step 16: Save the R1 configuration.
Save the R1 configuration using the copy running-config startup-config command.
R1#copy running-config startup-config
Building configuration...
All contents are Copyright © 1992–2007 Cisco Systems, Inc. All rights reserved. This document is Cisco Public Information.
Page 9 of 28
CCNA Exploration
Routing Protocols and Concepts:
Introduction to Routing and Packet Forwarding
Lab 1.5.1: Cabling a Network and Basic Router Configuration
[OK]
R1#
Task 7: Perform Basic Configuration of Router R2.
Step 1: For R2, repeat Steps 1 through 10 from Task 6.
Step 2: Configure the Serial 0/0/0 interface with the IP address 192.168.2.2/24.
R2(config)#interface serial 0/0/0
R2(config-if)#ip address 192.168.2.2 255.255.255.0
R2(config-if)#no shutdown
%LINK-5-CHANGED: Interface Serial0/0/0, changed state to up
%LINEPROTO-5-UPDOWN: Line protocol on Interface Serial0/0/0, changed state
to up
R2(config-if)#
Step 3: Use the description command to provide a description for this interface.
R1(config-if)#description Link to R1
R1(config-if)#
Step 4: Configure the FastEthernet 0/0 interface with the IP address 192.168.3.1/24.
R2(config-if)#interface fastethernet 0/0
R2(config-if)#ip address 192.168.3.1 255.255.255.0
R2(config-if)#no shutdown
%LINK-5-CHANGED: Interface FastEthernet0/0, changed state to up
%LINEPROTO-5-UPDOWN: Line protocol on Interface FastEthernet0/0, changed
state to up
R2(config-if)#
Step 5: Use the description command to provide a description for this interface.
R1(config-if)#description R2 LAN
R1(config-if)#
Step 6: Use the end command to return to privileged EXEC mode.
R2(config-if)#end
R2#
Step 7: Save the R2 configuration.
Save the R2 configuration using the copy running-config startup-config command,
R2#copy running-config startup-config
Building configuration...
[OK]
R2#
All contents are Copyright © 1992–2007 Cisco Systems, Inc. All rights reserved. This document is Cisco Public Information. Page 10 of 28
CCNA Exploration
Routing Protocols and Concepts:
Introduction to Routing and Packet Forwarding
Lab 1.5.1: Cabling a Network and Basic Router Configuration
Task 8: Configure IP Addressing on the Host PCs.
Step 1: Configure the host PC1.
Configure the host PC1 that is attached to R1 with an IP address of 192.168.1.10/24 and a default
gateway of 192.168.1.1.
Step 2: Configure the host PC2.
Configure the host PC2 that is attached to R2 with an IP address of 192.168.3.10/24 and a default
gateway of 192.168.3.1.
Task 9: Examine Router show Commands.
There are many show commands that can be used to examine the operation of the router. In both
privileged EXEC and user EXEC modes, the command show ? provides a list of available show
commands. The list is considerably longer in privileged EXEC mode than it is in user EXEC mode.
Step 1: Examine the show running-config command.
The show running-config command is used to display the contents of the currently running
configuration file. From privileged EXEC mode on the R1 router, examine the output of the show
running-config command. If the –-More-- prompt appears, press the Spacebar to view the
remainder of the command output.
R1#show running-config
!
version 12.3
!
hostname R1
!
!
enable secret 5 $1$AFDd$0HCi0iYHkEWR4cegQdTQu/
!
no ip domain-lookup
!
interface FastEthernet0/0
description R1 LAN
mac-address 0007.eca7.1511
ip address 192.168.1.1 255.255.255.0
duplex auto
speed auto
!
interface FastEthernet0/1
mac-address 0001.42dd.a220
no ip address
duplex auto
speed auto
shutdown
!
interface Serial0/0/0
description Link to R2
ip address 192.168.2.1 255.255.255.0
clock rate 64000
!
interface Serial0/0/1
no ip address
All contents are Copyright © 1992–2007 Cisco Systems, Inc. All rights reserved. This document is Cisco Public Information. Page 11 of 28
CCNA Exploration
Routing Protocols and Concepts:
Introduction to Routing and Packet Forwarding
Lab 1.5.1: Cabling a Network and Basic Router Configuration
shutdown
!
interface Vlan1
no ip address
shutdown
!
ip classless
!
!
!
!
line con 0
password cisco
line vty 0 4
password cisco
login
!
end
Step 2: Examine The show startup-config command.
The show startup-config command displays the startup configuration file contained in NVRAM.
From privileged EXEC mode on the R1 router, examine the output of the show startup-config
command. If the –-More-- prompt appears, press the Spacebar to view the remainder of the command
output.
R1#show startup-config
Using 583 bytes
!
version 12.3
!
hostname R1
!
!
no ip domain-lookup
!
interface FastEthernet0/0
description R1 LAN
mac-address 0007.eca7.1511
ip address 192.168.1.1 255.255.255.0
duplex auto
speed auto
!
interface FastEthernet0/1
mac-address 0001.42dd.a220
no ip address
duplex auto
speed auto
shutdown
!
interface Serial0/0/0
description Link to R2
ip address 192.168.2.1 255.255.255.0
clock rate 64000
!
interface Serial0/0/1
no ip address
All contents are Copyright © 1992–2007 Cisco Systems, Inc. All rights reserved. This document is Cisco Public Information. Page 12 of 28
CCNA Exploration
Routing Protocols and Concepts:
Introduction to Routing and Packet Forwarding
Lab 1.5.1: Cabling a Network and Basic Router Configuration
shutdown
!
interface Vlan1
no ip address
shutdown
!
ip classless
!
!
!
!
line con 0
password cisco
line vty 0 4
password cisco
login
!
end
Step 3: Examine the show interfaces command.
The show interfaces command displays statistics for all interfaces configured on the router. A specific
interface can be added to the end of this command to display the statistics for only that interface. From
privileged EXEC mode on the R1 router, examine the output of the show interfaces
fastEthernet0/0 command. If the –-More-- prompt appears, press the Spacebar to view the
remainder of the command output.
R1# show interfaces fastEthernet 0/0
FastEthernet0/0 is up, line protocol is up (connected)
Hardware is Lance, address is 0007.eca7.1511 (bia 0002.1625.1bea)
Description: R1 LAN
Internet address is 192.168.1.1/24
MTU 1500 bytes, BW 100000 Kbit, DLY 100 usec, rely 255/255, load 1/255
Encapsulation ARPA, loopback not set
ARP type: ARPA, ARP Timeout 04:00:00,
Last input 00:00:08, output 00:00:05, output hang never
Last clearing of "show interface" counters never
Queueing strategy: fifo
Output queue :0/40 (size/max)
5 minute input rate 0 bits/sec, 0 packets/sec
5 minute output rate 0 bits/sec, 0 packets/sec
0 packets input, 0 bytes, 0 no buffer
Received 0 broadcasts, 0 runts, 0 giants, 0 throttles
0 input errors, 0 CRC, 0 frame, 0 overrun, 0 ignored, 0 abort
0 input packets with dribble condition detected
0 packets output, 0 bytes, 0 underruns
0 output errors, 0 collisions, 1 interface resets
0 babbles, 0 late collision, 0 deferred
0 lost carrier, 0 no carrier
0 output buffer failures, 0 output buffers swapped out
R1#
Step 4: Examine the show version command.
The show version command displays information about the currently loaded software version along
with hardware and device information. From privileged EXEC mode on the R1 router, examine the output
All contents are Copyright © 1992–2007 Cisco Systems, Inc. All rights reserved. This document is Cisco Public Information. Page 13 of 28
CCNA Exploration
Routing Protocols and Concepts:
Introduction to Routing and Packet Forwarding
Lab 1.5.1: Cabling a Network and Basic Router Configuration
of the show version command. If the –-More-- prompt appears, press the Spacebar to view the
remainder of the command output.
R1#show version
Cisco IOS Software, 1841 Software (C1841-IPBASE-M), Version 12.3(14)T7,
RELEASE SOFTWARE (fc2)
Technical Support: http://www.cisco.com/techsupport
Copyright (c) 1986-2006 by Cisco Systems, Inc.
Compiled Mon 15-May-06 14:54 by pt_team
ROM: System Bootstrap, Version 12.3(8r)T8, RELEASE SOFTWARE (fc1)
System returned to ROM by power-on
System image file is "flash:c1841-ipbase-mz.123-14.T7.bin"
This product contains cryptographic features and is subject to United
States and local country laws governing import, export, transfer and
use. Delivery of Cisco cryptographic products does not imply
third-party authority to import, export, distribute or use encryption.
Importers, exporters, distributors and users are responsible for
compliance with U.S. and local country laws. By using this product you
agree to comply with applicable laws and regulations. If you are unable
to comply with U.S. and local laws, return this product immediately.
A summary of U.S. laws governing Cisco cryptographic products may be found
at:
http://www.cisco.com/wwl/export/crypto/tool/stqrg.html
If you require further assistance please contact us by sending email to
export@cisco.com.
Cisco 1841 (revision 5.0) with 114688K/16384K bytes of memory.
Processor board ID FTX0947Z18E
M860 processor: part number 0, mask 49
2 FastEthernet/IEEE 802.3 interface(s)
2 Low-speed serial(sync/async) network interface(s)
191K bytes of NVRAM.
31360K bytes of ATA CompactFlash (Read/Write)
Configuration register is 0x2102
R1#
Step 5: Examine the show ip interface brief command.
The show ip interface brief command displays a summary of the usability status information for
each interface. From privileged EXEC mode on the R1 router, examine the output of the show ip
interface brief command. If the –-More-- prompt appears, press the Spacebar to view the
remainder of the command output.
R1#show ip interface brief
Interface
IP-Address
OK? Method Status
Protocol
FastEthernet0/0
192.168.1.1
YES manual up
up
FastEthernet0/1
unassigned
YES manual administratively down down
All contents are Copyright © 1992–2007 Cisco Systems, Inc. All rights reserved. This document is Cisco Public Information. Page 14 of 28
CCNA Exploration
Routing Protocols and Concepts:
Introduction to Routing and Packet Forwarding
Lab 1.5.1: Cabling a Network and Basic Router Configuration
Serial0/0/0
192.168.2.1
YES manual up
Serial0/0/1
unassigned
YES manual administratively down down
Vlan1
R1#
unassigned
up
YES manual administratively down down
Task 10: Using ping.
The ping command is a useful tool for troubleshooting Layers 1 though 3 of the OSI model and
diagnosing basic network connectivity. This operation can be performed at either the user or privileged
EXEC modes. Using ping sends an Internet Control Message Protocol (ICMP) packet to the specified
device and then waits for a reply. Pings can be sent from a router or a host PC.
Step 1: Use the ping command to test connectivity between the R1 router and PC1.
R1#ping 192.168.1.10
Type escape sequence to abort.
Sending 5, 100-byte ICMP Echos to 192.168.1.10, timeout is 2 seconds:
.!!!!
Success rate is 80 percent (4/5), round-trip min/avg/max = 72/79/91 ms
Each exclamation point (!) indicates a successful echo. Each period (.) on the display indicates that the
application on the router timed out while it waited for a packet echo from a target. The first ping packet
failed because the router did not have an ARP table entry for the destination address of the IP packet.
Because there is no ARP table entry, the packet is dropped. The router then sends an ARP request,
receives a response, and adds the MAC address to the ARP table. When the next ping packet arrives, it
will be forwarded and be successful.
Step 2: Repeat the ping from R1 to PC1.
R1#ping 192.168.1.10
Type escape sequence to abort.
Sending 5, 100-byte ICMP Echos to 192.168.1.10, timeout is 2 seconds:
!!!!!
Success rate is 100 percent (5/5), round-trip min/avg/max = 72/83/93 ms
R1#
All of the pings are successful this time because the router has an entry for the destination IP address in
the ARP table.
Step 3: Send an extended ping from R1 to PC1.
To accomplish this, type ping at the privileged EXEC prompt and press Enter. Fill out the rest of the
prompts as shown:
R1#ping
Protocol [ip]:
Target IP address: 192.168.1.10
Repeat count [5]: 10
Datagram size [100]:
Timeout in seconds [2]:
Extended commands [n]:
All contents are Copyright © 1992–2007 Cisco Systems, Inc. All rights reserved. This document is Cisco Public Information. Page 15 of 28
CCNA Exploration
Routing Protocols and Concepts:
Introduction to Routing and Packet Forwarding
Lab 1.5.1: Cabling a Network and Basic Router Configuration
Sweep range of sizes [n]:
Type escape sequence to abort.
Sending 10, 100-byte ICMP Echos to 192.168.1.10, timeout is 2 seconds:
!!!!!!!!!!
Success rate is 100 percent (10/10), round-trip min/avg/max = 53/77/94 ms
R1#
Step 4: Send a ping from PC1 to R1.
From Windows go to Start > Programs > Accessories > Command Prompt. In the Command Prompt
window that opens, ping R1 by issuing the following command:
C:\> ping 192.168.1.1
The ping should respond with successful results.
Step 5: Send an extended ping from PC1 to R1.
To accomplish this, enter the following command at the Windows command prompt:
C:\>ping 192.168.1.1 –n 10
There should be 10 successful responses from the command.
Task 11: Using traceroute.
The traceroute command is an excellent utility for troubleshooting the path that a packet takes through
an internetwork of routers. It can help to isolate problem links and routers along the way. The
traceroute command uses ICMP packets and the error message generated by routers when the
packet exceeds its Time-To-Live (TTL). This operation can be performed at either the user or privileged
EXEC modes. The Windows version of this command is tracert.
Step 1: Use the traceroute command at the R1 privileged EXEC prompt to discover the path that
a packet will take from the R1 router to PC1.
R1#traceroute 192.168.1.10
Type escape sequence to abort.
Tracing the route to 192.168.1.10
1
R1#
192.168.1.10
103 msec
81 msec
70 msec
Step 2: Use the tracert command at the Windows command prompt to discover the path that a
packet will take from the R1 router to PC1.
C:\>tracert 192.168.1.1
Tracing route to 192.168.1.1 over a maximum of 30 hops:
1
71 ms 70 ms 73 ms 192.168.1.1
Trace complete.
C:\>
All contents are Copyright © 1992–2007 Cisco Systems, Inc. All rights reserved. This document is Cisco Public Information. Page 16 of 28
CCNA Exploration
Routing Protocols and Concepts:
Introduction to Routing and Packet Forwarding
Lab 1.5.1: Cabling a Network and Basic Router Configuration
Task 12: Create a start.txt File.
Router configurations can be captured to a text (.txt) file and saved for later use. The configuration can be
copied back to the router so that the commands do not have to be entered one at a time.
Step 1: View the running configuration of the router using the show running-config command.
R1#show running-config
!
version 12.3
!
hostname R1
!
!
enable secret 5 $1$J.hq$Ds72Qz86tvpcuW2X3FqBS.
!
no ip domain-lookup
!
interface FastEthernet0/0
description R1 LAN
mac-address 0007.eca7.1511
ip address 192.168.1.1 255.255.255.0
duplex auto
speed auto
!
interface FastEthernet0/1
mac-address 0001.42dd.a220
no ip address
duplex auto
speed auto
shutdown
!
interface Serial0/0/0
description Link to R2
ip address 192.168.2.1 255.255.255.0
clock rate 64000
!
interface Serial0/0/1
no ip address
shutdown
!
interface Vlan1
no ip address
shutdown
!
ip classless
!
!
!
!
line con 0
password cisco
line vty 0 4
password cisco
login
All contents are Copyright © 1992–2007 Cisco Systems, Inc. All rights reserved. This document is Cisco Public Information. Page 17 of 28
CCNA Exploration
Routing Protocols and Concepts:
Introduction to Routing and Packet Forwarding
Lab 1.5.1: Cabling a Network and Basic Router Configuration
!
end
R1#
Step 2: Copy the command output.
Select the command output. From the HyperTerminal Edit menu, choose the copy command.
Step 3: Paste output in Notepad.
Open Notepad. Notepad is typically found on the Start menu under Programs > Accessories. From the
Notepad Edit menu, click Paste.
Step 4: Edit commands.
Some commands will have to be edited or added before the startup script can be applied to a router.
Some of these changes are:
Adding a no shutdown command to FastEthernet and serial interfaces that are being used.
Replacing the encrypted text in the enable secret command with the appropriate password.
Removing the mac-address command from the interfaces.
Removing the ip classless command.
Removing unused interfaces.
Edit the text in the Notepad file as shown below:
hostname R1
!
!
enable secret class
!
no ip domain-lookup
!
interface FastEthernet0/0
description R1 LAN
ip address 192.168.1.1 255.255.255.0
no shutdown
duplex auto
speed auto
!
interface Serial0/0/0
description Link to R2
ip address 192.168.2.1 255.255.255.0
clock rate 64000
no shutdown
!
!
!
!
line con 0
password cisco
line vty 0 4
password cisco
All contents are Copyright © 1992–2007 Cisco Systems, Inc. All rights reserved. This document is Cisco Public Information. Page 18 of 28
CCNA Exploration
Routing Protocols and Concepts:
Introduction to Routing and Packet Forwarding
Lab 1.5.1: Cabling a Network and Basic Router Configuration
login
!
end
Step 5: Save the open file in Notepad to start.txt.
Task 13: Load the start.txt File onto the R1 Router.
Step 1: Erase the current startup configuration of R1.
Confirm the objective when prompted, and answer no if asked to save changes. The result should look
something like this:
R1#erase startup-config
Erasing the nvram filesystem will remove all files! Continue? [confirm]
[OK]
Erase of nvram: complete
Router#
Step 2: When the prompt returns, issue the reload command.
Confirm the objective when prompted. After the router finishes the boot process, choose not to use the
AutoInstall facility, as shown:
Would
Would
Press
Press
you like to enter the initial configuration dialog? [yes/no]: no
you like to terminate autoinstall? [yes]:
Enter to accept default.
RETURN to get started!
Step 3: Enter global configuration mode.
Router#configure terminal
Enter configuration commands, one per line.
Router(config)#
End with CNTL/Z.
Step 4: Copy the commands.
In the start.txt file that was created in Notepad, select all the lines, and then choose Edit > Copy.
Step 5: From the HyperTerminal Edit menu, choose Paste to Host.
Step 6: Verify the running configuration.
After all of the pasted commands have been applied, use the show running-config command to
verify that the running configuration appears as expected.
Step 7: Save the running configuration,
Save the running configuration to NVRAM using the copy running-config startup-config
command.
R1#copy running-config startup-config
Building configuration...
[OK]
R1#
All contents are Copyright © 1992–2007 Cisco Systems, Inc. All rights reserved. This document is Cisco Public Information. Page 19 of 28
CCNA Exploration
Routing Protocols and Concepts:
Introduction to Routing and Packet Forwarding
Lab 1.5.1: Cabling a Network and Basic Router Configuration
Appendix 1: Installing and Configuring Tera Term for use on Windows XP
Tera Term is a free terminal emulation program for Windows. It can be used in the lab environment in
place of Windows HyperTerminal. Tera Term can be obtained at the following URL:
http://hp.vector.co.jp/authors/VA002416/teraterm.html
Download the “ttermp23.zip”, unzip it, and install Tera Term.
Step 1: Open the Tera Terminal program.
Step 2: Assign Serial port.
To use Terra Term to connect to the router console, open the New connection dialog box and select the
Serial port.
Step 3: Set Serial port parameters.
Set appropriate parameters for Port in the Serial section of the Tera Term:New Connection dialog box.
Normally, your connection is through COM1. If you are unsure what port to use, ask your instructor for
assistance.
Step 4: Configure settings.
Terra Term has some settings that can be changed to make it more convenient to use. From the Setup >
Terminal menu, check the Term size = win size checkbox. This setting allows command output to
remain visible when the Terra Term window is resized.
All contents are Copyright © 1992–2007 Cisco Systems, Inc. All rights reserved. This document is Cisco Public Information. Page 20 of 28
CCNA Exploration
Routing Protocols and Concepts:
Introduction to Routing and Packet Forwarding
Lab 1.5.1: Cabling a Network and Basic Router Configuration
Step 5: Change scroll buffer number.
From the Setup > Window menu, change the scroll buffer number to a number higher than 100. This
setting allows you to scroll up and view previous commands and outputs. If there are only 100 lines
available in the buffer, only the last 100 lines of output are visible. In the example below, the scroll buffer
has been changed to 1000 lines.
All contents are Copyright © 1992–2007 Cisco Systems, Inc. All rights reserved. This document is Cisco Public Information. Page 21 of 28
CCNA Exploration
Routing Protocols and Concepts:
Introduction to Routing and Packet Forwarding
Lab 1.5.1: Cabling a Network and Basic Router Configuration
Appendix 2: Configuring Tera Term as the Default Telnet Client in Windows XP
Be default, Windows may be set to use HyperTerminal as the Telnet client. Windows may also be set to
use the DOS version of Telnet. In the NetLab environment, you can change the Telnet client to Local
Telnet Client, which means that NetLab will open the current Windows default Telnet client. This may be
set to HyperTerminal or to the DOS-like version of Telnet embedded in the Windows operating system.
Complete the following steps to change your default Telnet client to Tera Term (or any other Telnet
client):
Step 1: Go to Folder Options.
Double-click My Computer, and then choose Tools > Folder Options.
Step 2: Go to (NONE) URL:Telnet Protocol.
Click the File Types tab and scroll down in the list of Registered file types: until you find the (NONE)
URL:Telnet Protocol entry. Select it and then click the Advanced button.
All contents are Copyright © 1992–2007 Cisco Systems, Inc. All rights reserved. This document is Cisco Public Information. Page 22 of 28
CCNA Exploration
Routing Protocols and Concepts:
Introduction to Routing and Packet Forwarding
Lab 1.5.1: Cabling a Network and Basic Router Configuration
Step 3: Edit the open action.
In the Edit File Type dialog box, click Edit to edit the open action.
Step 4: Change the application.
In the Editing action for type: URL: Telnet Protocol dialog box, the Application used to perform
action is currently set to HyperTerminal. Click Browse to change the application.
All contents are Copyright © 1992–2007 Cisco Systems, Inc. All rights reserved. This document is Cisco Public Information. Page 23 of 28
CCNA Exploration
Routing Protocols and Concepts:
Introduction to Routing and Packet Forwarding
Lab 1.5.1: Cabling a Network and Basic Router Configuration
Step 5: Open ttermpro.exe.
Browse to the Tera Term installation folder. Click the ttermpro.exe file to specify this program for the open
action, and then click Open.
Step 6: Confirm ttermpro.exe and close.
Click OK twice and then Close to close the Folder Options dialog box. The Windows default Telnet
client is now set to Tera Term.
All contents are Copyright © 1992–2007 Cisco Systems, Inc. All rights reserved. This document is Cisco Public Information. Page 24 of 28
CCNA Exploration
Routing Protocols and Concepts:
Introduction to Routing and Packet Forwarding
Lab 1.5.1: Cabling a Network and Basic Router Configuration
All contents are Copyright © 1992–2007 Cisco Systems, Inc. All rights reserved. This document is Cisco Public Information. Page 25 of 28
CCNA Exploration
Routing Protocols and Concepts:
Introduction to Routing and Packet Forwarding
Lab 1.5.1: Cabling a Network and Basic Router Configuration
Appendix 3: Accessing and Configuring HyperTerminal
In most versions of Windows, HyperTerminal can be found by navigating to Start > Programs >
Accessories > Communications > HyperTerminal.
Step 1: Create a new connection.
Open HyperTerminal to create a new connection to the router. Enter an appropriate description in the
Connection Description dialog box and then click OK.
Step 2: Assign COM1 port.
On the Connect To dialog box, make sure the correct serial port is selected in the Connect using field.
Some PCs have more than one COM port. Click OK.
All contents are Copyright © 1992–2007 Cisco Systems, Inc. All rights reserved. This document is Cisco Public Information. Page 26 of 28
CCNA Exploration
Routing Protocols and Concepts:
Introduction to Routing and Packet Forwarding
Lab 1.5.1: Cabling a Network and Basic Router Configuration
Step 3: Set COM1 properties.
In the COM1 Properties dialog box under Port Setting, clicking Restore Defaults normally sets the
correct properties. If not, set the properties to the values show in the following graphic, and then click OK.
All contents are Copyright © 1992–2007 Cisco Systems, Inc. All rights reserved. This document is Cisco Public Information. Page 27 of 28
CCNA Exploration
Routing Protocols and Concepts:
Introduction to Routing and Packet Forwarding
Lab 1.5.1: Cabling a Network and Basic Router Configuration
Step 4: Verify connection.
You should now have a console connection to the router. Press Enter to get a router prompt.
All contents are Copyright © 1992–2007 Cisco Systems, Inc. All rights reserved. This document is Cisco Public Information. Page 28 of 28

