~Square-Rimmed Bowls~
Eric Lofstrom - Eric@EricLofstrom.com
How do I turn a square-rimmed bowl?
Outline of Process:
1. Understand Foundational Facegrain
Info.- (attached)
a. Lathe Maintenance– Smooth toolrest, clean
ways of bed, ensure spindle alignment, adjust
speed range to suite project (var. speed allows
fine tuning of vibrations).
b. Understand & apply Anchor, Bevel, Cut….
Direct Attention, ‘Shavings Give Feedback (see attached)
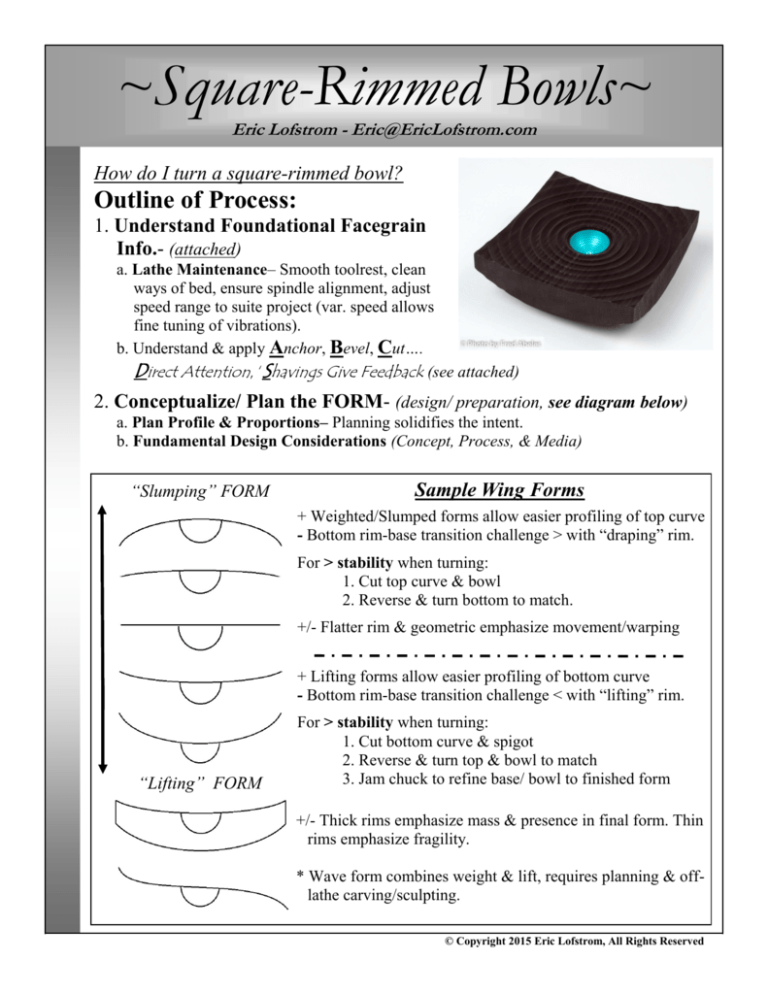
2. Conceptualize/ Plan the FORM- (design/ preparation, see diagram below)
a. Plan Profile & Proportions– Planning solidifies the intent.
b. Fundamental Design Considerations (Concept, Process, & Media)
“Slumping” FORM
Sample Wing Forms
+ Weighted/Slumped forms allow easier profiling of top curve
- Bottom rim-base transition challenge > with “draping” rim.
For > stability when turning:
1. Cut top curve & bowl
2. Reverse & turn bottom to match.
+/- Flatter rim & geometric emphasize movement/warping
+ Lifting forms allow easier profiling of bottom curve
- Bottom rim-base transition challenge < with “lifting” rim.
“Lifting” FORM
For > stability when turning:
1. Cut bottom curve & spigot
2. Reverse & turn top & bowl to match
3. Jam chuck to refine base/ bowl to finished form
+/- Thick rims emphasize mass & presence in final form. Thin
rims emphasize fragility.
* Wave form combines weight & lift, requires planning & offlathe carving/sculpting.
© Copyright 2015 Eric Lofstrom, All Rights Reserved
~Square-Rimmed Bowls~
Eric Lofstrom - Eric@EricLofstrom.com
3. Rough the Exterior Profile/ Underside of
Rim/ Wing- (screw chuck/ between centers allows
for max. degree of adjustments)
uppor
t
ed fib
ers
Mark Center
Cut s
a. Initial Roughing– May be done with the bandsaw,
especially if the blank needs balancing of mass/wt.
b. Rough Shape– Fingernail Grind Bowl Gouge (see attached) is the most versatile cutting tool for this job. If
turning a thin, weighted/ slumped –wing, leave the
wing nearest the bowl thick, to allow support during
refining/ finish cuts for the top surface of the wing.
c. Refine Underside of Rim/ Wing– Shear-cut the surface w/ bowl gouge wing, then shear scrape to refine
surface.
d. Turn Spigot & Base (see diagram below)- Profile/
dia. shape to match jaw profile & register on jaw face.
The holding integrity of chuck relies completely on spigot-jaw dia. & profile match.
4. Hollow the Interior- (chuck/ faceplate mounted)
1
s
ep 3
St 2
rs
d fibe
pporte
Cut su
a. Cut the Rim/ Wing– Take rim/ wing to finish thickness
using sweeping cuts.
b. Use a Step Technique (see diagram)– Cut the interior
bowl in steps. Stop to check the profile & wall thickness frequently. BLEND EA. SECTION W/ THE PREVIOUS– AS
YOU PROGRESS.
c. Finish Bowl Interior– Use a bowl gouge w/ appropriate
bevel angle to allow bevel support throughout the cut & use
a negative rake scraper to refine the interior curve. Rehearse
cuts before applying.
d. Measure & Note the Finished Bowl Depth– Mark on
exterior of blank for reference during reverse turning (Step5)
e. Refine Top Rim/ Wing Surface– Use a shearing cut,
shear scraping & sanding. Finish to desired refinement.
© Copyright 2015 Eric Lofstrom, All Rights Reserved
~Square-Rimmed Bowls~
Eric Lofstrom - Eric@EricLofstrom.com
5. Refine the Exterior/ Underside & Foot-
ot
Remove spig
Jam / Vacuum Chuck
(reversed, jam / vacuum chuck)
a. Reverse Turn– Using a jam / vacuum chuck, align using center mark from roughing between centers.
b. Refine the Curve- Shear cut/ scrape to follow exterior
curve THROUGH the spigot.
c. For Complete Access to Base- Use a vacuum chuck,
friction-drive jam chuck, Longworth, or Cole jaws for
complete access to underside without the need for tailstock during final blending of curve. If turning a thick
wing, the complete underside can be re-turned with
choice of effect. If turning thin, consider the fragility &
how this will effect the finish turning process!
c. Complete/ Refine Bottom Profile with shear scraping
& sanding. Finish to desired refinement.
6. Finish/ Embellish as Desired- (according to personal taste, wood, & intent)
A Few Favorite Embellishments for Square & Flat Rims
Crisp coves, echoing as ripples.
Pyrography/ carved quilt pattern.
When embellishing, explore
a concept & have FUN!
Thin rim, geom. pierced & heat-warped.
© Copyright 2015 Eric Lofstrom, All Rights Reserved
~Foundational Facegrain Info.~
Eric Lofstrom - Eric@EricLofstrom.com
ABC...D’S of Controlling the Cut:
A = Anchor tool on toolrest.
B = Bevel glides across wood, directing tool.
C = Cut supported fibers when possible.
D = Direct attention ahead of the cut.
‘S = Shavings are feedback on quality of cut.
3+ Anchor Points = Stability
Cutting vs. Scraping:
Cutting = Bevel glides across wood.
Scraping = NO bevel/ relief contact;
drawing the burr/ edge across the wood.
Shearing = edge angle approaches parallel to surface movement of wood, decreases resistance to the cut.
Using a Shearing angle will result in the
Three points of contact (tripod) yields control cleanest cut/ scraped fibers.
& stability; 1)toolrest, 2)body, & 3)bevel.
Cut when you can cut & scrape when you
Maintain bevel contact by steering the bevel are unable to maintain bevel contact, or to
where you want the tool to travel.
refine the curve.
Use the tool as an extension of your body.
Grain Orientation Matters!
rs
p
sup
or
e
fib
ted
su
pp
or
ted
fib
e
rs
Fundamentally, wood is a bundle of straws; which flex & tear if there
is no support behind them, resulting in torn grain (a.k.a. “tear-out”).
Cutting “supported fibers” gives a cleaner surface & less sanding.
Face Grain Turning = fibers lay perpendicular to axis of rotation
Direction of cuts:
OUTSIDE of bowl (convex curve) = cut SMALL dia. to LARGE
INSIDE of bowl (concave curve) = cut LARGE dia. to SMALL
When turning THIN- Cut in STEPS from rim to center–
ONCE YOU GO THIN, DON’T GO BACK!
My Basic Bowl Turning Tools:
Negative Rake Scraper– Top
Fingernail Bowl Gouge– Side
<9
0ͦ
~55ͦ
- used to remove nearly all wood inside
& out, shear cut & shear scrape exterior.
Profile– Side
~70ͦ
- used to refine
interior form of
bowls, scrape
broad coves &
blend multifaceted concave
surfaces.
© Copyright 2015 Eric Lofstrom, All Rights Reserved


