Dynamic Distribution List Guide - Omni Technology Solutions Inc.
advertisement

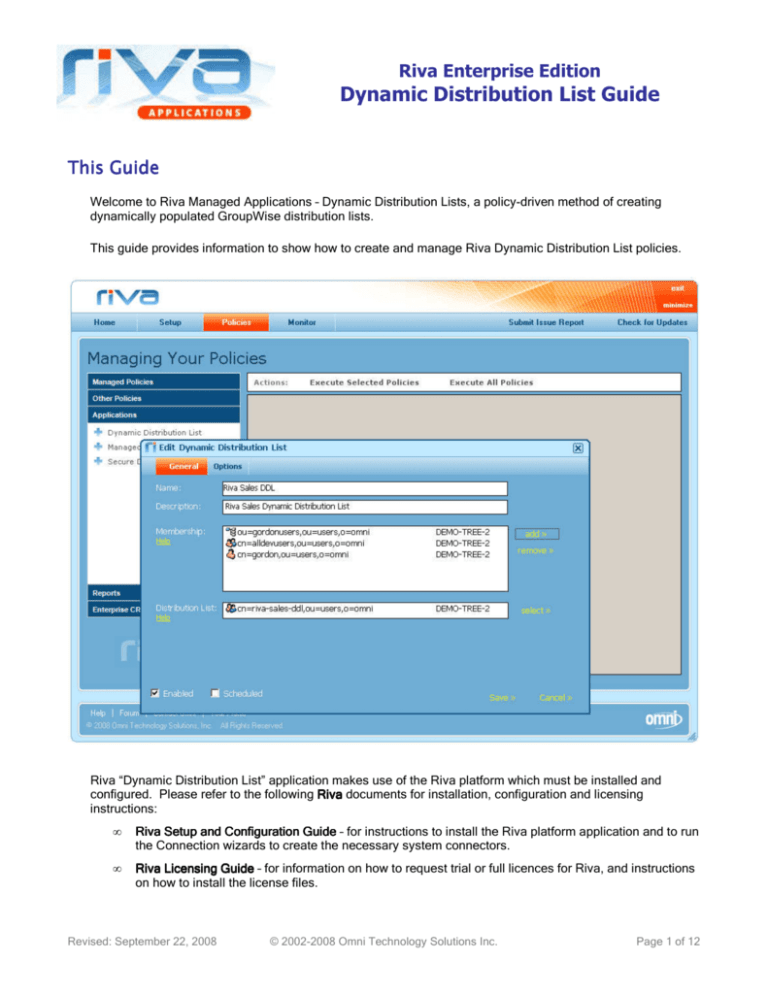
Riva Enterprise Edition Dynamic Distribution List Guide This Guide Welcome to Riva Managed Applications – Dynamic Distribution Lists, a policy-driven method of creating dynamically populated GroupWise distribution lists. This guide provides information to show how to create and manage Riva Dynamic Distribution List policies. Riva “Dynamic Distribution List” application makes use of the Riva platform which must be installed and configured. Please refer to the following Riva documents for installation, configuration and licensing instructions: • Riva Setup and Configuration Guide – for instructions to install the Riva platform application and to run the Connection wizards to create the necessary system connectors. • Riva Licensing Guide – for information on how to request trial or full licences for Riva, and instructions on how to install the license files. Revised: September 22, 2008 © 2002-2008 Omni Technology Solutions Inc. Page 1 of 12 Riva Dynamic Distribution List Guide www.omni-ts.com Table of Contents Dynamic Distribution Lists .................................................................................................. 3 How Dynamic Distribution List Policies Work ................................................................... 3 Creating Dynamic Distribution List Policies....................................................................... 3 Use Query Lists ........................................................................................................... 5 Confirming a GroupWise Dynamic Distribution List Policy .................................................. 6 How to Execute and Schedule Riva Policies ...................................................................... 7 Best Practices for Dynamic Distribution List Policies ....................................................... 10 Support for Riva ................................................................................................................. 11 Reporting a technical Issue ......................................................................................... Upgrade and Maintenance Support Agreements ............................................................. Free Support ............................................................................................................. Contacting Support .................................................................................................... Online Support .......................................................................................................... Revised: September 22, 2008 © 2002-2008 Omni Technology Solutions Inc. 11 11 11 12 12 Page 2 of 12 Riva Dynamic Distribution List Guide www.omni-ts.com Use Dynamic Distribution List Policies How Dynamic Distribution List Policies Work The Dynamic GW Distribution Lists policy wizard allows administrators to configure dynamic distribution lists. For each dynamic distribution list, an administrator can configure one or multiple eDirectory groups or eDirectory containers and use advanced LDAP filter values to dynamically update the distribution list. When a Dynamic Distribution List policy is executed, it polls the source eDirectory groups (nested groups) or containers and/or runs the LDAP query filter and replaces the previous members of the distribution list with the new membership information. Creating Dynamic Distribution List Policies To create a Dynamic Distribution List policy: 1. In the Policies page under Applications, Applications click the Dynamic Distribution Lists link. 2. Provide a short name and description for the policy. 3. For Membership:: Membership:: click the add >> link, browse and select the eDirectory users, groups or container objects. This will constitute the membership for the Dynamic Distribution List. Click Ok >>. >> Revised: September 22, 2008 © 2002-2008 Omni Technology Solutions Inc. Page 3 of 12 Riva Dynamic Distribution List Guide www.omni-ts.com 4. For Distribution List: click select >> and select the desired GroupWise Distribution List object. Click OK>>. OK>> Revised: September 22, 2008 © 2002-2008 Omni Technology Solutions Inc. Page 4 of 12 Riva Dynamic Distribution List Guide www.omni-ts.com Note - Dynamic Distribution List policies assume they are the sole management point for the specified GroupWise distribution list. When a Dynamic Distribution List policy is executed, it will delete all existing users from the distribution list’s membership and then add the users from the source group and query filter identified in the policy. 5. If containers are used in the “Membership:” list and you want the policy to include users from child containers, select Options and check Include subsub-containers when extracting users from membership containers containers. ners This option does not apply to LDAP query filters. This option will affect all container objects used in the “Membership:” list. 6. Verify that Enabled is checked to enable the policy. Only enabled policies can be executed. 7. Click Save>> to save the policy. Use Query Lists In addition to allowing an eDirectory group be the source of the members of a GroupWise dynamic distribution list, the “Query Lists” option allows you to create dynamic distribution lists based on multiple eDirectory attribute values. Riva DDL uses LDAP queries to extract this information from eDirectory. This requires that you understand how to build LDAP queries. Refer to www.faqs.org/rfcs/rfc2254.html for additional information. Softerra provides a free “LDAP Browser” utility at www.softerra.com/download.htm that can be used to determine the class and attribute names being used in eDirectory. Revised: September 22, 2008 © 2002-2008 Omni Technology Solutions Inc. Page 5 of 12 Riva Dynamic Distribution List Guide www.omni-ts.com A “Query Base” is considered the “root” container object from which the LDAP query will be performed. All sub-containers are automatically searched when you perform a Query List. You can add multiple Query Bases. To create a Query List: 1. Select Options and check Enable Query Query Lists. 2. Build a suitable LDAP Query Filter. Filter For our example above: (|(ou=Sales)(ou=Accounting) “ | ” is the logical OR operator “ ou “ is the LDAP attribute for “Department Department” Department Note - The query from our example will add users which match the filter (users in “Sales” OR “Marketing” Departments) starting at the “Query Base” (ou=users,o=omni) to the users already identified in the “Membership” list specified on the “General” page. It is possible to leave the “Membership” list on the General page blank in which case the policy affects only those users that match the “Query Filter”. 3. Add one or more Query Bases: which are the eDirectory container objects to start from.. 4. Check “Include subsub-containers in query” if the LDAP queries is to include user objects in child containers below the “Query Base” container objects. 5. Click Save>> to save changes to the policy. Please contact us if you have questions about how to create complex LDAP Query List filters.. Confirming a GroupWise Dynamic Distribution List Policy After saving a Dynamic Distribution List policy, the quickest way to confirm it is properly configured is to rightclick the policy and select “Preview Preview Items to Push”. Push” This will cause Riva to poll the eDirectory tree, extract the group and container information and run the LDAP query to provide you with the list of accounts that will be pushed to the GroupWise distribution list. Revised: September 22, 2008 © 2002-2008 Omni Technology Solutions Inc. Page 6 of 12 Riva Dynamic Distribution List Guide www.omni-ts.com How to Execute and Schedule Riva Policies There are two global settings which affect policy execution: Revised: September 22, 2008 © 2002-2008 Omni Technology Solutions Inc. Page 7 of 12 Riva Dynamic Distribution List Guide www.omni-ts.com • Enabled – this setting controls execution from within the Riva GUI. • Scheduled – this setting control execution when Riva.exe is run from the command line or using Windows Task Scheduler. Enabled and Scheduled are mutually exclusive. If both are selected, then the policy can be executed from within the Riva GUI and it can be run from the command line or by using Windows Task Scheduler. There are four ways to execute Riva policies: • Execute All Policies – click the “Execute All Policies” link in the Actions: tool bar. This will execute all enabled Riva policies. • Execute Selected Policies – use Ctrl+click to select one or more policies and click “Execute Selected Policies” in the Actions: tool bar. This will execute only those selected policies that are enabled. Note Note - When policies are executed from Riva interface, the Monitor tool will automatically open and display the policy execution in real-time. Revised: September 22, 2008 © 2002-2008 Omni Technology Solutions Inc. Page 8 of 12 Riva Dynamic Distribution List Guide www.omni-ts.com When the policy execution completes, a window will open that displays the list of summary logs for policies executed. Any of those log files can be opened using the Show >> button. Summary execution log files for Dynamic Distribution List policies are saved in the \ExecutionSummaries\ ExecutionSummaries\Dynamic Distribution List folder of your Riva installation. • Command Line Execution Execution – You can run Riva from the command line for single execution or for scheduled updates: c:\ c:\<path to file>\ file>\riva.exe riva.exe /execute will cause all scheduled policies to be executed. • Schedule a Policy – You can schedule one or more Riva Policies using Windows Task Scheduler. To schedule Riva: 1. Run the “Add Scheduled Task” wizard (Start > Programs > Accessories > System Tools > Scheduled Tasks). Click Next > and click Browse . . . to navigate to and select the RivaApp.exe file. Specify the frequency to run this task and click Next >. > Complete the wizard. 2. Open the task and modify the Run: Run value C:\Program Files\ Files\Omni\ Omni\Riva\ Riva\\Riva.exe to read "C:\Program Files\ Files\Omni\ Omni\Riva\ Riva\\Riva.exe" Riva.exe" –execute Revised: September 22, 2008 © 2002-2008 Omni Technology Solutions Inc. Page 9 of 12 Riva Dynamic Distribution List Guide www.omni-ts.com Place double-quotation marks around the path to the Riva.exe file and add –execute to the end of the line. Click OK or Apply to save the changes to the task. Best Practices for Dynamic Distribution List Policies Here are recommended best practices: • Before implementing Dynamic Distribution List policies, create an accurate list of existing distribution list memberships so those users can be added to the source eDirectory groups. • Test, test, and test. When creating a new policy, use a sample group as the source and a “test” distribution list as the destination to ensure that the membership lists are working as desired. Once the policy is confirmed, the destination objects can be changed to identify the desired set of users. • Create the source eDirectory Groups in the same container as the distribution lists to ease management. Ensure that you create only one source group for each distribution list. • To change the membership in the distribution list, add / remove users in the source group and rerun the Dynamic Distribution List policy for that distribution list. • If eDirectory templates are used to create user accounts, add Dynamic Distribution List linked groups to the appropriate eDirectory templates. This ensures that new users will be automatically assigned to dynamic distribution lists the next time the Dynamic Distribution List policy is run. • If eDirectory templates are used to create user accounts, and if LDAP Query Filters are being used in these policies, ensure that the attribute being queried (e.g. “Department”) is being populated by the eDirectory template. Revised: September 22, 2008 © 2002-2008 Omni Technology Solutions Inc. Page 10 of 12 Riva Dynamic Distribution List Guide www.omni-ts.com Support Support for Riva Reporting a Technical Issue Riva CRM Enterprise Edition includes a “Submit Issue Report” feature in the program. If you experience a problem with the application, click the Submit Issue Report link and complete the form. Please ensure that you include the correct contact information. Once the OK button is clicked, Riva CRM Enterprise Edition will send this issue and a copy of the application logs to our technical support team. . Upgrade and Maintenance Support Agreements Customers who have current upgrade and maintenance support contracts are eligible to receive full email and telephone support Monday to Friday between 9:00 a.m. and 5:00 p.m. Mountain Time. Limited email support may be available during extended hours. Email and telephone support is also available to customers who are evaluating Riva. 365x7x24 support is available for optional purchase. Free Support Support Free support is limited to information available from our support forum, our web site and information contained in the user manual. Telephone and email support for customers who do not have a current support contract can be provided on a fee per incident or fee per hour basis, whichever is greater. Revised: September 22, 2008 © 2002-2008 Omni Technology Solutions Inc. Page 11 of 12 Riva Dynamic Distribution List Guide www.omni-ts.com Contacting Support You can contact support using the following methods. Please include as many details as possible when requesting support: Use the “Contact Us” link in the top right corner of any page of our website and complete the online form or go to www.omni-ts.com/contact-us.html. Call or fax us: Phone: Fax: 1-780780-423423-4200 1-780-423-4711 Online Resources Online resources for Riva include: • Product Documentation: Go to www.omni-ts.com select Support, Support, follow the link for Documentation Documentation and select Messaging Documentation • Riva Flash Tutorials: will be added to www.omni-ts.com/quicktours • Support Forum: Go to www.omni-ts.com/Forum and: • o Select the Riva for GroupWise ~ Installing, Using, Support forum o “Riva Riva Tips” Tips available at www.omni-ts.com/forum/post--2055--page-1.html is a collection of forum articles to provide troubleshooting and advanced management steps Product FAQ: Go to www.omni-ts.com/integration and select Frequently Asked Questions Revised: September 22, 2008 © 2002-2008 Omni Technology Solutions Inc. Page 12 of 12


