BrightSign GilderScript
advertisement
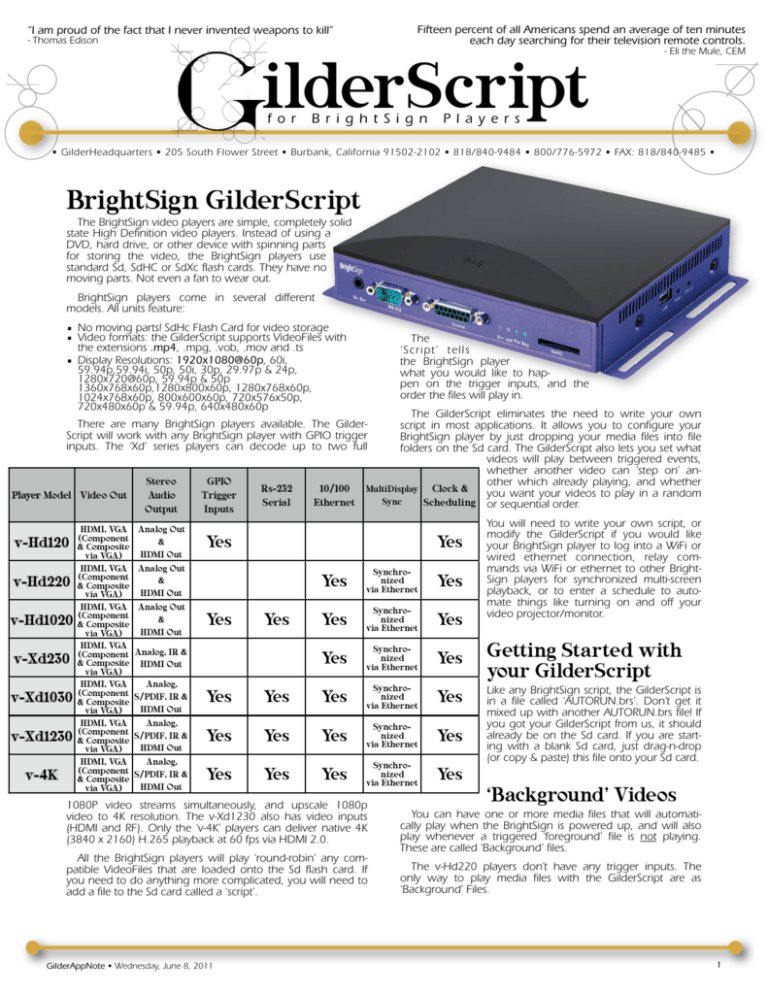
Fifteen percent of all Americans spend an average of ten minutes each day searching for their television remote controls. “I am proud of the fact that I never invented weapons to kill” - Thomas Edison ilderScript f o r B r i g h t S i g n - Eli the Mule, CEM P l a y e r s • GilderHeadquarters • 205 South Flower Street • Burbank, California 91502-2102 • 818/840-9484 • 800/776-5972 • FAX: 818/840-9485 • BrightSign GilderScript The BrightSign video players are simple, completely solid state High Definition video players. Instead of using a DVD, hard drive, or other device with spinning parts for storing the video, the BrightSign players use standard Sd, SdHC or SdXc flash cards. They have no moving parts. Not even a fan to wear out. BrightSign players come in several different models. All units feature: • No moving parts! SdHc Flash Card for video storage • Video formats: the GilderScript supports VideoFiles with the extensions .mp4, .mpg, .vob, .mov and .ts • Display Resolutions: 1920x1080@60p, 60i, 59.94p,59.94i, 50p, 50i, 30p, 29.97p & 24p, 1280x720@60p, 59.94p & 50p 1360x768x60p,1280x800x60p, 1280x768x60p, 1024x768x60p, 800x600x60p, 720x576x50p, 720x480x60p & 59.94p, 640x480x60p The ‘Script’ tells the BrightSign player what you would like to happen on the trigger inputs, and the order the files will play in. The GilderScript eliminates the need to write your own script in most applications. It allows you to configure your BrightSign player by just dropping your media files into file folders on the Sd card. The GilderScript also lets you set what videos will play between triggered events, whether another video can ‘step on’ another which already playing, and whether 10/100 MultiDisplay Clock & you want your videos to play in a random Sync Ethernet Scheduling or sequential order. There are many BrightSign players available. The GilderScript will work with any BrightSign player with GPIO trigger inputs. The ‘Xd’ series players can decode up to two full Player Model Video Out v-Hd120 v-Hd220 v-Hd1020 v-Xd230 v-Xd1030 v-Xd1230 v-4K HDMI, VGA (Component & Composite via VGA) HDMI, VGA (Component & Composite via VGA) HDMI, VGA (Component & Composite via VGA) HDMI, VGA (Component & Composite via VGA) HDMI, VGA (Component & Composite via VGA) HDMI, VGA (Component & Composite via VGA) HDMI, VGA (Component & Composite via VGA) Stereo Audio Output Analog Out & HDMI Out Analog Out & HDMI Out Analog Out & HDMI Out GPIO Trigger Inputs Rs-232 Serial Yes Yes Yes Yes Analog, IR & HDMI Out Analog, S/PDIF, IR & HDMI Out Analog, S/PDIF, IR & HDMI Out Analog, S/PDIF, IR & HDMI Out Yes Synchronized via Ethernet Yes Yes Synchronized via Ethernet Yes Yes Synchronized via Ethernet Yes Yes Yes Yes Synchronized via Ethernet Yes Yes Yes Yes Synchronized via Ethernet Yes Yes Yes Yes Synchronized via Ethernet Yes 1080P video streams simultaneously, and upscale 1080p video to 4K resolution. The v-Xd1230 also has video inputs (HDMI and RF). Only the ‘v-4K’ players can deliver native 4K (3840 x 2160) H.265 playback at 60 fps via HDMI 2.0. All the BrightSign players will play ‘round-robin’ any compatible VideoFiles that are loaded onto the Sd flash card. If you need to do anything more complicated, you will need to add a file to the Sd card called a ‘script’. GilderAppNote • Wednesday, June 8, 2011 You will need to write your own script, or modify the GilderScript if you would like your BrightSign player to log into a WiFi or wired ethernet connection, relay commands via WiFi or ethernet to other BrightSign players for synchronized multi-screen playback, or to enter a schedule to automate things like turning on and off your video projector/monitor. Getting Started with your GilderScript Like any BrightSign script, the GilderScript is in a file called ‘AUTORUN.brs’. Don’t get it mixed up with another AUTORUN.brs file! If you got your GilderScript from us, it should already be on the Sd card. If you are starting with a blank Sd card, just drag-n-drop (or copy & paste) this file onto your Sd card. ‘Background’ Videos You can have one or more media files that will automatically play when the BrightSign is powered up, and will also play whenever a triggered ‘foreground’ file is not playing. These are called ‘Background’ files. The v-Hd220 players don’t have any trigger inputs. The only way to play media files with the GilderScript are as ‘Background’ Files. 1 If you need Background files in your application, just create a folder named ‘Background Loop’ on the Sd card, and drop one or more media files into this folder. If you have more than one media file in a folder, then they will normally play in alphanumeric order. If you would like the files to play in a random order, just append an ‘&’ (ampersand) onto the end of the playlist’s name. Once all the files in a folder have played, they will be ‘reshuffled’, and will begin Binary Select Direct If there is single Number Trigger Input to Brightsign amedia file of Inputs 0 1 2 3 4 5 6 7 i‘ nB a tch k-e 1 to 6 1 2 3 4 5 6 Pause Stop g r o u n d 7 1 2 3 4 5 6 7 Stop L o o p ’ f o l d e r, 8 1 2 3 4 5 6 7 8 Pause Stop then it will 9 to 15 +1 +2 +4 +8 loop con16 to 31 +1 +2 +4 +8 +16 Pause Stop tinuously. 32 to 63 +1 +2 +4 +8 +16 +32 Pause Stop If there is 64 to 127 +1 +2 +4 +8 +16 +32 +64 Stop more than 128 to 254 +1 +2 +4 +8 +16 +32 +64 +128 o n e m edia file, then they will play sequentially in alphanumeric order. Random Order Playback Triggering Videos The v-Hd120 and v-Hd1020 have eight trigger inputs that can be used to start and stop playback using buttons, switches, motion detectors or an external controller. For each ‘button’ you will be using to trigger the Brightsign player, create a folder on the Sd card named ‘Playlist001’ (change the number on each folder to match your button numbers). Once you have created the folders, just drag your media files into them. If you put more than one file into any folder, the GilderScript will play each file in turn (in alphanumeric order) on each button press. If you have between one and eight buttons, each button will directly play the files ‘directly’ in the matching playlist. If you have nine or more buttons, you will have to use a ‘binary’ pattern to access all 255 potential playlist folders. We have an application note on building your own ‘binary’ keypad on our website. If you don’t want to build your own, we also offer the KP-200 keypad (available with or without buttons). The first KP-200 gives you fifteen buttons, and each additional KP200 adds sixteen more. A sustained closure will tell a triggered file or playlist to loop. If using ‘binary’ triggering, sending a ‘255’ value the GPIO port will stop playback. Do not leave empty ‘Playlist’ folders on your Sd card. Empty ‘Playlist’ folders will keep the GilderScript from initializing. Input #6 Special Functions If not being used for triggering media files in a playlist (six or less playlists in ‘direct’ mode, or less than 64 playlists in ‘binary’ mode), input #6 can be used to pause the currently playing media file (on closure), and resume playback (on opening). Input #7 Special Functions If not being used for triggering media files in a playlist (seven or less playlists in ‘direct’ mode, or less than 128 playlists in ‘binary’ mode), input #7 can be used to immediately stop the currently playing media file (on closure). 2 playing in a different random order. This will work for either the ‘background’ or ‘foreground’ Playlist folders. Non-Steppable Playback When a triggered media file is playing, if another trigger input comes in, the current file will stop and the new one will begin playing. If your videos are triggered by the people who are watching them, you probably don’t want them turning your carefully crafted video into a ‘Max Headroom’ comedy. If you add an ‘!’ (exclamation point) onto the end of a media file’s name, or the end of the name of a playlist folder, that will render that individual file, or the entire folder, ‘unsteppable’. You cannot make the folder named ‘Background Loop’ unsteppable. If you could, you would never be able to start your ‘foreground’ files playing. Wiring the Inputs In some applications, you can wire normally open buttons right to the fifteen position D-Sub connector. This input is not isolated, so we make the vHd-to-1/4J6 adapter that isolates these inputs and converts them to the standard wiring used on all Gilderfluke & Company control systems. You should use the v-Hd-to-1/4J6 when triggering the Brightsign player from anything but nearby buttons, or when there is any chance the buttons will receive static ‘zaps’ from people touching them. The v-Hd-to-1/4J6 should also be GilderAppNote • Monday, April 11, 2011 used when controlling the Brightsign player from a Gilderfluke & Company Show Control System, PLC or other external control system, especially if that controller runs at a higher voltage. Starter kits with the v-Hd-to-1/4J6, wire, C-10Trans screw terminal adapter, flash card and GilderScript are available from Gilderfluke. Triggering High Definition Video Using Standard DMX-512 Using the GilderScript, you can easily trigger hundreds of high definition videos on a BrightSign player using buttons or other switches, a PLC, or (of course) a Gilderfluke & Co. show controller. In most venues, what you have is the DMX-512 from a standard light board or from another piece of GilderGear. With the v-HD-to-DMX, GilderScript and a BrightSign player, that’s all you need to incorporate audio and 1080p video to any presentation. The v-HD-to-DMX plugs right into a v-Hd120, v-Hd1020 or any other BrightSign video player with a GPIO port. The v-HD-to-DMX listens to any stream of DMX-512 to trigger video clips on the BrightSign player. Since it is trigged by DMX-512, all the audio/visual cues will be perfectly in sync with all your lighting cues. v-HD-to-DMX Settings There is very little to do to configure the v-HD-to-DMX: • Turn ‘off’ Dipswitch #1 if you want to use ‘one-based’ (1512) DMX-512 address numbers. Turn Dipswitch #1 ‘on’ if you want to use ‘zero-based’ (0-511) addresses. If set for ‘one-based’ (1-512) DMX-512, then DMX channel ‘1’ will appear on the v-HD-to-DMX’s output whether the address switches are set to either ‘000’ or ‘001’. • Turn ‘off’ Dipswitch #2 if you want to use a single DMX512 address for triggering the v-HD-to-DMX. Turn Dipswitch #2 ‘on’ if you want to use eight consecutive DMX-512 addresses for triggering the v-HD-to-DMX. The v-HD-to-DMX’s eight outputs will then be addressed to eight consecutive DMX-512 addresses, and will be activated by sending lighting levels above 50% to each of these DMX-512 channels. If there are less than nine videos on the player, then each individual clip is triggered by an individual output from the v-HD-to-DMX (the first output triggers the fist video, the second output triggers the second video, etc.). Not all lighting boards can han- GilderAppNote • Monday, April 11, 2011 dle this gracefully, and it may be easer to use eight consecutive DMX-512 addresses in this case. • There are three rotary switches that are used to select the base DMX-512 address for the v-HD-to-DMX. Enter the ‘hundreds’ into the far left switch, the ‘tens’ into the middle one, and the ‘units’ of your DMX-512 address into the far right switch (the rotary switch closest to the two position dipswitch). Any legal DMX-512 address from 0511 (if dipswitch #1 is ‘on’), or from 1-512 (if dipswitch #1 is ‘off’) is acceptable. Setting these switches to ‘999’ on powerup puts the v-HD-to-DMX’s into a hardware test mode, where the address switches control the outputs directly. Writing Your Lighting Cues The cues sent to the v-HD-to-DMX are just like any other lighting cues. Just bump the value from zero for approximately a second with no ramps. If there are eight or less videos, the individual bits will trigger a video. If there are nine or more videos, then bump to the value to the binary number of the video you want to trigger. A value of ‘123’ would select and play any media files in the folder named ‘Playlist123’. Any bits that aren’t used for triggering videos can be used to stop or pause a video (see the GilderScript for details on these additional functions). Wiring DMX-512 In & Out The only connections to the v-HD-to-DMX are the fifteen pin connector that plugs into the GPIO jack on the BrightSign player, and two DMX-512 connectors. The two DMX-512 connectors are RJ-45s. These are the eight position, eight conductor plugs typically used for ethernet cables. There are two of them, wired in parallel, to allow you to easily daisy chain between multiple v-HD-to-DMXs and other DMX-512 devices. The pinout of the DMX-512 connectors follows the USITT wiring standards: Pair Pair 2 Pair 3 Pair 1 Pair 4 Shield Wire # Color 1 White / Orange 2 Orange 3 White / Green 6 Green 4 Blue 5 White / Blue 7 White / Brown 8 Brown Drain Function Data 1+ Data 1- DMX-512 Pin DMX-512 Pin 3 DMX-512 Pin 2 no connection no connection Signal Common DMX-512 Pin 1 Wires #1, #2 , #7 and #8 are wired in parallel between both Rj-45 connectors. There is no connection or feedthrough on pins #3 through #6. The v-HD-to-DMX DMX-512 connection is galvanically isolated from the v-HD-to-DMX. This eliminates the possibility of ground loops and other problems in installations with many BrightSign video players. The high impedance DMX-512 input allows up to 256 v-HD-to-DMXs on a DMX-512 line. 3
