Installation Instructiions
advertisement
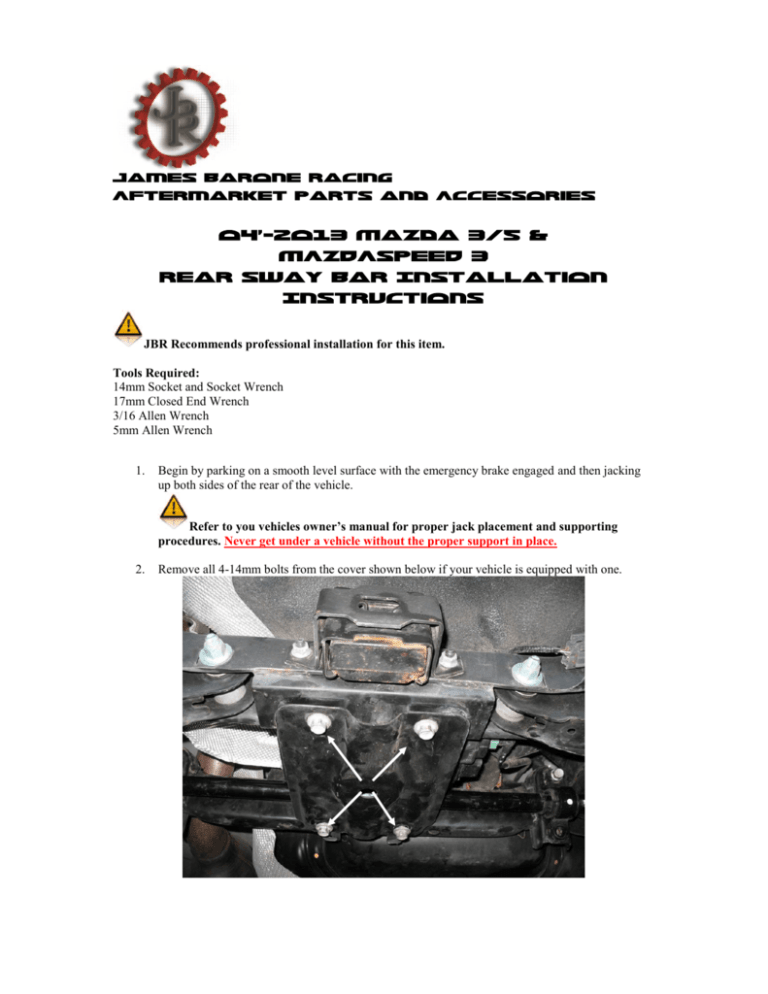
James Barone Racing Aftermarket Parts and Accessories 04’-2013 Mazda 3/5 & MAZDASPEED 3 Rear Sway Bar Installation Instructions JBR Recommends professional installation for this item. Tools Required: 14mm Socket and Socket Wrench 17mm Closed End Wrench 3/16 Allen Wrench 5mm Allen Wrench 1. Begin by parking on a smooth level surface with the emergency brake engaged and then jacking up both sides of the rear of the vehicle. Refer to you vehicles owner’s manual for proper jack placement and supporting procedures. Never get under a vehicle without the proper support in place. 2. Remove all 4-14mm bolts from the cover shown below if your vehicle is equipped with one. 3. Remove 2-17mm nuts from both end links using a 17mm closed end wrench and a 5mm allen wrench. These can be very tight so be sure to have the allen wrench secured in the end of the endlink. 4. Remove the 4-14mm bolts securing the end link brackets and bushings to the vehicles sub-frame. Then remove the factory sway bar from the vehicle. 5. Apply 1 complete packet of grease in to each of the new included sway bar bushings and slip the bushings over the sway bar. Place the brackets on to the bushings. The grease provided is for initial installation and bushing break in. Additional grease will be required. The use of ONLY synthetic grease is recommended to avoid creaking. 6. To install the new JBR Sway Bar in to the vehicle first by placing both of the end links in to the desired hole in the end of the sway bar arm. The recommend staring point is the center hole. The hole closest to the front of the vehicle is the stiffest setting. The hole closest to the rear of the vehicle is the softest setting. 7. Install each of the 4-14mm bolts through the new bushing brackets securing the sway bar to the vehicles sub-frame leaving them loose at this time. 8. Center the sway bar by sliding it left or right and ensure the gap between the arms and the outside edge of the bushings are equal. 9. Raise and torque the 4-14mm bolts to 30-35ft/lbs so the bolts are centered in the brackets. 10. Place 1 lock washer on each end link and tighten the 2-17mm nuts removed earlier using a 17mm closed end wrench and a 5mm allen wrench. It’s important to get these very tight or clunking may occur. Clunking may also occur if the end links are old and worn 11. Install both locating collars on to the sway bar inboard of each bushing leaving about the thickness of a piece of paper between the collar and the bushing and tighten evenly using a 3/16 allen wrench. 12. Replace the cover if your vehicle was equipped with one. 13. Recheck/torque all nuts and bolts after the first few hundred miles of operation. If clunking occurs it’s most likely the end links and they will to be re-tightened. This is a good time to add additional synthetic grease to the bushings using a grease gun. Congratulations!! You’ve now completed the installation of your new JBR Rear Sway Bar!! SHIPPING All orders are carefully inspected and packaged prior to shipment. The recipient must inspect all shipments for damage and report any damage to the carrier and JAMES BARONE RACING immediately. JAMES BARONE RACING is not responsible for damage that occurs during shipping. RETURNS: All sales are final. JAMES BARONE RACING will only except returns in the event of a manufacturer’s defect. Defective items will be exchanged for the identical item or repaired at our discretion. Return shipping costs are the responsibility of the purchaser. An RMA # (Return to Manufacturer Authorization Number) Must accompany all returns. In rare cases where a return is accepted a 15% restocking fee will be deducted from the refund or credit. Shipping charges are non- refundable. No returns or exchanges will be accepted after 30 days. DISCLAIMERS: Failure to carefully follow the installation instructions for your JAMES BARONE RACING product could result in significant property damage, personal injury, injury to others or even death. Please take the time to read and thoroughly understand the instructions prior to installation. The instructions are as accurate as possible and may vary slightly from model year to model year. Professional installation is recommended. Neither JAMES BARONE RACING nor any of its employees, officers, directors, or shareholders will accept responsibility for improper use or installation of our products. JAME BARONE RACING is not responsible for the misuse, incorrect installation, or failure of any product we sell. Under no circumstances, including but not limited to negligence, will JAMES BARONE RACING be liable for special or consequential damages that result from the use or inability to use our products. JAMES BARONE RACING does not assume responsibility for any damage to the user, driver, passenger or vehicle resulting from the operation of a JAMES BARONE RACING product. PLEASE DRIVE RESPONSIBLY. WARRANTY: All JAMES BARONE RACING products carry a lifetime warranty to the original purchaser. Warranty is non-transferable. Warranty does not cover damage or failure caused by abuse, misuse, faulty installation or repairs not conducted by JAMES BARONE RACING. JAMES BARONE RACING is not liable for consequential damages arising from the use of our products or any indirect damages resulting in the loss of property, revenue or costs for towing, removal, installation, or re-installation. To receive warranty service you must contact JAMES BARONE RACING to receive an RMA # (Return to Manufacturer Authorization Number) at which time you will be provided with instructions for returning the faulty product CONTACT: If you have questions or problems, e-mail us at jamesbaroneracing@gmail.com. Posting questions or problems in the forums or other social media outlets will only delay you from getting the correct answer or personalized attention from us.
