Michelson Interferometer Experiment: Wavelength Measurement
advertisement
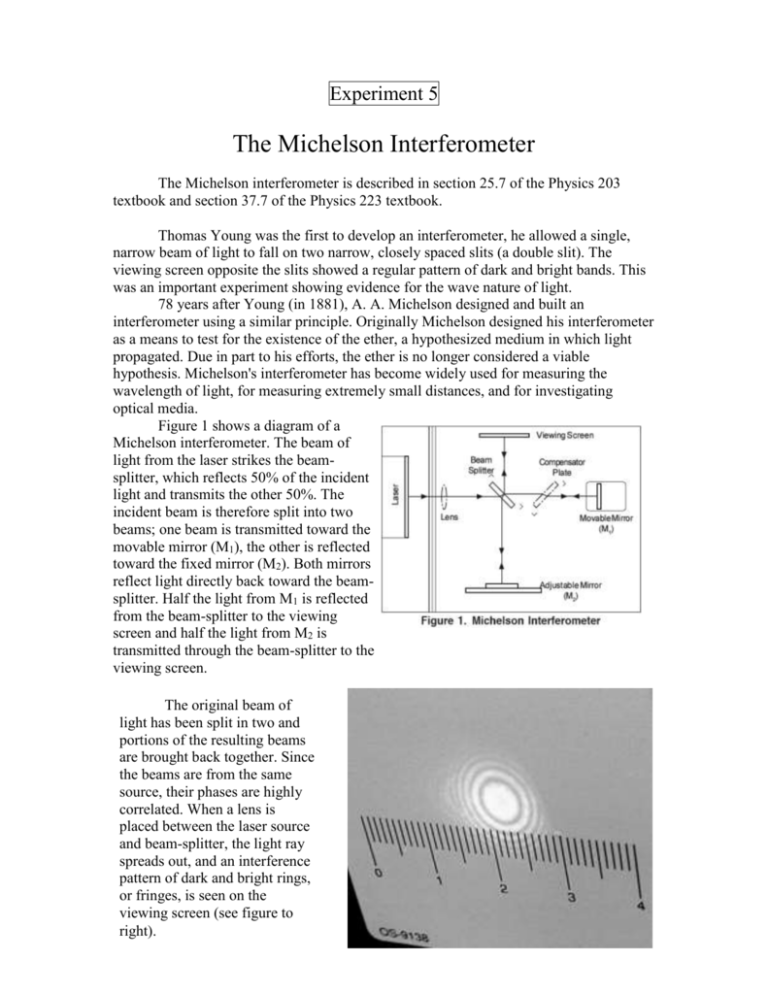
Experiment 5 The Michelson Interferometer The Michelson interferometer is described in section 25.7 of the Physics 203 textbook and section 37.7 of the Physics 223 textbook. Thomas Young was the first to develop an interferometer, he allowed a single, narrow beam of light to fall on two narrow, closely spaced slits (a double slit). The viewing screen opposite the slits showed a regular pattern of dark and bright bands. This was an important experiment showing evidence for the wave nature of light. 78 years after Young (in 1881), A. A. Michelson designed and built an interferometer using a similar principle. Originally Michelson designed his interferometer as a means to test for the existence of the ether, a hypothesized medium in which light propagated. Due in part to his efforts, the ether is no longer considered a viable hypothesis. Michelson's interferometer has become widely used for measuring the wavelength of light, for measuring extremely small distances, and for investigating optical media. Figure 1 shows a diagram of a Michelson interferometer. The beam of light from the laser strikes the beamsplitter, which reflects 50% of the incident light and transmits the other 50%. The incident beam is therefore split into two beams; one beam is transmitted toward the movable mirror (M1), the other is reflected toward the fixed mirror (M2). Both mirrors reflect light directly back toward the beamsplitter. Half the light from M1 is reflected from the beam-splitter to the viewing screen and half the light from M2 is transmitted through the beam-splitter to the viewing screen. The original beam of light has been split in two and portions of the resulting beams are brought back together. Since the beams are from the same source, their phases are highly correlated. When a lens is placed between the laser source and beam-splitter, the light ray spreads out, and an interference pattern of dark and bright rings, or fringes, is seen on the viewing screen (see figure to right). The relative phase of the two beams when they meet at the viewing screen depends on the difference in the length of their optical paths in reaching that point. By moving M1, the path length of one of the beams can be varied. Since the beam traverses the path between M1 and the beam-splitter twice, moving M1 1/4 wavelength nearer the beam-splitter will reduce the optical path of that beam by 1/2 wavelength. The interference pattern will change; the former positions of maxima will now be minima and vice versa. If M1 is moved an additional 1/4 wavelength closer to the beam-splitter, the maxima and minima will again trade positions, the new arrangement will be identical to the original. By slowly moving the mirror a distance d, and counting the number of times the fringe pattern is restored to its original state m, the wavelength of the light can be calculated as: 2d = m If the wavelength is known, the same procedure can be used to measure the distance d. ----------------------------------------------------------------------------------------------------NOTE: The Compensator In Figure 1, one beam (the one reflecting off M2) passes through the glass of the beamsplitter only once, while the other beam passes through it three times. When using a laser (which is highly coherent and monochromatic), this is no problem. With other light sources this is a problem. A compensator is identical to the beam-splitter, but without the reflective coating. By inserting it in the beam path (as shown in Figure 1), both beams pass through the same thickness of glass. This evens the path lengths and thus increases the coherence of the beams at the viewing screen. We do not need, and will not use the compensator. ----------------------------------------------------------------------------------------------------Setup and Operation Set the interferometer base on a lab table with the micrometer knob pointing toward you. Position the laser alignment bench (short, magnetic optical bench upon which a laser can be placed) to the left of the base approximately perpendicular to the interferometer base and place a laser on the bench. Secure the "movable mirror" in the recessed hole in the interferometer base. Turn the laser on. Adjust the height of the laser and the direction of the laser so that the laser beam hits the middle of the mirror and reflects directly back into the laser aperture. The laser's height can be adjusted using the leveling screws on the laser bench, the beam direction can be adjusted by simply turning the laser alignment bench. Mount the adjustable mirror on the interferometer base. Put a component holder in front of the laser, holder side out. Place another holder opposite the adjustable mirror, holder side in. Attach a white viewing screen (with millimeter scale) on the component holder opposite the adjustable mirror. Position the "beam splitter" at a 45° angle to the laser beam, atop the marks on the interferometry table. There should now be two sets of bright dots on the viewing screen; one set comes from the fixed mirror (adjustable mirror) and the other comes from the movable mirror. Each set of dots includes a bright dot with two or more dimmer dots due to multiple reflections. Adjust the angle of the beam-splitter until the two sets of dots are aligned vertically, tighten the thumbscrew to secure the beam-splitter. Using the thumbscrews on the back of the adjustable mirror, adjust the mirror until the two sets of dots on the viewing screen coincide exactly. Attach the 18 mm FL lens to the magnetic backing of the component holder in front of the laser. When correctly placed, you will see circular fringes on the beam splitter (like in picture on page 1). If you don't see the fringes immediately, just play with the lens position for a while. If you still don't see them, repeat setup procedure. Turn the micrometer knob, you'll see the fringes shift. Don't screw the micrometer knob all the way in or all the way out. Completed setup. Other possible setup problems: While warming up, the laser intensity may vary causing fringe shifts. If this occurs, it will go away as the laser warms up and becomes more stable. If the mirror brackets have become bent, it may be impossible to obtain fringes or the fringes may have significant distortion. You may also see background fringes due to reflections off other surfaces. These background patterns generally don't move when the mirror is moved and should have no impact on your measurements. Vibration of the interferometer base or table can effect your interference pattern. Counting Fringes It is not necessary that the interference pattern be perfectly symmetrical or sharp. As long as you can clearly distinguish the maxima and minima, you can make accurate measurements. You can move the viewing screen so that, say, a minimum in the fringe pattern is aligned with a particular mark on the screen's millimeter scale. Then you'll have advanced exactly one fringe when the next minimum is aligned with the same mark – the pattern should then look identical to the original. When turning the micrometer dial to count fringes, always turn it one complete revolution before you start, then continue turning in the same direction while counting. This will eliminate the "backlash" in the micrometer movement (the mechanical slippage when reversing the direction of motion in a mechanical instrument). The dark ring at the base of the micrometer knob adjusts the tension in the dial. Be sure to adjust the tension to a comfortable level before taking measurements. Always take several readings and average them for greater accuracy. Wavelength Measurement Turn the micrometer knob one full turn counterclockwise, continue turning until the zero on the knob is aligned with the index mark. Adjust the position of your viewing screen so that one of the marks on the millimeter scale is aligned with one of the fringes in your interference pattern. You'll probably find it easier to count fringes if the reference mark is one or two fringes out from the center of the pattern. Rotate the micrometer knob slowly counterclockwise. Count the fringes as they pass your reference mark. Continue until 30 fringes (or so) have passed your mark. Make sure you do not count the fringe at the initial position of the micrometer knob as 1, but the next fringe.) As you finish your count, the fringes should be in the same position with respect to your reference mark as they were when you started to count. Record the final reading on the micrometer dial. Ignore the numbers along the micrometer shaft. The distance d (in µm, micrometers, 10-6 m) that the movable mirror moved toward the beam-splitter is the reading from the micrometer knob. Record d and N, the number of fringes that passed. Repeat the experiment two more times. For each trial, calculate the wavelength of the light, then average your results. = 2d/N (Q1) In the calculation of , why did we multiply d by two? Index of Refraction of Air Measurement The speed of light through a material depends on the index of refraction of that material. If one of our interferometry beams passes through a section of vacuum while the other traverses only through air, the beams will end up additionally out of phase. Attach the vacuum cell inside the rotational pointer using the magnetic backing, and put the combination in the slot between the movable mirror and the beam-splitter. See Figure 2.2 on the previous page. Push the air hose of the vacuum pump over the air outlet hole of the cell. Adjust the alignment of the fixed mirror as needed so the center of the interference pattern is clearly visible on the viewing screen. The fringe pattern will be somewhat distorted by irregularities in the glass end-plates of the vacuum cell, this is not a problem. Practice using the handheld vacuum pump. Squeezing the trigger near the bottom causes air to be removed from the vacuum cell, you should see the fringe patterns shift as the air is pumped out. You can fill the cell with air again by flipping the vacuum release toggle switch on the pump. The initial reading on the vacuum pump should be zero. Slowly pump the air out of the vacuum cell while counting the fringe transitions that occur. Do multiple pumps to reduce the air pressure as far as the pump can achieve. Record the pressure change ∆P (in cm Hg, centimeters of mercury) and number of fringes N. Analyzing the Data The pressure gauge indicates the change in pressure relative to atmospheric pressure. So a reading of 34 cm Hg means the pressure was 34 cm Hg below atmospheric pressure. Atmospheric pressure is about 76 cm Hg. The reading may be given in inches of Hg, if so just convert to cm. The fringe shifts indicate that the light going through the vacuum cell has gained on the light that didn't (because of its greater speed in vacuum). From the number of fringe shifts N, we can calculate the difference in the index of refraction (∆n) between the two media. The formula is ∆n = N / (2d) where is wavelength of the light in vacuum (calculated in the previous part) and d is the length of the vacuum cell (3.0 cm). Use this formula to calculate ∆n for your data. This formula represents the shift in index of refraction from air to partial vacuum. Let's assume that the shift is linear and extrapolate the data to determine ∆n between air and complete vacuum. This can be done by setting up a simple proportion, ∆P ∆n 76 cm Hg = ∆n0 where ∆n0 is the change in index between air and total vacuum, solve for ∆n0. (Q2) Why did we use (2d) in the above formula? (Q3) How does your result for ∆n0 compare to the textbook difference between the index of refractions of air and vacuum? (Q4) The index of refraction for a gas depends on temperature as well as pressure. Describe an experiment that would determine the temperature dependence of the index of refraction for air.


