Audacity tutorial
advertisement
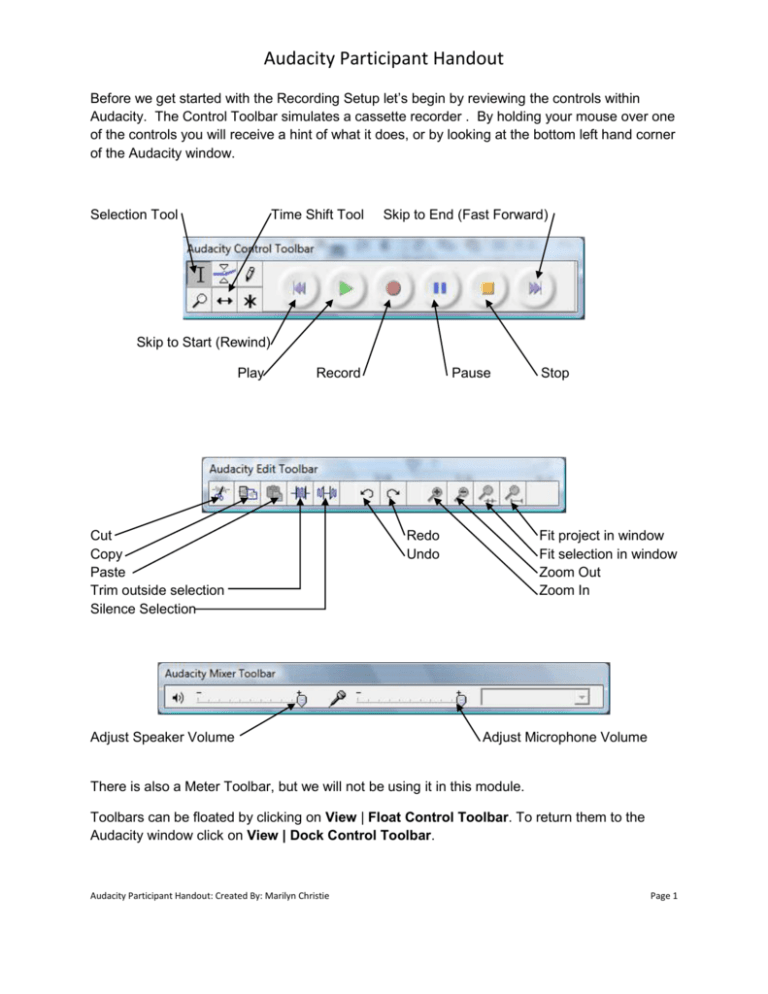
Audacity Participant Handout Before we get started with the Recording Setup let’s begin by reviewing the controls within Audacity. The Control Toolbar simulates a cassette recorder . By holding your mouse over one of the controls you will receive a hint of what it does, or by looking at the bottom left hand corner of the Audacity window. Selection Tool Time Shift Tool Skip to End (Fast Forward) Skip to Start (Rewind) Play Record Cut Copy Paste Trim outside selection Silence Selection Adjust Speaker Volume Pause Redo Undo Stop Fit project in window Fit selection in window Zoom Out Zoom In Adjust Microphone Volume There is also a Meter Toolbar, but we will not be using it in this module. Toolbars can be floated by clicking on View | Float Control Toolbar. To return them to the Audacity window click on View | Dock Control Toolbar. Audacity Participant Handout: Created By: Marilyn Christie Page 1 Audacity Participant Handout Editing Tools First we will begin by creating a short recording. 1. Click on the Record button at say “Welcome to the Audacity tutorial podcast”. 2. Click on the Stop button. 3. Click on the Skip to Start button (Rewind). 4. Click on the Play button to review your recording. Notice the ruler at the top? This ruler measures time, and will display the time in either seconds or minutes depending upon how long the podcast is. The ruler on the side is measuring decibels. The decibel (abbreviated dB) is the unit used to measure the intensity of a sound. On the decibel scale, the smallest audible sound (near total silence) is 0 dB. A sound 10 times more powerful is 10 dB. Here are some common sounds and their decibel ratings: Near total silence - 0 dB A whisper - 15 dB Normal conversation - 60 dB A lawnmower - 90 dB A car horn - 110 dB A rock concert or a jet engine - 120 dB A gunshot or firecracker - 140 dB Audacity Participant Handout: Created By: Marilyn Christie Page 2 Audacity Participant Handout Basic Editing and Trimming Now let’s edit the podcast. Notice the silence spots, the straight lines at the beginning and ending of the recording. We are going to delete those using the selection tool. 1. Click on the Selection Tool icon, left click and drag to make a selection, then press the delete key on your keyboard or click on Edit | Delete. 2. Repeat for the silent spot at the end of the recording if you have one. 3. Click the Rewind button. 4. Click Play to review your changes. If you make a mistake editing your podcast, use the Undo button. 5. You can use the Selection Tool to delete whole words or to delete unnecessary music. Audacity Participant Handout: Created By: Marilyn Christie Page 3 Audacity Participant Handout Adjusting Levels Now let’s play with adjusting levels within your podcast. Say you had a word that you did not speak very loudly during your recording. 1. Select the word you wish to change using the Selection Tool. 2. Click on Effect on the Menu bar, and select Amplify. Slide the amplification bar slider slightly to the right to increase the volume and slide it to the left to decrease the volume. You can also type the value in but I find easier to move the bar. Click OK to complete. Notice how the blue lines get larger, this means they are louder. 3. Press Rewind and Play to review your changes. Audacity Participant Handout: Created By: Marilyn Christie Page 4 Audacity Participant Handout Review on your own the other Effects under the Effect menu. I particularly use the Fade In and Fade Out a lot. Amplify – changes the volume of the selected audio. Bass Boost – enhances the bass frequencies. Change Pitch – changes the pitch\frequency of the selected audio without changing the tempo. When you open the dialog, the starting frequency is set to Audacity’s best guess as to the frequency of the selection. This works well for recordings of singing or musical instruments without background noise. You can specify the pitch change in one of four different ways: musical note, semitones, frequency, or percent change. Change Speed – changes the speed of the audio by re-sampling. Making the speed higher will also increase the pitch, and vice versa. This will change the length of the selection. Change Tempo – changes the tempo (speed) of the audio with changing the pitch. This will change the length of the selection. Click Removal – This effect is designed to remove the annoying clicks on recordings from vinyl records without damaging the rest of the audio. You can choose how sensitive the click detection is, and what the maximum length of a click is. Compressor – compresses the dynamic range of the selection so that the load parts are softer while keeping the volume of the soft parts the same. Echo – very simple effect the repeats the selection with a decay, sounding like a series of echoes. This effect does not change the length of the selection, so you may want to add silence to the end of the track before applying it (using the Generate Menu). Equalization – Boost or reduce arbitrary frequencies. You can select one of a number of different curves designed to equalize the sound of some popular record players, or draw your own curve. Fade In – fades the selection in linearly. Fade Out – fades the selection out linearly. FFT Filter – similar to Equalization, lets you enhance or reduce arbitrary frequencies. The curve here uses a linear scale for frequency. Invert – flips the waveform vertically, reversing its phase. Noise Removal – This effect lets you clean up noise from a recording. Select a small piece of audio that is silent except for the noise, select Noise Removal, and click on the Get Noise Profile button. Then select all of the audio you want filtered, select Noise Audacity Participant Handout: Created By: Marilyn Christie Page 5 Audacity Participant Handout Removal again and click the Remove Noise button. You can experiment with the slider to try to remove more or less of the noise. It is normal for Noise Removal to result in some distortion. It works best when the audio signal is much louder than the noise. Normalize – allows you to correct for DC offset ( a vertical displacement of the track) and/or amplify such that the maximum amplitude is a fixed amount, -3 db. It’s useful to normalize all of your tracks before mixing. Nyquist Prompt – for advanced users. Allows you to express arbitrary transformations using a powerful functional programming language. See the Nyquist section of the Audacity website for more information. Phaser - the name Phaser comes from Phase Shifter, because it works by combining phase-sifted signals with the original signal. The movement of the phase-shifted signals is controlled using a Low Frequency Oscillator (LFO). Repeat – repeats the selection a certain number of times. This operation is quite fast and space-efficient, so it is practical to use it to create nearly-infinite loops. Reverse – This effect reverses the selected audio temporally; after the effect the end of the audio will be heard first and the beginning last. Wahwah – uses a moving bandpass filter to create its sound. A low frequency oscillator (LFO) is used to control the movement of the filter throughout the frequency spectrum. Adjusts the phase of the left and right channels when given a stereo selection, so that the effect seems to travel across speakers. Other advanced effects are: Cross Fade In, Cross Fade Out, Delay, GVerb, Hard Limiter, High Pass Filter, Low Pas Filter, SC4, and Tremolo. Audacity Participant Handout: Created By: Marilyn Christie Page 6 Audacity Participant Handout Importing Audio and Adding Music Participants should have their audio files readily accessible at this point. 1. Select Project | Import Audio , browse to the location of the music file (C:\program files\audacity), click on the file name of sample.mp3 and click Open. You might prefer to drag and drop the audio file into Audacity using Windows Explorer. Notice the Sample music we inserted has 2 channels, meaning it was recorded in stereo. 2. Press the Record button and say “Welcome to Audacity”. Audacity Participant Handout: Created By: Marilyn Christie Page 7 Audacity Participant Handout 3. Using the Selection Tool, select the audio you recorded, and click on the Time Shift Tool. Drag the audio over to approximately 15 seconds. 4. Using the Selection Tool, select the silence at the beginning of the recording and click on Edit | Delete. 5. Using the Selection Tool, select the first 15 seconds of the audio file and click on Effect | Fade In. 6. Using the Selection Tool, select 15 seconds of the audio file after your recoding and click on Effect | Fade Out. 7. Using the Selection Tool, select the rest of the audio file, and click on Edit | Delete. Audacity Participant Handout: Created By: Marilyn Christie Page 8 Audacity Participant Handout You should end up with a window similar to what’s shown above. Audacity Participant Handout: Created By: Marilyn Christie Page 9 Audacity Participant Handout Saving Your Project and Exporting to MP3 or WAV 1. As your working on your project, click on File | Save, in the File name box, type in your name and click on Save. Notice the file extension is aup. Files with the extension aup and editable (changes can be made to) in Audacity. 2. Export as a Wav Type in your name again and click on Save. Be sure to notice where you are saving the file to. The file can be posted to the Internet and played with Windows Media Player. Audacity Participant Handout: Created By: Marilyn Christie Page 10


