P21 Homework Set #9
advertisement
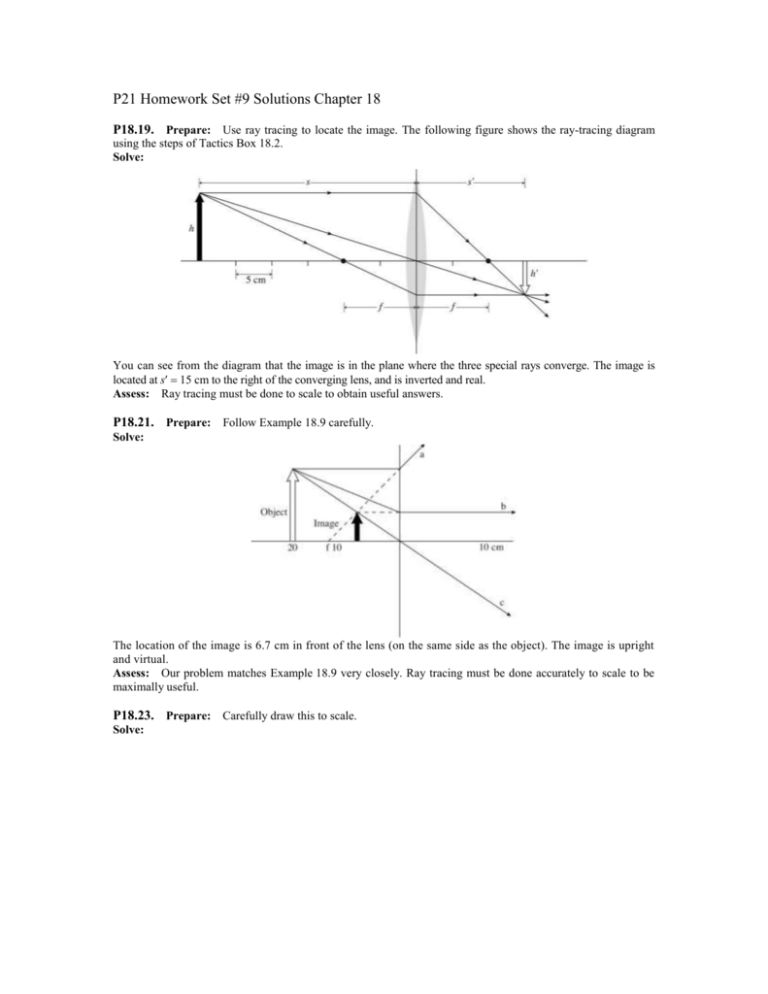
P21 Homework Set #9 Solutions Chapter 18 P18.19. Prepare: Use ray tracing to locate the image. The following figure shows the ray-tracing diagram using the steps of Tactics Box 18.2. Solve: You can see from the diagram that the image is in the plane where the three special rays converge. The image is located at s 15 cm to the right of the converging lens, and is inverted and real. Assess: Ray tracing must be done to scale to obtain useful answers. P18.21. Prepare: Follow Example 18.9 carefully. Solve: The location of the image is 6.7 cm in front of the lens (on the same side as the object). The image is upright and virtual. Assess: Our problem matches Example 18.9 very closely. Ray tracing must be done accurately to scale to be maximally useful. P18.23. Prepare: Carefully draw this to scale. Solve: As seen in the figure, the image is located 40 cm behind the mirror; it is also twice as tall as the object. The image is upright and virtual. Assess: You may have seen one of these make-up mirrors in your home or a hotel; if not look in a large fairly flat soup spoon with your eye very close to the spoon. The image is upright and magnified—just what people want for putting on make-up. P18.25. Prepare: Carefully draw this to scale. The object is the bright lamp, the image is where the light is focused at the patient. We want to know s given s 100 cm and f 15 cm. Follow the strategy in Tactics Box 18.4. We are actually looking for the object distance rather than the usual image distance, but all of the rays can be reversed and the same strategies and equations apply. So, for the sake of the ray tracing diagram start with the image and draw the three special rays to find the object. Solve: We read the object distance from our scale drawing. It looks to be about 18 cm; that is, the bright light is 18 cm away from the mirror plane, or just outside the focal length. Assess: The image is inverted relative to the object, but that doesn’t matter for this application, since it is a presumably symmetrical light source. Notice the concave mirror on the illuminating light fixture next time you are on the operating table, or even in the dentist chair. P18.27. Prepare: Carefully draw this to scale. Solve: As seen in the figure, the image is located 1.34 m 1.3 m behind the mirror; but it is smaller than the object. The image is upright and virtual. Assess: You’ve seen mirrors like this on the passenger side of a vehicle or in a convenience store. The image is upright (so we aren’t confused) but smaller so one can get a wider view. P18.29. Prepare: Assume that the converging lens is a thin lens and Equation 18.11 applies. Solve: Using the thin-lens formula, 1 1 1 1 1 1 1 1 s 40 cm s s f 40 cm s 20 cm s 40 cm The image height is obtained from M h s 40 cm 1 h s 40 cm The image is inverted and as tall as the object, that is, h 2.0 cm. We also show the ray-tracing diagram in the following figure. The three rays after refraction converge to give an image at s 40 cm. The height of the image is h 2 cm. Assess: The ray-tracing diagram shown confirms that both the position and height obtained here are correct. P18.31. Prepare: Assume that the converging lens is a thin lens and Equation 18.11 is applicable. Solve: Using the thin-lens formula, 1 1 1 1 1 1 1 1 s 60 cm s s f 15 cm s 20 cm s 60 cm The image height is obtained from M s 60 cm 4 s 15 cm Thus, the image is four times larger than the object or h Mh 4h 4(2.0 cm) 8.0 cm. The image is upright. We also show later the ray-tracing diagram. The three special rays after refracting do not converge. Instead the rays appear to come from a point that is 60 cm on the same side of the lens as the object, so s 60 cm. The image is upright and has a height of 8.0 cm. Assess: The ray-tracing diagram confirms that the position and height obtained above are correct. P18.33. Prepare: Assume that the diverging lens is a thin lens and the thin-lens Equation 18.11 applies. Solve: Using the thin-lens formula, 1 1 1 1 1 1 1 7 60 s cm 8.6 cm s s f 15 cm s 20 cm s 60 cm 7 The image height is obtained from M s (60/7 cm) 4 0.57 s 15 cm 7 Thus, the image is 0.57 times larger than the object, or h Mh (0.57)(2.0 cm) 1.14 cm. The image is upright because M is positive. The following figure also shows the ray-tracing diagram. After refraction, the three special rays do not converge. The rays, on the other hand, appear to meet at a point that is 8.5 cm on the same side of the lens as the object. So s 8.5 cm. The image is upright and has a height of 1.1 cm. Assess: The ray-tracing diagram confirms that both the position and height obtained previously are correct. P18.35. Prepare: We’ll first use the thin-lens equation to find the image position and then we’ll use h/h – s/h. We are given s 15 cm, f 25 cm, and h 30 cm. Solve: 1 1 1 1 1 0 107 cm 1 s f s 25 cm 15 cm So s 1/ 0107 cm 1 94 cm. So the image is 9.4 cm behind the mirror. h h 9 4 cm s 3 0 cm 1 9 cm s 15 cm Assess: A quick ray-tracing diagram confirms that both the position and height given are probably correct. P18.37. Prepare: The object distance, image distance, and focal length are related by 1/s 1/s 1/f . The magnification is related to the object, image distance and height by m h/h s/s. Solve: The image position is obtained by 1 1 1 1 1 2 s f s 25 cm 15 cm 75 cm or s 37.5 cm. The image height is obtained by h h(s/s) (3.0 cm)(37.5 cm/15 cm) 7.5 cm Assess: First note that the object is inside the focal length of the concave mirror. This tells us that the image will be erect (same orientation as the object), virtual (hence the negative image distance) and a magnification with a magnitude greater than one (the image appears to be taller than the object). The given information regarding images formed by a concave mirror is consistent with the calculated values.

